清苑网站建设网页自动点击软件

文章目录
- 前言
- 前期准备
- 配置客户端 ID 和重定向 URL
- 配置 OAuth 权限请求页面
- 登录流程
- 前端演示代码
- 后端演示代码
- 总结
- 个人简介
前言
Google OAuth 2.0是其中一种常见的第三方登录方式,广泛应用于各类网站和应用程序。通过Google OAuth 2.0,用户可以使用其 Google 账户轻松登录第三方网站,而不必创建额外的账户。本文将介绍如何集成Google OAuth 2.0服务,实现用户在第三方网站上的登录。
前期准备
配置客户端 ID 和重定向 URL
- 访问
Google API Console获取 OAuth 2.0 凭据。点击左侧边栏的“Credentials”选项,然后创建一个客户端 ID(OAuth client ID)。
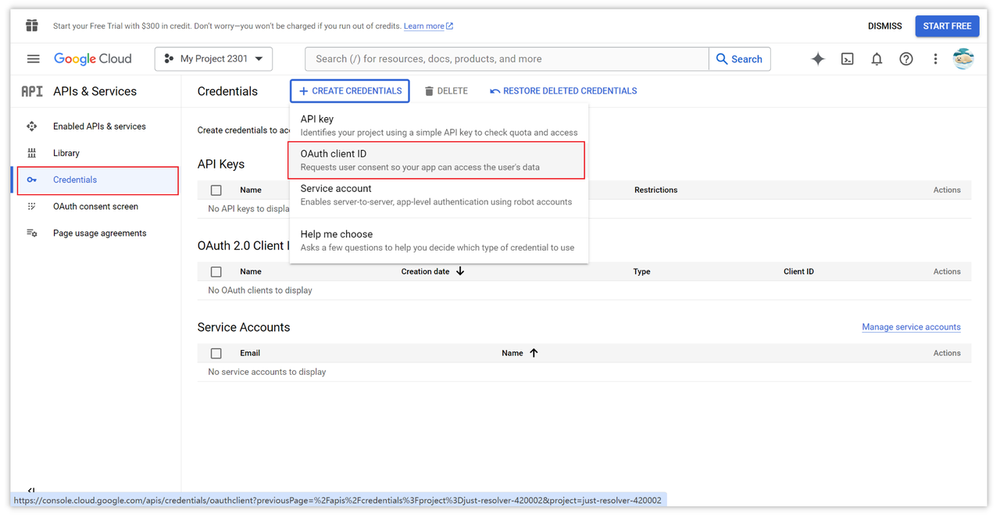
- 选择你的应用类型,可以选择 Web 站点、Android、或者 IOS 应用等,这取决于你的业务。接着在 “Authorized JavaScript origins” 这一栏目,填写你的网站域名即可,如果是本地调试的话,通常设置为http://localhost,如果有端口,加一个端口名,如 http://localhost:8000,这里的目的是让谷歌知道你网站托管的 HTTP 来源。然后在“Authorized redirect URIs”这一栏目,填写你的重定向地址,一般是你的后端登录路径。
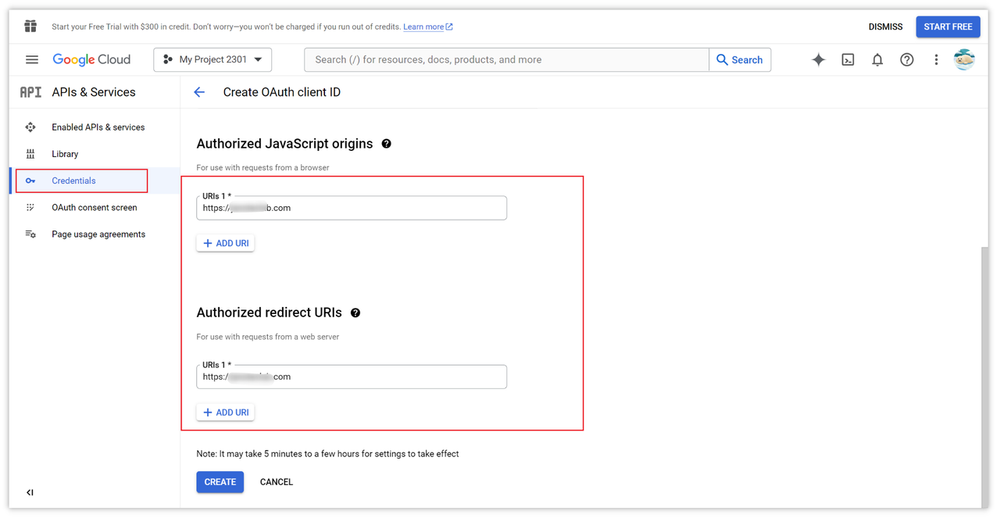
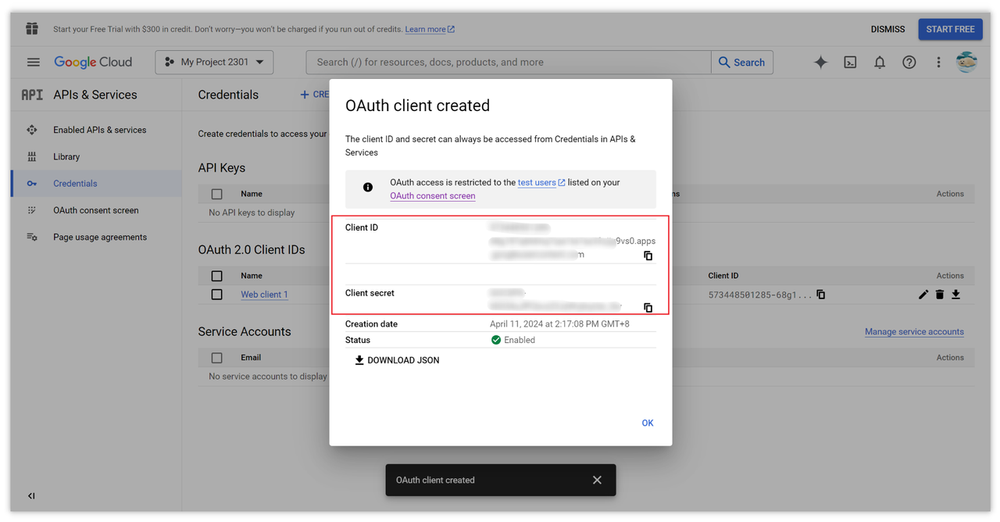
- 上文相关的选项都配置好以后,点击“CREATE”按钮来保存并生成客户端 ID(Client ID) 和客户端密钥(Client secret)。
配置 OAuth 权限请求页面
- 点击左侧列表的“OAuth consent srceen” 选项,创建一个应用。

- 填写应用的基本信息,比如名字、邮箱、域名等。这个页面的信息,会显示在弹出的确认授权登录框中,可帮助最终用户了解你是谁并与你联系。

- 配置可访问的权限,将权限勾选后保存即可。
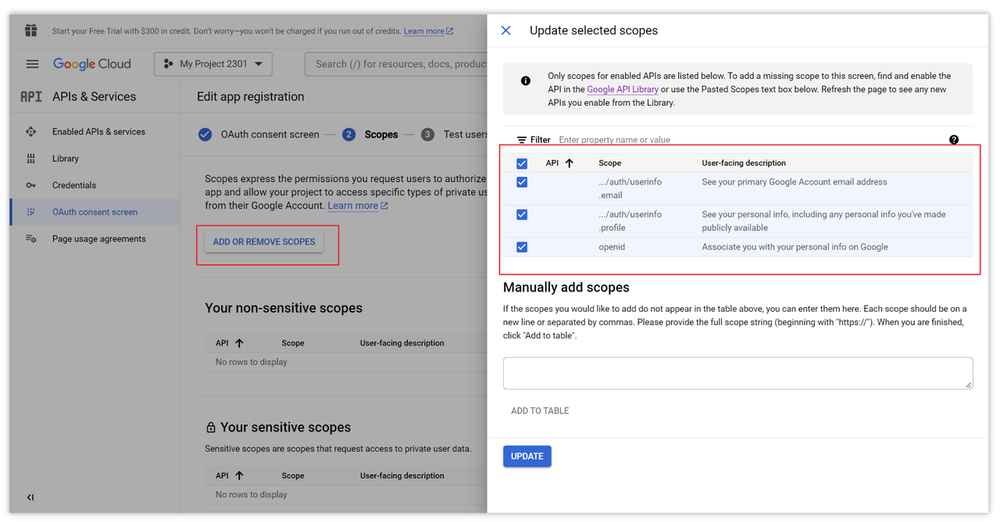
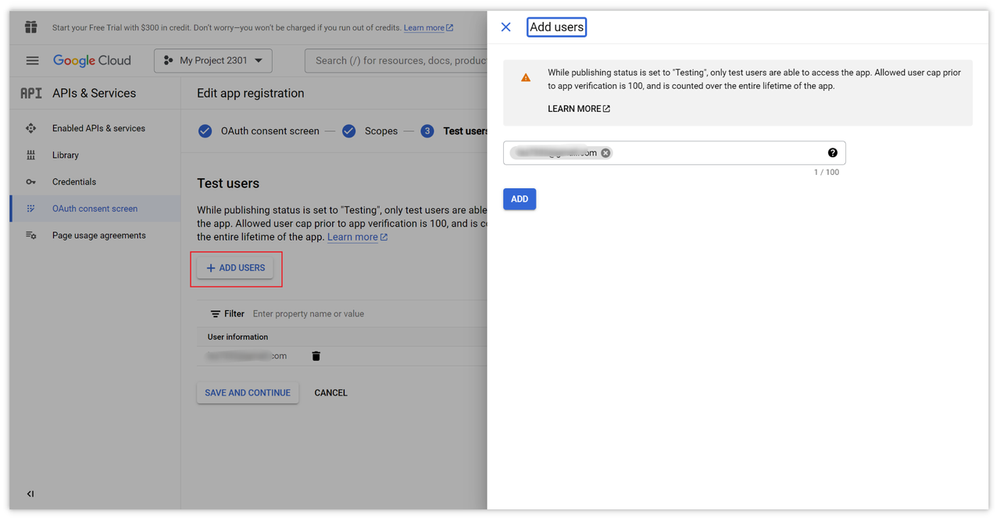
- 添加测试账户,也就是在未正式上线之前,可以进行 OAuth 2.0 登录的邮箱账。
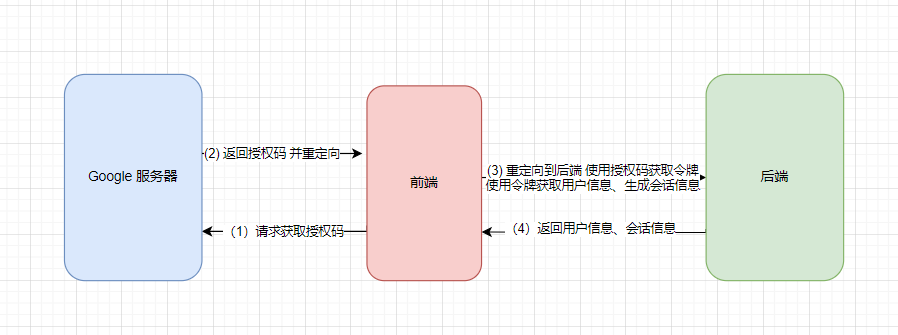
登录流程
前端演示代码
<!DOCTYPE html>
<html lang="en">
<head><meta charset="UTF-8"><meta name="viewport" content="width=device-width, initial-scale=1.0"><title>Google Login</title><script src="https://apis.google.com/js/platform.js" async defer></script>
</head>
<body>
<h2>Google 登录示例</h2>
<button id="googleSignInButton">使用 Google 登录</button><script>document.getElementById('googleSignInButton').onclick = function () {// Google OAuth 2.0 URLconst clientId = '994578547547-gc6XXXX0vp9hl.apps.googleusercontent.com';  // 替换为你的Google客户端IDconst redirectUri = 'http://localhost:8000/api/google/login';  // 替换为后端的回调登录URIconst scope = 'email profile';const responseType = 'code';const googleAuthUrl = `https://accounts.google.com/o/oauth2/v2/auth?client_id=${clientId}&redirect_uri=${redirectUri}&response_type=${responseType}&scope=${scope}`;// 重定向到 Google OAuth 2.0 授权页面window.location.href = googleAuthUrl;};
</script>
</body>
</html>
后端演示代码
- Maven 依赖
<dependency><groupId>org.springframework.boot</groupId><artifactId>spring-boot-starter-oauth2-client</artifactId></dependency>
google:token-apply-url: https://oauth2.googleapis.com/tokenuserinfo-url: https://www.googleapis.com/oauth2/v3/userinfooauth2:client-id: 994578547547-gc6uXXXXjtpk0vp9hl.apps.googleusercontent.comclient-secret: GOCSPX-nWFVXXXXFImvw3iHLNkR@Api(tags = "谷歌服务相关请求")
@RestController
@RequestMapping("/api/google")
@RequiredArgsConstructor
public class GoogleController {@Value("${google.oauth2.client-id}")private String clientId;@Value("${google.oauth2.client-secret}")private String clientSecret;@Value("${google.token-apply-url}")private String tokenEndpoint;@Value("${google.userinfo-url}")private String userInfoEndpoint;private final RestTemplate restTemplate;private final TokenProvider tokenProvider;private final UserDetailsService userDetailsService;private final UserService userService;private final SecurityProperties properties;private final OnlineUserService onlineUserService;@AnonymousGetMapping("/login")public ResponseEntity<Object> handleGoogleLogin(@RequestParam("code") String authorizationCode, HttpServletRequest req) {// Step 1: 用授权码获取 Access TokenMultiValueMap<String, String> params = new LinkedMultiValueMap<>();params.add("client_id", clientId);params.add("client_secret", clientSecret);params.add("code", authorizationCode);params.add("redirect_uri", "http://localhost:8000/api/google/login");params.add("grant_type", "authorization_code");HttpHeaders headers = new HttpHeaders();headers.setContentType(MediaType.APPLICATION_FORM_URLENCODED);HttpEntity<MultiValueMap<String, String>> request = new HttpEntity<>(params, headers);ResponseEntity<Map> response = restTemplate.postForEntity(tokenEndpoint, request, Map.class);String accessToken = (String) response.getBody().get("access_token");// Step 2: 用 Access Token 获取用户信息HttpHeaders userInfoHeaders = new HttpHeaders();userInfoHeaders.setBearerAuth(accessToken);HttpEntity<String> userInfoRequest = new HttpEntity<>(userInfoHeaders);ResponseEntity<Map> userInfoResponse = restTemplate.exchange(userInfoEndpoint, HttpMethod.GET, userInfoRequest, Map.class);Map<String, Object> userInfo = userInfoResponse.getBody();String googleId = (String) userInfo.get("sub");String email = (String) userInfo.get("email");String name = (String) userInfo.get("name");String picture = (String) userInfo.get("picture");// 用户登录逻辑、并返回用户信息、会话信息}
}
总结
- 通过集成
Google OAuth 2.0服务,第三方网站可以实现简单、快捷且安全的用户登录方式。OAuth 2.0 的流程保障了用户的隐私安全,不需要将敏感信息(如密码)提供给第三方应用。同时,使用 Google 登录可以减少用户的注册步骤,提升用户体验。
个人简介
👋 你好,我是 Lorin 洛林,一位 Java 后端技术开发者!座右铭:Technology has the power to make the world a better place.
🚀 我对技术的热情是我不断学习和分享的动力。我的博客是一个关于Java生态系统、后端开发和最新技术趋势的地方。
🧠 作为一个 Java 后端技术爱好者,我不仅热衷于探索语言的新特性和技术的深度,还热衷于分享我的见解和最佳实践。我相信知识的分享和社区合作可以帮助我们共同成长。
💡 在我的博客上,你将找到关于Java核心概念、JVM 底层技术、常用框架如Spring和Mybatis 、MySQL等数据库管理、RabbitMQ、Rocketmq等消息中间件、性能优化等内容的深入文章。我也将分享一些编程技巧和解决问题的方法,以帮助你更好地掌握Java编程。
🌐 我鼓励互动和建立社区,因此请留下你的问题、建议或主题请求,让我知道你感兴趣的内容。此外,我将分享最新的互联网和技术资讯,以确保你与技术世界的最新发展保持联系。我期待与你一起在技术之路上前进,一起探讨技术世界的无限可能性。
📖 保持关注我的博客,让我们共同追求技术卓越。