武汉网站建设视频教程游戏推广平台代理
前言
1.安检在公共场合的重要性不言而喻,保障群众人身安全是其首要任务。在各种场合,安检都是不可或缺的环节。x光安检机作为安检的重要工具,尽管其具有人工监控判断成像的特性,但是其局限性也十分明显。
为了解决这一局限性为出发点,让人工智能介入,这里在Torch框架下使用YOLO算法实现了对x光图像中刀具、气罐、鞭炮等10类危险物品的目标检测功能。
2.源码地址:https://download.csdn.net/download/matt45m/88178088
数据集
1.数据集定义
每个场景的安检违禁品都是一样的,但从法律法规的角度来度,违禁品可以分10大类,60多种小类,具体如下:
- 枪支类:运动枪、机枪、防暴枪、电击枪、发令枪、麻醉注射枪、气枪、步枪、冲锋枪、射钉枪、消防灭火枪、猎枪、玩具枪、仿真枪、催泪枪、道具枪、钢珠枪、手枪
- 五金工具类:大扳手、铁锤子、铲子、警棍、斧子、臂力器、甩棍
- 宠物类:猫咪、仓鼠、水獭、蛇、刺猬、龙猫、兔子、狗狗(导盲犬除外)、乌龟、蜥蜴
- 消毒用品类:医用酒精、84消毒液、酒精免洗凝胶、酒精喷雾、过氧乙酸消毒液、双氧水消毒液、酒精消毒液
- 毒品、腐蚀物:盐酸、硒粉、农药、水银、氰化物、砒霜、苯酚、硫酸、老鼠药、硝酸、氢氧化钾、杀虫药、氢氧化钠
- 燃料、气体:煤油、乙烷、乙烯、天然气、甲烷、柴油、丙烯、乙炔、液化石油气、丁烷、汽油、氢气、一氧化碳
- 易燃物:红磷、固体酒精、白磷、赛璐珞、镁铝粉、钾、锂、钠、油漆、稀料、油纸、乙醚、黄磷、松香油、碳化钙(电石)、丙酮、苯、闪光粉
- 食品类:未密封的榴莲、自嗨锅、活鱼、活虾、自热米饭、活螃蟹、臭豆腐、自热火锅
- 爆炸物品类:燃烧弹、毒气弹、引火线、导火索、雷管、催泪弹、炸药、炸弹、照明弹、手雷、信号弹、各种烟花爆竹、手榴弹、烟幕弹、烟火药。
- 刀具用品类:美工刀、屠宰刀、尖头剪刀、陶瓷刀、水果刀、餐刀、瑞士军刀、菜刀。
2.数据集收集
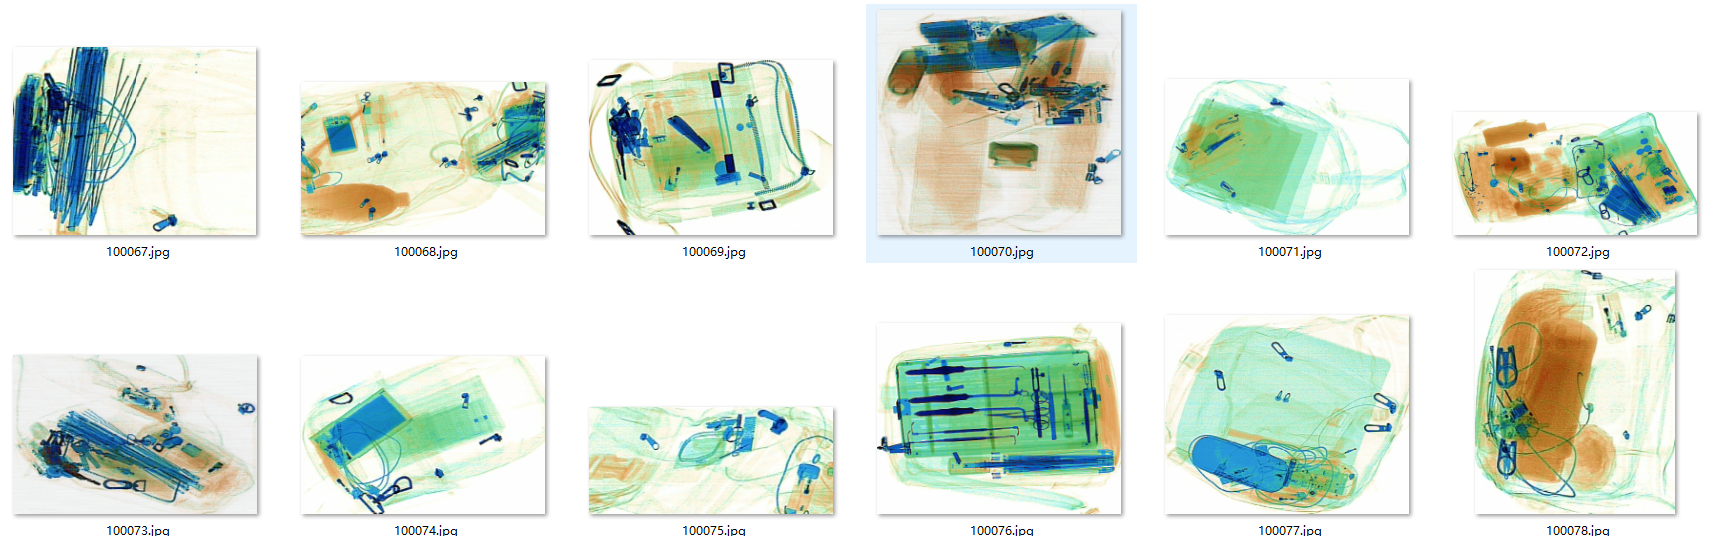
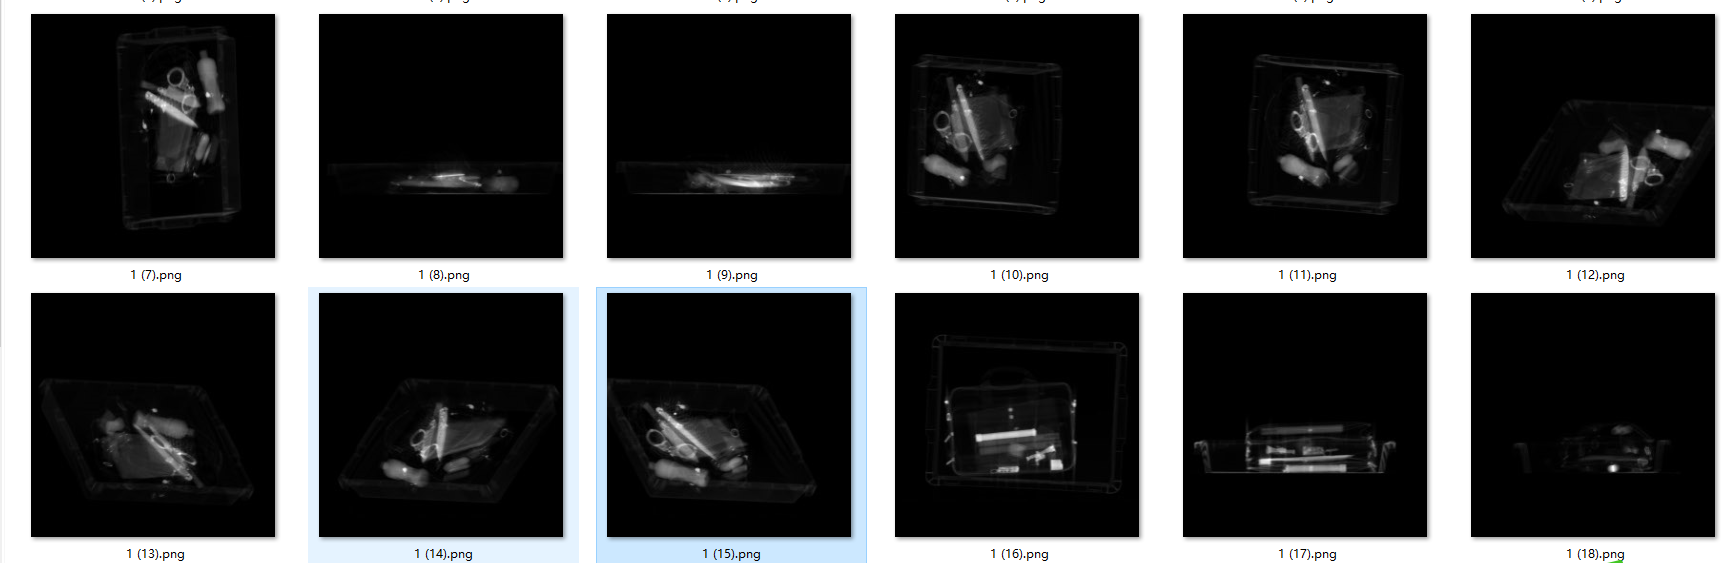
X光的数据有两种形式,一种彩色的成像,一种是黑白成像,相对于彩色成像,黑白成像对于人类视觉,更难于分出违禁品。
3.数据标注
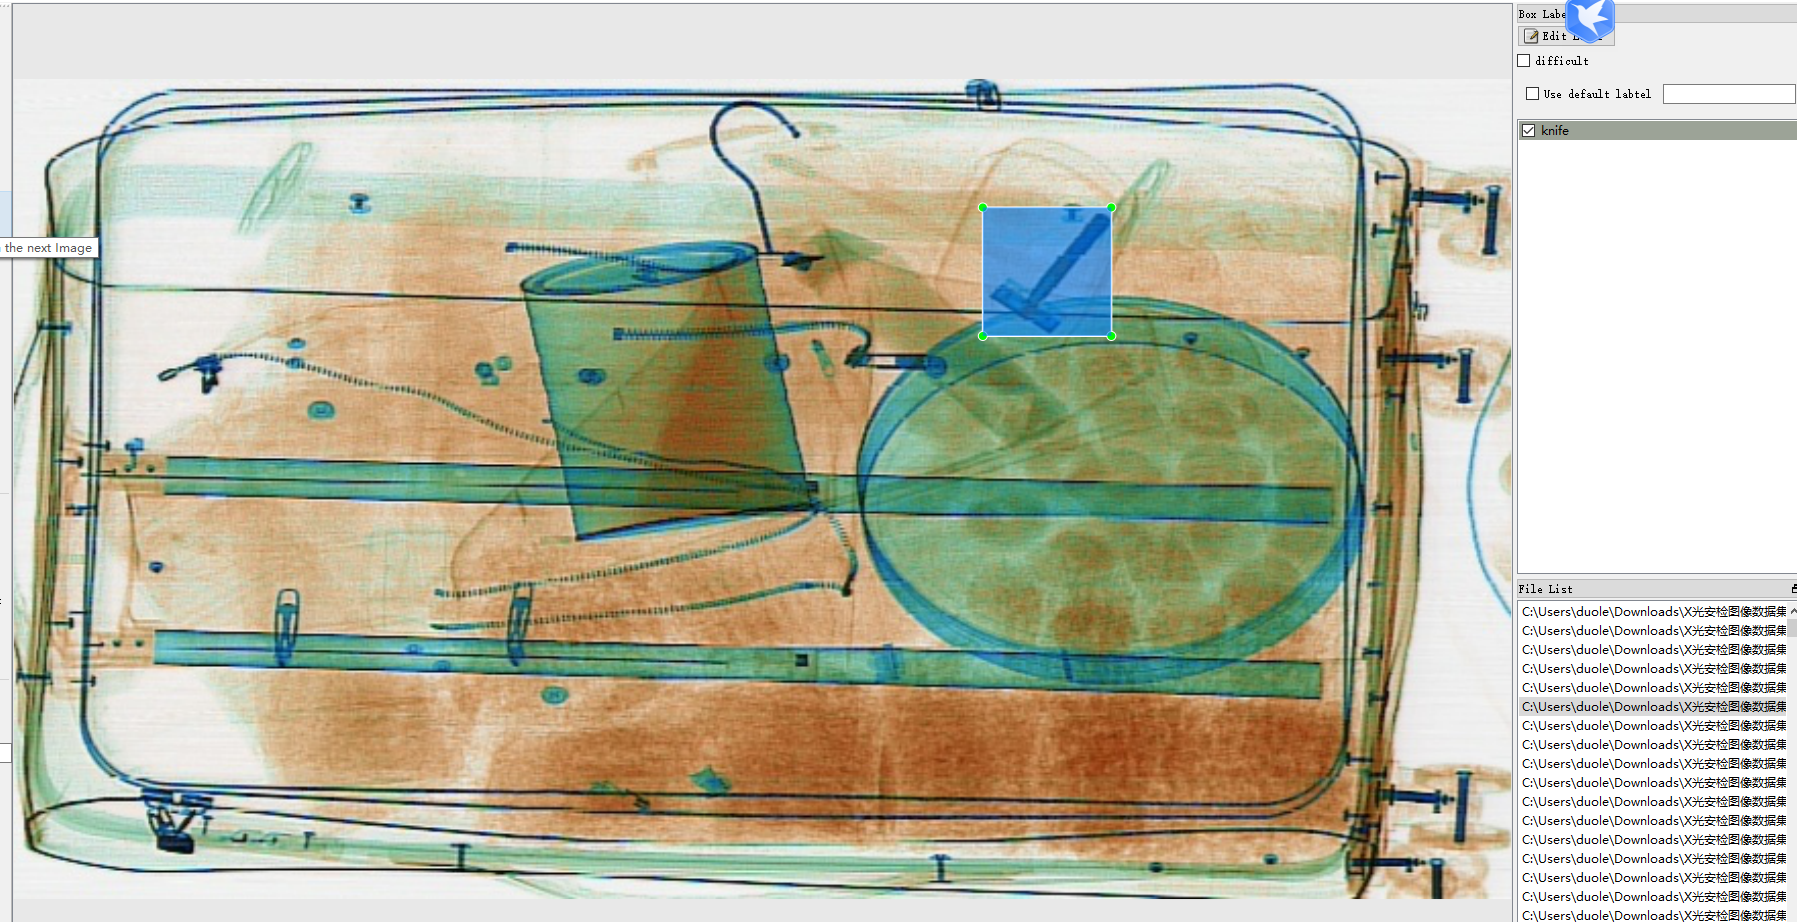
数据集使用了网上开源的数据和私人收集的部分数据集,数据集涵盖了基本上所有的违禁品,但由于人手与算力了的问题,只挑了4000张彩色成像的x光图像,标注了10个我国常见的违禁品,分别是有:‘lighter’,‘scissors’,‘powerbank’,‘pressure’,‘knife’,‘zippooil’,‘handcuffs’,‘slingshot’,‘firecrackers’,‘nailpolish’。数据标注LabelImg,标注格式是YOLO。

模型训练
训练和开发环境是win10,显卡RTX3080;cuda10.2,cudnn7.1;OpenCV4.5;yolov5用的是5s的模型,Anaconda 3.5。
1.创建环境
conda create --name yolov5 python=3.8activate yolov5git clone https://github.com/ultralytics/yolov5.gitcd yolov5pip install -r requirements.txt
或者
conda create --name yolov5 python=3.8
activate yolov5
git clone https://github.com/ultralytics/yolov5.git
cd yolov5
conda install pytorch torchvision cudatoolkit=10.2 -c pytorch
pip install cython matplotlib tqdm opencv-python tensorboard scipy pillow onnx pyyaml pandas seaborn
2.训练
打开model/yolov5s.yaml,更改nc数目。
# parameters
nc: 10  # 检测总类别
depth_multiple: 0.33  # model depth multiple 网络的深度系数
width_multiple: 0.50  # layer channel multiple 卷积核的系数# anchors 候选框,可以改成自己目标的尺寸,也可以增加候选框
anchors:- [10,13, 16,30, 33,23]  # P3/8- [30,61, 62,45, 59,119]  # P4/16- [116,90, 156,198, 373,326]  # P5/32# YOLOv5 backbone
backbone: #特征提取模块# [from, number, module, args]# from - 输入是什么,-1:上一层的输出结果;# number - 该层的重复的次数,要乘以系数,小于1则等于1 源码( n = max(round(n * gd), 1) if n > 1 else n)# module - 层的名字# args - 卷积核的个数[[-1, 1, Focus, [64, 3]],  # 0-P1/2  # 64要乘以卷积核的个数 64*0.5 = 32个特征图[-1, 1, Conv, [128, 3, 2]],  # 1-P2/4[-1, 3, BottleneckCSP, [128]],[-1, 1, Conv, [256, 3, 2]],  # 3-P3/8[-1, 9, BottleneckCSP, [256]],[-1, 1, Conv, [512, 3, 2]],  # 5-P4/16[-1, 9, BottleneckCSP, [512]],[-1, 1, Conv, [1024, 3, 2]],  # 7-P5/32[-1, 1, SPP, [1024, [5, 9, 13]]],[-1, 3, BottleneckCSP, [1024, False]],  # 9]# YOLOv5 head
head:[[-1, 1, Conv, [512, 1, 1]],[-1, 1, nn.Upsample, [None, 2, 'nearest']],[[-1, 6], 1, Concat, [1]],  # cat backbone P4[-1, 3, BottleneckCSP, [512, False]],  # 13[-1, 1, Conv, [256, 1, 1]],[-1, 1, nn.Upsample, [None, 2, 'nearest']],[[-1, 4], 1, Concat, [1]],  # cat backbone P3[-1, 3, BottleneckCSP, [256, False]],  # 17 (P3/8-small)[-1, 1, Conv, [256, 3, 2]],[[-1, 14], 1, Concat, [1]],  # cat head P4[-1, 3, BottleneckCSP, [512, False]],  # 20 (P4/16-medium)[-1, 1, Conv, [512, 3, 2]],[[-1, 10], 1, Concat, [1]],  # cat head P5[-1, 3, BottleneckCSP, [1024, False]],  # 23 (P5/32-large)[[17, 20, 23], 1, Detect, [nc, anchors]],  # Detect(P3, P4, P5) [17,20,23] #17层、20层、23层;]
在data目录下添加一个dangerous.yaml训练数据配置文件,文件内容如下:
# download command/URL (optional)
download: bash data/scripts/get_voc.sh# 训练集txt与验证集txt路径
train: data/xxx/train.txt
val: data/xxx/val.txt# 总类别数
nc: 10# 类名
names: ['lighter','scissors','powerbank','pressure','knife','zippooil','handcuffs','slingshot','firecrackers','nailpolish']
开始训练
训练命令
单卡:
python train.py --cfg models/yolov5s.yaml --data data/ODID.yaml --hyp data/hyps/hyp.scratch.yaml --epochs 100 --multi-scale --device 0
多卡:
python train.py --cfg models/yolov5s.yaml --data data/ODID.yaml --hyp data/hyps/hyp.scratch.yaml --epochs 100 --multi-scale --device 0,1
测试模型
python test.py --weights runs/train/exp/weights/best.pt --data data/ODID.yaml --device 0 --verbose
--weights: 训练得到的模型
--data:数据配置文件.txt
--device:选择gpu进行评测
--verbose:是否打印每一类的评测指标
模型推理
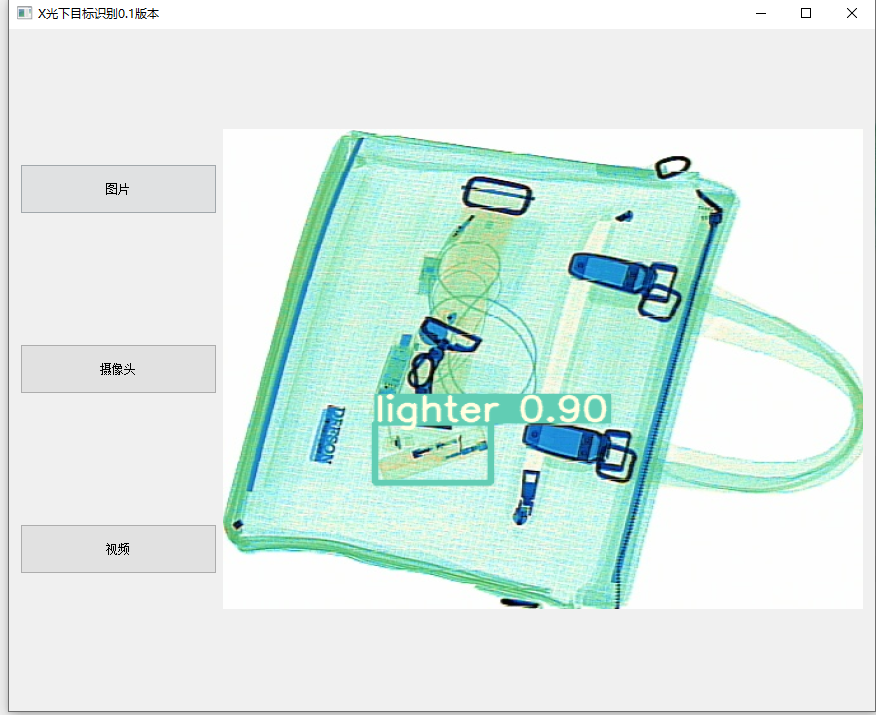
对于简单的项目需求,可以使用Gradio来快速部署。但是,当项目的复杂性增加,界面布局变得更复杂时,使用Gradio来管理和设置各个控件的位置会变得非常困难。在这种情况下,就可以考虑使用Qt。PyQt是一个Python绑定的Qt框架,它利用Qt的布局和设计工具,将拖放和设置好的界面转换为Python代码,从而简化了项目开发过程。
py qt5安装
pip install PyQt5
pip install PyQt5-tools
安装好PyQt5之后就可以开始编写推理代码了,pyqt能快速创建一个一推理的UI界面,项目分三种输入,图像、摄像头、视频。
#! /usr/bin/env python
# -*- coding: utf-8 -*-
"""
Run a YOLO_v3 style detection model on test images.
"""
import numpy as np
import argparseimport cv2
import torch
import torch.backends.cudnn as cudnn
from numpy import randomfrom models.experimental import attempt_load
from utils.general import check_img_size, non_max_suppression, scale_coords
from utils.plots import plot_one_box
from utils.torch_utils import select_device
import sys
from PyQt5 import QtCore, QtGui, QtWidgets
from PyQt5.QtWidgets import *
flag = Falsedef letterbox(img, new_shape=(640, 640), color=(114, 114, 114), auto=True, scaleFill=False, scaleup=True):# Resize image to a 32-pixel-multiple rectangle https://github.com/ultralytics/yolov3/issues/232shape = img.shape[:2]  # current shape [height, width]shape = img.shape[:2]  # current shape [height, width]if isinstance(new_shape, int):new_shape = (new_shape, new_shape)# Scale ratio (new / old)r = min(new_shape[0] / shape[0], new_shape[1] / shape[1])if not scaleup:  # only scale down, do not scale up (for better test mAP)r = min(r, 1.0)# Compute paddingratio = r, r  # width, height ratiosnew_unpad = int(round(shape[1] * r)), int(round(shape[0] * r))dw, dh = new_shape[1] - new_unpad[0], new_shape[0] - new_unpad[1]  # wh paddingif auto:  # minimum rectangledw, dh = np.mod(dw, 32), np.mod(dh, 32)  # wh paddingelif scaleFill:  # stretchdw, dh = 0.0, 0.0new_unpad = (new_shape[1], new_shape[0])ratio = new_shape[1] / shape[1], new_shape[0] / shape[0]  # width, height ratiosdw /= 2  # divide padding into 2 sidesdh /= 2if shape[::-1] != new_unpad:  # resizeimg = cv2.resize(img, new_unpad, interpolation=cv2.INTER_LINEAR)top, bottom = int(round(dh - 0.1)), int(round(dh + 0.1))left, right = int(round(dw - 0.1)), int(round(dw + 0.1))img = cv2.copyMakeBorder(img, top, bottom, left, right, cv2.BORDER_CONSTANT, value=color)  # add borderreturn img, ratio, (dw, dh)
# with torch.no_grad():
#     detect()
class Ui_MainWindow(QtWidgets.QWidget):def __init__(self, parent=None):super(Ui_MainWindow, self).__init__(parent)self.timer_camera = QtCore.QTimer()self.timer_camera_capture = QtCore.QTimer()self.cap = cv2.VideoCapture()self.CAM_NUM = 0self.set_ui()self.slot_init()# self.detect_image(self.image)self.__flag_work = 0self.x = 0parser = argparse.ArgumentParser()parser.add_argument('--weights', nargs='+', type=str, default='weights/dangerous-best.pt', help='model.pt path(s)')parser.add_argument('--source', type=str, default='images', help='source')  # file/folder, 0 for webcamparser.add_argument('--img-size', type=int, default=640, help='inference size (pixels)')parser.add_argument('--conf-thres', type=float, default=0.5, help='object confidence threshold')parser.add_argument('--iou-thres', type=float, default=0.45, help='IOU threshold for NMS')parser.add_argument('--device', default='', help='cuda device, i.e. 0 or 0,1,2,3 or cpu')parser.add_argument('--view-img', action='store_true', help='display results')parser.add_argument('--save-txt', action='store_true', help='save results to *.txt')parser.add_argument('--save-conf', action='store_true', help='save confidences in --save-txt labels')parser.add_argument('--save-dir', type=str, default='results', help='directory to save results')parser.add_argument('--classes', nargs='+', type=int, help='filter by class: --class 0, or --class 0 2 3')parser.add_argument('--agnostic-nms', action='store_true', help='class-agnostic NMS')parser.add_argument('--augment', action='store_true', help='augmented inference')parser.add_argument('--update', action='store_true', help='update all models')self.opt = parser.parse_args()print(self.opt)ut, source, weights, view_img, save_txt, imgsz = \self.opt.save_dir, self.opt.source, self.opt.weights, self.opt.view_img, self.opt.save_txt, self.opt.img_sizewebcam = source.isnumeric() or source.startswith(('rtsp://', 'rtmp://', 'http://')) or source.endswith('.txt')self.device = select_device(self.opt.device)# if os.path.exists(out):  # output dir#     shutil.rmtree(out)  # delete dir# os.makedirs(out)  # make new dirself.half = self.device.type != 'cpu'  # half precision only supported on CUDA# Load modelself.model = attempt_load(weights,device=self.device)  # load FP32 modelself.imgsz = check_img_size(imgsz, s=self.model.stride.max())  # check img_sizeif self.half:self.model.half()  # to FP16cudnn.benchmark = True  # set True to speed up constant image size inference# Get names and colorsself.names = self.model.module.names if hasattr(self.model, 'module') else self.model.namesself.colors = [[random.randint(0, 255) for _ in range(3)] for _ in range(len(self.names))]def set_ui(self):self.__layout_main = QtWidgets.QHBoxLayout()self.__layout_fun_button = QtWidgets.QVBoxLayout()self.__layout_data_show = QtWidgets.QVBoxLayout()self.openimage = QtWidgets.QPushButton(u'图片')self.opencameras = QtWidgets.QPushButton(u'摄像头')self.train = QtWidgets.QPushButton(u'视频')# self.Openvideo = QtWidgets.QPushButton(u'打开视频')self.openimage.setMinimumHeight(50)self.opencameras.setMinimumHeight(50)self.train.setMinimumHeight(50)# self.Openvideo.setMinimumHeight(50)# self.lineEdit = QtWidgets.QLineEdit(self)  # 创建 QLineEdit# self.lineEdit.textChanged.connect(self.text_changed)# self.lineEdit.setMinimumHeight(50)self.openimage.move(10, 30)self.opencameras.move(10, 50)self.train.move(15,70)# 信息显示self.showimage = QtWidgets.QLabel()# self.label_move = QtWidgets.QLabel()# self.lineEdit.setFixedSize(70, 30)self.showimage.setFixedSize(641, 481)self.showimage.setAutoFillBackground(False)self.__layout_fun_button.addWidget(self.openimage)self.__layout_fun_button.addWidget(self.opencameras)self.__layout_fun_button.addWidget(self.train)# self.__layout_fun_button.addWidget(self.Openvideo)self.__layout_main.addLayout(self.__layout_fun_button)self.__layout_main.addWidget(self.showimage)self.setLayout(self.__layout_main)# self.label_move.raise_()self.setWindowTitle(u'X光下目标识别0.1版本')def slot_init(self):self.openimage.clicked.connect(self.button_open_image_click)self.opencameras.clicked.connect(self.button_opencameras_click)self.timer_camera.timeout.connect(self.show_camera)# self.timer_camera_capture.timeout.connect(self.capture_camera)self.train.clicked.connect(self.button_train_click)# self.Openvideo.clicked.connect(self.Openvideo_click)def button_open_image_click(self):imgName, imgType = QFileDialog.getOpenFileName(self, "打开图片", "", "*.jpg;;*.png;;All Files(*)")img = cv2.imread(imgName)print(imgName)showimg = imgwith torch.no_grad():img = letterbox(img, new_shape=self.opt.img_size)[0]# Convertimg = img[:, :, ::-1].transpose(2, 0, 1)  # BGR to RGB, to 3x416x416img = np.ascontiguousarray(img)img = torch.from_numpy(img).to(self.device)img = img.half() if self.half else img.float()  # uint8 to fp16/32img /= 255.0  # 0 - 255 to 0.0 - 1.0if img.ndimension() == 3:img = img.unsqueeze(0)# Inferencepred = self.model(img, augment=self.opt.augment)[0]# Apply NMSpred = non_max_suppression(pred, self.opt.conf_thres, self.opt.iou_thres, classes=self.opt.classes, agnostic=self.opt.agnostic_nms)# Process detectionsfor i, det in enumerate(pred):  # detections per imageif det is not None and len(det):# Rescale boxes from img_size to im0 sizedet[:, :4] = scale_coords(img.shape[2:], det[:, :4], showimg.shape).round()# Write resultsfor *xyxy, conf, cls in reversed(det):label = '%s %.2f' % (self.names[int(cls)], conf)plot_one_box(xyxy, showimg, label=label, color=self.colors[int(cls)], line_thickness=3)self.result = cv2.cvtColor(showimg, cv2.COLOR_BGR2BGRA)self.result = cv2.resize(self.result, (640, 480), interpolation=cv2.INTER_AREA)self.QtImg = QtGui.QImage(self.result.data, self.result.shape[1], self.result.shape[0],QtGui.QImage.Format_RGB32)# 显示图片到label中;self.showimage.setPixmap(QtGui.QPixmap.fromImage(self.QtImg))def button_train_click(self):global flagself.timer_camera_capture.stop()self.cap.release()if flag == False:flag = TrueimgName, imgType = QFileDialog.getOpenFileName(self, "打开视频", "", "*.mp4;;*.avi;;All Files(*)")flag = self.cap.open(imgName)if flag == False:msg = QtWidgets.QMessageBox.warning(self, u"Warning", u"打开视频失败",buttons=QtWidgets.QMessageBox.Ok,defaultButton=QtWidgets.QMessageBox.Ok)else:self.timer_camera.start(30)self.train.setText(u'关闭识别')else:flag = Falseself.timer_camera.stop()self.cap.release()self.showimage.clear()self.train.setText(u'打开视频')def button_opencameras_click(self):self.timer_camera_capture.stop()self.cap.release()if self.timer_camera.isActive() == False:flag = self.cap.open(self.CAM_NUM)if flag == False:msg = QtWidgets.QMessageBox.warning(self, u"Warning", u"请检测相机与电脑是否连接正确",buttons=QtWidgets.QMessageBox.Ok,defaultButton=QtWidgets.QMessageBox.Ok)else:self.timer_camera.start(30)self.opencameras.setText(u'关闭识别')else:self.timer_camera.stop()self.cap.release()self.showimage.clear()self.opencameras.setText(u'打开摄像头')def show_camera(self):flag, img = self.cap.read()if img is not None:showimg = imgwith torch.no_grad():img = letterbox(img, new_shape=self.opt.img_size)[0]# Convertimg = img[:, :, ::-1].transpose(2, 0, 1)  # BGR to RGB, to 3x416x416img = np.ascontiguousarray(img)img = torch.from_numpy(img).to(self.device)img = img.half() if self.half else img.float()  # uint8 to fp16/32img /= 255.0  # 0 - 255 to 0.0 - 1.0if img.ndimension() == 3:img = img.unsqueeze(0)# Inferencepred = self.model(img, augment=self.opt.augment)[0]# Apply NMSpred = non_max_suppression(pred, self.opt.conf_thres, self.opt.iou_thres, classes=self.opt.classes,agnostic=self.opt.agnostic_nms)# Process detectionsfor i, det in enumerate(pred):  # detections per imageif det is not None and len(det):# Rescale boxes from img_size to im0 sizedet[:, :4] = scale_coords(img.shape[2:], det[:, :4], showimg.shape).round()# Write resultsfor *xyxy, conf, cls in reversed(det):label = '%s %.2f' % (self.names[int(cls)], conf)print(label)plot_one_box(xyxy, showimg, label=label, color=self.colors[int(cls)], line_thickness=3)show = cv2.resize(showimg, (640, 480))self.result = cv2.cvtColor(show, cv2.COLOR_BGR2RGB)showImage = QtGui.QImage( self.result.data,  self.result.shape[1],  self.result.shape[0], QtGui.QImage.Format_RGB888)self.showimage.setPixmap(QtGui.QPixmap.fromImage(showImage))else:flag = Falseself.timer_camera.stop()self.cap.release()self.showimage.clear()self.train.setText(u'打开视频')if __name__ == '__main__':app = QtWidgets.QApplication(sys.argv)ui = Ui_MainWindow()ui.show()sys.exit(app.exec_())
然后运行main.py

后记
1.违禁品中有要检测的危险品是小巧的打火机,考虑到其在复杂拥挤环境中的易遮挡性,有时候是很难精确检测到的,我这个用的是S模型,检测效果还可以,如果对精度有更高的要求,除了加大训练数据之外还可以选择更大的模型或者使用YOLOv8。
2.在安检这个场景中,出现漏检要比出现错检所触发的问题更严重,为了优化漏检率,可以适当放大置信度和加入一些相近的样本,还有场景负样本。
3.如果对该项目感兴趣或者在安装的过程中遇到什么错误的的可以加我的企鹅群:487350510,大家一起探讨。