网站建设的用处百度提交入口网址是什么
色彩处理
通过色彩矩阵处理
色彩矩阵介绍
图像的RGBA可拆分为一个4行5列的矩阵和5行1列矩阵相乘
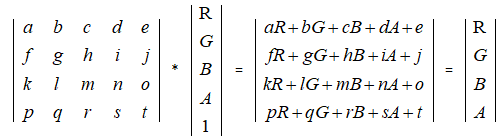
其中4行5列矩阵即为ColorMatrix,可通过调整ColorMatrix间接调整RGBA
- 第一行 abcde 决定新的 R
- 第二行 fghij 决定新的 G
- 第三行 klmno 决定新的 G
- 第四行 pqrst 决定新的 A
- ColorMatrix第五列 ejot 决定offset
当第一行a=1,b=c=d=e=0时,R=R1,即红色保持不变
其他行以此类推,可得到如下初始颜色矩阵(即图片最开始的颜色)

当要改变颜色值时,可通过
- 修改offset
- 修改ColorMatrix
利用API修改
描述图像,可通过
- 色调:物体传播的颜色
- 饱和度:颜色的纯度,0到100%
- 亮度:颜色的相对明暗程度
调整色调可通过如下,第一个参数0-1-2代表RGB,第二个参数为具体值
float hue = 0.5f;
ColorMatrix hueMatrix = new ColorMatrix();
hueMatrix.setRotate(0, hue);
hueMatrix.setRotate(1, hue);
hueMatrix.setRotate(2, hue);
调整饱和度可通过如下,为0时变成灰度图像
float saturation = 0.5f;
ColorMatrix saturationMatrix = new ColorMatrix();
saturationMatrix.setSaturation(saturation);
调整亮度通过三原色以相同比例进行混合,就会显示白色
float lum = 0.5f;
ColorMatrix lumMatrix = new ColorMatrix();
lumMatrix.setScale(lum, lum, lum, 1);
除此之外,还可以通过矩阵运算,将上面效果进行叠加
ColorMatrix imageMatrix = new ColorMatrix();
imageMatrix.postConcat(hueMatrix);
imageMatrix.postConcat(saturationMatrix);
imageMatrix.postConcat(lumMatrix);
下面为实例,设置三个进度条分别修改Hum、Saturation、Lum
public class MainActivity extends AppCompatActivity implements SeekBar.OnSeekBarChangeListener {private ImageView imageView;private Bitmap bitmap;private SeekBar seekBarHue, seekBarSaturation, seekBarLum;private float mHue;private float mSaturation;private float mLum;private final int MID_VALUE = 50;protected void onCreate(Bundle savedInstanceState) {super.onCreate(savedInstanceState);setContentView(R.layout.activity_main);imageView = (ImageView) findViewById(R.id.iv);seekBarHue = (SeekBar) findViewById(R.id.seek_bar_hue);seekBarSaturation = (SeekBar) findViewById(R.id.seek_bar_saturation);seekBarLum = (SeekBar) findViewById(R.id.seek_bar_Lum);seekBarHue.setProgress(MID_VALUE);seekBarSaturation.setProgress(MID_VALUE);seekBarLum.setProgress(MID_VALUE);//将图片转化为Bitmap设置到ImageViewbitmap = BitmapFactory.decodeResource(getResources(), R.drawable.a);imageView.setImageBitmap(bitmap);seekBarHue.setOnSeekBarChangeListener(this);seekBarSaturation.setOnSeekBarChangeListener(this);seekBarLum.setOnSeekBarChangeListener(this);}private Bitmap handleImage(Bitmap bm, float hue, float saturation, float lum) {//不允许修改原图的bitmap,创建bitmap副本,通过修改副本间接修改图像Bitmap bmp = Bitmap.createBitmap(bm.getWidth(), bm.getHeight(), Bitmap.Config.ARGB_8888);Canvas canvas = new Canvas(bmp);Paint paint = new Paint();ColorMatrix hueMatrix = new ColorMatrix();hueMatrix.setRotate(0, hue);hueMatrix.setRotate(1, hue);hueMatrix.setRotate(2, hue);ColorMatrix saturationMatrix = new ColorMatrix();saturationMatrix.setSaturation(saturation);ColorMatrix lumMatrix = new ColorMatrix();lumMatrix.setScale(lum, lum, lum, 1);ColorMatrix colorMatrix = new ColorMatrix();colorMatrix.postConcat(hueMatrix);colorMatrix.postConcat(saturationMatrix);colorMatrix.postConcat(lumMatrix);//通过setColorFilter设置ColorMatrix,并将副本返回设置到ImageViewpaint.setColorFilter(new ColorMatrixColorFilter(colorMatrix));canvas.drawBitmap(bm, 0, 0, paint);return bmp;}@Overridepublic void onProgressChanged(SeekBar bar, int progress, boolean fromUser) {switch (bar.getId()) {case R.id.seek_bar_hue:mHue = (progress - MID_VALUE) * 1.0F / MID_VALUE * 180;Log.d("song", "onProgressChanged: mHue = " + mHue);break;case R.id.seek_bar_saturation:mSaturation = progress * 1.0F / MID_VALUE;break;case R.id.seek_bar_Lum:mLum = progress * 1.0F / MID_VALUE;break;default:break;}imageView.setImageBitmap(handleImage(bitmap, mHue, mSaturation, mLum));}@Overridepublic void onStartTrackingTouch(SeekBar arg0) {// TODO Auto-generated method stub}@Overridepublic void onStopTrackingTouch(SeekBar arg0) {// TODO Auto-generated method stub}
}
布局如下
<?xml version="1.0" encoding="utf-8"?>
<LinearLayout xmlns:android="http://schemas.android.com/apk/res/android"android:layout_width="match_parent"android:layout_height="match_parent"android:orientation="vertical"><ImageViewandroid:id="@+id/iv"android:layout_width="match_parent"android:layout_height="wrap_content"android:layout_gravity="center" /><SeekBarandroid:id="@+id/seek_bar_hue"android:layout_width="match_parent"android:layout_height="40dp" /><SeekBarandroid:id="@+id/seek_bar_saturation"android:layout_width="match_parent"android:layout_height="40dp" /><SeekBarandroid:id="@+id/seek_bar_Lum"android:layout_width="match_parent"android:layout_height="40dp" />
</LinearLayout>
效果如图(不知道为什么只设置Hum会导致黑掉)

利用矩阵修改
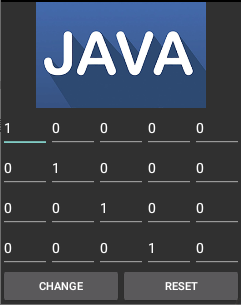
上面是通过API对ColorMatrix间接修改,此外还可通过直接修改矩阵实现更精确的颜色修改,布局如下
<LinearLayout xmlns:android="http://schemas.android.com/apk/res/android"xmlns:tools="http://schemas.android.com/tools"android:layout_width="match_parent"android:layout_height="match_parent"android:orientation="vertical"><ImageViewandroid:id="@+id/imageview"android:layout_width="match_parent"android:layout_height="0dp"android:layout_weight="2" /><GridLayoutandroid:id="@+id/group"android:layout_width="match_parent"android:layout_height="0dp"android:layout_weight="3"android:columnCount="5"android:rowCount="4" /><LinearLayoutandroid:layout_width="match_parent"android:layout_height="wrap_content"android:orientation="horizontal"><Buttonandroid:layout_width="0dp"android:layout_height="wrap_content"android:layout_weight="1"android:onClick="btnChange"android:text="Change" /><Buttonandroid:layout_width="0dp"android:layout_height="wrap_content"android:layout_weight="1"android:onClick="btnReset"android:text="Reset" /></LinearLayout></LinearLayout>
代码如下,创建一个4行5列矩阵,并将所设置的值转化为ColorMatrix
public class MainActivity extends AppCompatActivity {private Bitmap mBitmap;private GridLayout mGroup;private ImageView mImageView;private int mEtWidth, mEtHeight;private EditText[] mEts = new EditText[20];private float[] mColorMatrix = new float[20];protected void onCreate(Bundle savedInstanceState) {super.onCreate(savedInstanceState);setContentView(R.layout.activity_main);mBitmap = BitmapFactory.decodeResource(getResources(), R.drawable.b);mImageView = (ImageView) findViewById(R.id.imageview);mGroup = (GridLayout) findViewById(R.id.group);mImageView.setImageBitmap(mBitmap);mGroup.post(new Runnable() {@Overridepublic void run() {//无法在OnCreate()中获取视图的宽高,需通过post在视图创建完毕后获取mEtWidth = mGroup.getWidth() / 5;mEtHeight = mGroup.getHeight() / 4;addEts();initMatrix();}});}private void addEts() {for (int i = 0; i < 20; i++) {EditText editText = new EditText(this);mEts[i] = editText;mGroup.addView(editText, mEtWidth, mEtHeight);}}private void initMatrix() {for (int i = 0; i < 20; i++) {if (i % 6 == 0) {mEts[i].setText(String.valueOf(1));} else {mEts[i].setText(String.valueOf(0));}}}private void getMatrix() {for (int i = 0; i < 20; i++) {mColorMatrix[i] = Float.parseFloat(mEts[i].getText().toString());}}private void setImageMatrix() {Bitmap bmp = Bitmap.createBitmap(mBitmap.getWidth(), mBitmap.getHeight(), Bitmap.Config.ARGB_8888);Canvas canvas = new Canvas(bmp);Paint paint = new Paint();ColorMatrix colorMatrix = new ColorMatrix(mColorMatrix);paint.setColorFilter(new ColorMatrixColorFilter(colorMatrix));canvas.drawBitmap(mBitmap, 0, 0, paint);mImageView.setImageBitmap(bmp);}public void btnChange(View view) {getMatrix();setImageMatrix();}public void btnReset(View view) {initMatrix();getMatrix();setImageMatrix();}
}
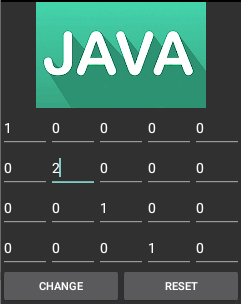
效果如图,如下修改了Green,使得图片变绿
通过像素点处理
布局如下
<LinearLayout xmlns:android="http://schemas.android.com/apk/res/android"xmlns:tools="http://schemas.android.com/tools"android:layout_width="match_parent"android:layout_height="match_parent"android:orientation="vertical"><ImageViewandroid:id="@+id/iv"android:layout_width="wrap_content"android:layout_height="wrap_content" />
</LinearLayout>
通过Bitmap的getPixels()获取整个图像的像素点,修改RGBA后再调用setPixelx()设置回去
public class MainActivity extends AppCompatActivity {protected void onCreate(Bundle savedInstanceState) {super.onCreate(savedInstanceState);setContentView(R.layout.activity_main);ImageView iv = (ImageView) findViewById(R.id.iv);Bitmap bitmap = BitmapFactory.decodeResource(getResources(), R.drawable.b);iv.setImageBitmap(handlerImageNegative(bitmap));}public Bitmap handlerImageNegative(Bitmap bm) {int width = bm.getWidth();int height = bm.getHeight();int color;int r, g, b, a;Bitmap bmp = Bitmap.createBitmap(width, height, Bitmap.Config.ARGB_8888);int[] oldPx = new int[width * height];int[] newPx = new int[width * height];bm.getPixels(oldPx, 0, width, 0, 0, width, height);for (int i = 0; i < width * height; i++) {color = oldPx[i];r = Color.red(color);g = Color.green(color);b = Color.blue(color);a = Color.alpha(color);r = 255 - r;g = 255 - g;b = 255 - b;if (r > 255) {r = 255;} else if (r < 0) {r = 0;}if (g > 255) {g = 255;} else if (g < 0) {g = 0;}if (b > 255) {b = 255;} else if (b < 0) {b = 0;}newPx[i] = Color.argb(a, r, g, b);}bmp.setPixels(newPx, 0, width, 0, 0, width, height);return bmp;}
}
如上实现图像的反转效果

图像处理
通过变形矩阵处理
变形矩阵介绍
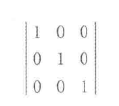
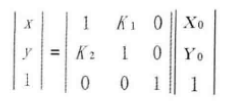
图像像素点的X、Y坐标可拆分为一个3行3列和3行一列矩阵相乘
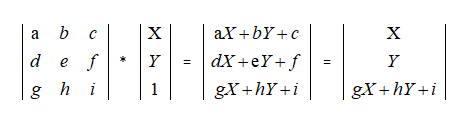
其中3行3列矩阵即为Matrix,可通过调整Matrix间接调整X、Y
- 第一行 abc 决定新的 X
- 第二行 def 决定新的 Y
- 通常让 g=h=0, i=1,保证 gX+hy+i =1 恒成立
当a=e=i=1,其他为0时得到初始矩阵
平移变换(Translation)
平移变换指对每个像素点都进行平移,当p(x0, y0)平移到p(x, y)时,如图
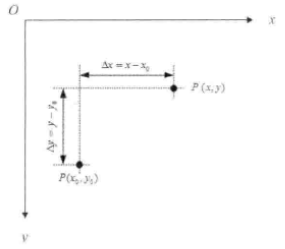
- X = X0 + ΔX
- Y = Y0 + ΔY
表现在矩阵上,则为加上偏移量
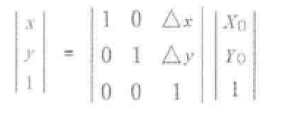
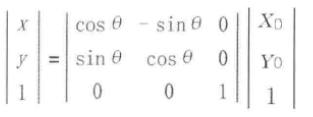
旋转变换(Rotate)
旋转变换指一个点围绕一个中心旋转到一个新的点,当p(x0, y0)以坐标原点为旋转中心旋转到p(x, y)时,如图
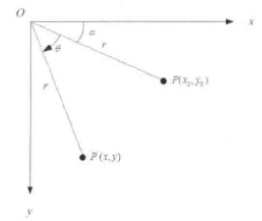
- x0 = r cosα
- y0 = r sinα
- x = r cos(α+θ) = r cosα cosθ - r sinα sinθ = x0 cosθ - y0 sinθ
- y = r sin(α+θ) = r sinα cosθ + r cosα sinθ = y0 cosθ + x0 sinθ
表现在矩阵上,则为
如果要实现以任意点为旋转中心进行旋转变换,则
- 将坐标原点平移到旋转中心
- 进行旋转变换
- 将坐标原点还原
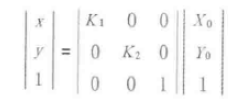
缩放变换(Scale)
缩放变换指对每个点坐标都进行相同比例的缩放,最终让整个图像缩放,计算公式为
- x = K1 * x0
- y = K1 * y0
表现在矩阵上,则为
错切变换(Skew)
又称剪切变换或缩并,让所有点的X坐标(或Y坐标)保持不变,而另一个坐标按比例发生平移,且平移的大小和该点到X轴(或Y轴)的垂直距离成正比
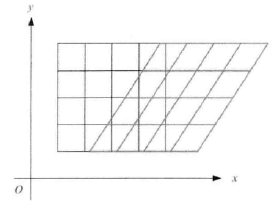
上图为水平错切,下图为垂直错切
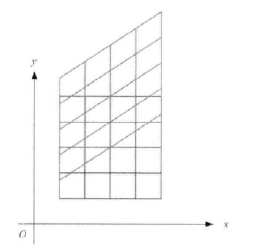
- x = x0 + K1 * y0
- y = K2 * x0 + y0
表现在矩阵上,则为
利用矩阵修改
通过上面的分析,可知矩阵每个元素所对应的功能

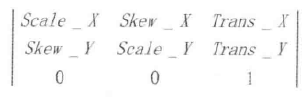
- a、e 控制缩放
- b、d 控制错切
- c、f 控制平移
- a、b、d、e 控制旋转
可自行调整矩阵实现图像变换
float[] imageMatrix = new float[9];
Matrix matrix = new Matrix();
matrix.setValues(imageMatrix);canvas.drawBitmap(bitmap, matrix, null);
利用API修改
Matrix matrix = new Matrix();
matrix.setRotate();
matrix.setTranslate();
matrix.setScale();
matrix.setSkew();
通过像素块处理
把图像分成一个个小块,通过改变每一个图像块来修改整个图像,具体做法是
- 在图像横纵画N-1条线构成N*N个点
- 坐标点以x1、y1、x2、y2的形式保存在数组中
- 通过改变坐标值重新定义每一个图像块
public class FlagBitmapMeshView extends View {private final int WIDTH = 200;  //横向分割线条数private final int HEIGHT = 200; //纵向分割线条数private int COUNT = (WIDTH + 1) * (HEIGHT + 1); //总图像块的个数private float[] verts = new float[COUNT * 2];   //调整后的矩阵,需要存x和y,所以*2private float[] orig = new float[COUNT * 2];    //调整前的矩阵private Bitmap bitmap;private float A = 50;private float k = 1;public FlagBitmapMeshView(Context context) {this(context, null);}public FlagBitmapMeshView(Context context, AttributeSet attrs) {this(context, attrs, 0);}public FlagBitmapMeshView(Context context, AttributeSet attrs, int defStyleAttr) {this(context, attrs, defStyleAttr, 0);}public FlagBitmapMeshView(Context context, @Nullable AttributeSet attrs, int defStyleAttr, int defStyleRes) {super(context, attrs, defStyleAttr, defStyleRes);initView(context);}private void initView(Context context) {bitmap = BitmapFactory.decodeResource(context.getResources(), R.drawable.b);float bitmapWidth = bitmap.getWidth();float bitmapHeight = bitmap.getHeight();int index = 0;for (int y = 0; y <= HEIGHT; y++) {float fy = bitmapHeight * y / HEIGHT;   //按比例划分高度,即y坐标for (int x = 0; x <= WIDTH; x++) {float fx = bitmapWidth * x / WIDTH; //按比例划分宽度,即x坐标orig[index * 2] = verts[index * 2] = fx;    //先放x,后放yorig[index * 2 + 1] = verts[index * 2 + 1] = fy + 100;  //y+100让图像下移一点index += 1;}}}@Overrideprotected void onDraw(Canvas canvas) {flagWave();k += 0.1F;  //不断更新k并重绘形成动态效果canvas.drawBitmapMesh(bitmap, WIDTH, HEIGHT, verts, 0, null, 0, null);invalidate();}private void flagWave() {for (int y = 0; y <= HEIGHT; y++) {for (int x = 0; x <= WIDTH; x++) {//图像的x坐标不变verts[(y * (WIDTH + 1) + x) * 2] += 0;//图像的y坐标偏移量,sin(x坐标占宽度的百分比 * 2PI + kPI),k用于动态更新float offsetY = (float) Math.sin((float) x / WIDTH * 2 * Math.PI + Math.PI * k);//图像的y坐标加上偏移量,A用于放大偏移量verts[(y * (WIDTH + 1) + x) * 2 + 1] = orig[(y * WIDTH + x) * 2 + 1] + offsetY * A;}}}
}
如上通过sin()函数实现飘扬的效果