西丽网站建设设计实时新闻
国内的libGDX文章很少,特别是libGDX实现灯光效果,所以就开始总结灯光效果的实现

绿色的框 是为了方便看到Body位置,使用Box2DDebugRenderer渲染的
工欲善其事,必先利其器,工具集合
gdx-setup.jar
1. 从libGDX官网下载项目生成工具
https://libgdx.com/wiki/start/setup
2.配置项目
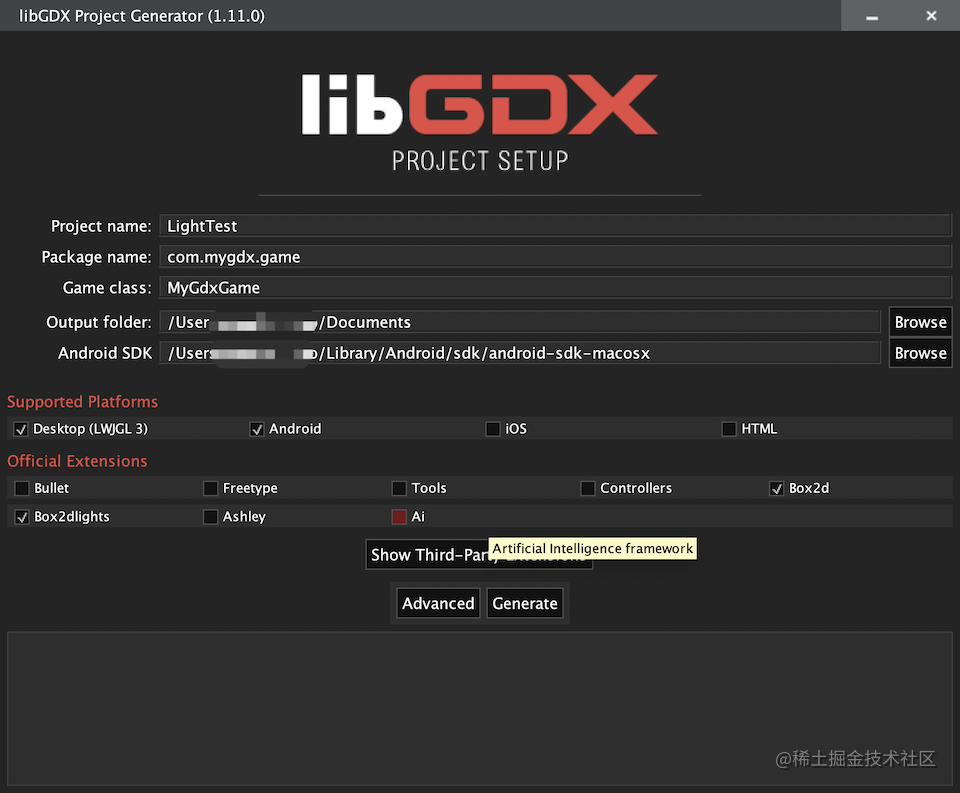
Output folder和Android SDK设置自己的,扩展库选择Box2d和Box2dlights,然后生成项目
3.配置ApplicationConfiguration,初始化ApplicationListener
由于是演示项目,所以直接使用系统创建好的Activity实现类
public class AndroidLauncher extends AndroidApplication {@Overrideprotected void onCreate (Bundle savedInstanceState) {super.onCreate(savedInstanceState);AndroidApplicationConfiguration config = new AndroidApplicationConfiguration();config.a = 8;config.r = 8;config.g = 8;config.b = 8;initialize(new MyGdxGame(), config);}
}
4.创建物理模拟环境
public class MyGdxGame extends ApplicationAdapter {private World mWorld;private Box2DDebugRenderer mWorldDebugger;private ArrayList bodys = new ArrayList<Body>();private OrthographicCamera camera;private ExtendViewport viewport;private float accumulator = 0f;private RayHandler rayHandler;private Body body;private static final float TIME_STEP = 1 / 120f;private static final int VELOCITY_ITERATIONS = 6;private static final int POSITION_ITERATIONS = 2;private int viewportWidth;private int viewportHeight;@Overridepublic void create() {super.create();// 1.创建worldmWorld = new World(new Vector2(0f, -10f), true);// 2.创建窗口大小,给camera用viewportWidth = Gdx.graphics.getWidth();viewportHeight = Gdx.graphics.getHeight();// 3.初始化正交投影相机initCamera();// 这个是为了查看bodymWorldDebugger = new Box2DDebugRenderer();// 创建Body,为了让点光源依附于他(可以不设置,点光源可以单独存在)makeBody();// 创建灯光处理(核心)rayHandler = new RayHandler(mWorld);makePointLight();}private void makePointLight() {// 创建点光源 // rays=100 越大约逼真,但是会降低性能// distance=150 光照扩展的范围PointLight light = new PointLight(rayHandler, 100, Color.RED, 150f, 0, 0);light.setSoftnessLength(0); //关闭软阴影light.attachToBody(body, 0.5f, 0.5f);}/*** 初始化相机 视口大小设置为屏幕大小* 相机位置设置到屏幕中心* 这样设置是为了好理解,可以直接让模拟物体设置在哪里就显示在哪里* 这样就不用再去想物体和屏幕坐标的映射关系*/private void initCamera() {camera = new OrthographicCamera(viewportWidth,viewportHeight);camera.position.x = Gdx.graphics.getWidth() / 2f;camera.position.y = Gdx.graphics.getHeight() / 2f;camera.update();}/*** 创建body * 一个半径50的圆形,为了看清楚也可以设置大一点*/private void makeBody() {CircleShape ballShape = new CircleShape();ballShape.setRadius(50f);FixtureDef fixtureDef = new FixtureDef();fixtureDef.shape = ballShape;BodyDef bodyDef = new BodyDef();bodyDef.type = BodyDef.BodyType.StaticBody;// 这里也是把这个圆形放到屏幕中心了(圆形是以圆心为绘制起点画圆)bodyDef.position.x = viewportWidth / 2f;bodyDef.position.y = viewportHeight / 2f;body = mWorld.createBody(bodyDef);body.createFixture(fixtureDef);ballShape.dispose();}}
5.render
public class MyGdxGame extends ApplicationAdapter {@Overridepublic void render() {super.render();// 1.更新相机camera.update();// 2.清理绘制区域ScreenUtils.clear(Color.CLEAR);Gdx.gl.glClear(GL20.GL_COLOR_BUFFER_BIT);// 3.时间步模拟(也可以按照官网的做固定时间步 1/60)doPhysicsStep(Gdx.graphics.getDeltaTime());// 4.给rayHandler设置matrixrayHandler.setCombinedMatrix(camera);// 5.渲染灯光rayHandler.updateAndRender();// 6.渲染body(非必须)mWorldDebugger.render(mWorld, camera.combined);}private void doPhysicsStep(float deltaTime) {// fixed time step// max frame time to avoid spiral of death (on slow devices)float frameTime = Math.min(deltaTime, 0.25f);accumulator += frameTime;while (accumulator >= TIME_STEP) {mWorld.step(TIME_STEP,VELOCITY_ITERATIONS,POSITION_ITERATIONS);accumulator -= TIME_STEP;}}
}
这样一个点光源就做好了,我的demo是让他附着在Body上,这样Body移动,他就可以跟着动