网上做效果图网站有哪些百度app官方下载安装到手机
系列文章目录
unity工具
文章目录
- 系列文章目录
- 👉前言
- 👉一、unity测量面积
- 👉1-1 视频效果
- 👉1-2 先创建预制体
- 👉1-3 在创建LineRenderer预制体
- 👉1-4 代码如下
- 👉二、测量平面和测量空间切换
- 👉2-1 平面测量
- 👉2-1 空间测量面积效果
- 👉三、unity测量角度的方法
- 👉3-1 准备工作
- 👉3-2 字体显示
- 👉3-3 实现代码如下
- 👉3-4 效果展示
- 👉壁纸分享
- 👉总结
👉前言
有时候unity会用到测量面积的问题,所以写了一个测量的小工具,里面有测量平面的面积和测量空间面积,方便使用,简单记录一下,不喜勿喷哦
大家好,我是心疼你的一切,不定时更新Unity开发技巧,觉得有用记得一键三连哦。
欢迎点赞评论哦.
下面就让我们进入正文吧 !
提示:以下是本篇文章正文内容,下面案例可供参考
👉一、unity测量面积
👉1-1 视频效果
先来看一下效果图吧,看看是不是自己想要的,如果是就继续往下看,如果不是就跳过
测量平面面积
👉1-2 先创建预制体
生成一个小球拖成预制体用来当鼠标点击的点来使用
👉1-3 在创建LineRenderer预制体
创建一个空物体,然后添加上lineRenderer组件,制作成预制体,至此准备工作已完成,开始编写代码实现功能,开始期待吧
👉1-4 代码如下
using System.Collections;
using System.Collections.Generic;
using UnityEngine;
using UnityEngine.EventSystems;
/// <summary>
/// 测量面积
/// </summary>
public class PlanimeteringCrotroller : MonoBehaviour
{public bool isClbool;public bool isOpenArea;private Vector3 posOne, posTwo;GUIStyle text = new GUIStyle();private int size = 40;  //文字大小public GameObject objPre; //圆点的预制体public LineRenderer lineRender;  //线的预制体public Transform allCLParentTransform;private List<Vector3> lv1 = new List<Vector3>();//存坐标的点private LineRenderer lineobj;// Start is called before the first frame updatevoid Start(){}public void OpenCLLLLLL(){isClbool = true;isOpenArea = true;}public void CloseCLLLLLL(){lv1.Clear();isClbool = false;isOpenArea = false;if (allCLParentTransform.childCount == 0) return;if (allCLParentTransform.childCount >0){for (int i = 0; i < allCLParentTransform.childCount; i++){Destroy(allCLParentTransform.GetChild(i).gameObject);}}}// Update is called once per framevoid Update(){if (isClbool && !EventSystem.current.IsPointerOverGameObject()){if (Input.GetMouseButtonDown(0)){posOne = Input.mousePosition;}Ray ray = Camera.main.ScreenPointToRay(Input.mousePosition);RaycastHit hit;if (isOpenArea){if (Input.GetMouseButtonUp(0)){posTwo = Input.mousePosition;if (Physics.Raycast(ray, out hit) && posOne == posTwo){text = new GUIStyle();text.fontSize = size;//创建圆点Transform go = Instantiate(objPre.transform, allCLParentTransform);go.position = hit.point + new Vector3(0, 0.1f, 0);if (lv1.Count >= 2){lv1.Add(hit.point + new Vector3(0, 0.1f, 0));lv1.Add(lv1[0]);                         }else{if (lv1.Count==0){lineobj = Instantiate(lineRender, allCLParentTransform);}lv1.Add(hit.point + new Vector3(0, 0.1f, 0));  //坐标的点}lineobj.positionCount = lv1.Count;lineobj.SetPositions(lv1.ToArray());if (lv1.Count >= 3){lv1.RemoveAt(lv1.Count - 1);}}}}}}void OnGUI(){//显示面积在中间if (lv1.Count > 2){//除了第一个点和最后个点,其它点都是存了两遍//for (int i = 0; i < lv.Count - 1; i = i + 2)//{//    Vector3 s = new Vector3((lv[i].x + lv[i + 1].x) / 2, (lv[i].y + lv[i + 1].y) / 2, (lv[i].z + lv[i + 1].z) / 2);//    Vector3 aa = Camera.main.WorldToScreenPoint(s);//    //注意屏幕坐标系与GUI的ui坐标系y轴相反,ToString(".000")保留小数点后3位数,几个零几位数//    //显示线段的长度//    GUI.Label(new Rect(aa.x - size, Screen.height - aa.y, 50, 20), "<color=white>" + Vector3.Distance(lv[i], lv[i + 1]).ToString(".0") + "</color>" + "<color=white>" + "m" + "</color>", text);//}Vector3 vector3 = Vector3.zero;for (int i = 0; i < lv1.Count; i++){vector3 += lv1[i];}Vector3 a = Camera.main.WorldToScreenPoint(vector3 / lv1.Count);GUI.Label(new Rect(a.x - 0, Screen.height - a.y, 100, 60), "<color=red>" + Compute_3D_polygon_area(lv1).ToString("f1") + "</color>" + "<color=red>" + "㎡" + "</color>", text);}//显示角度//if (lv1.Count == 3 && type == 2)//{//    Vector3 a = _camera.WorldToScreenPoint(lv1[1]);//    GUI.Label(new Rect(a.x, Screen.height - a.y, 50, 20), "<color=yellow>" + Angle(lv1[1], lv1[0], lv1[lv1.Count - 1]).ToString(".000") + "</color>" + "<color=blue>" + "℃" + "</color>", text);//}}//计算任意多边形的面积,顶点按照顺时针或者逆时针方向排列,不需要考虑y轴的坐标. 2Dpublic double ComputePolygonArea(List<Vector3> points){int point_num = points.Count;if (point_num < 3) return 0.0;float s = points[0].y * (points[point_num - 1].x - points[1].x);for (int i = 1; i < point_num; ++i)s += points[i].y * (points[i - 1].x - points[(i + 1) % point_num].x);return Mathf.Abs(s / 2.0f);}public double Compute_3D_polygon_area(List<Vector3> points){//points为任意多边形的点集合 注意输入时要按环的流动输入,不能乱序输入//此方法是3D空间的,相较于2D更具有普适性if (points.Count < 3) return 0.0;var P1X = points[0][0];var P1Y = points[0][1];var P1Z = points[0][2];var P2X = points[1][0];var P2Y = points[1][1];var P2Z = points[1][2];var P3X = points[2][0];var P3Y = points[2][1];var P3Z = points[2][2];var a = Mathf.Pow(((P2Y - P1Y) * (P3Z - P1Z) - (P3Y - P1Y) * (P2Z - P1Z)), 2) + Mathf.Pow(((P3X - P1X) * (P2Z - P1Z) - (P2X - P1X) * (P3Z - P1Z)), 2) + Mathf.Pow(((P2X - P1X) * (P3Y - P1Y) - (P3X - P1X) * (P2Y - P1Y)), 2);var cosnx = ((P2Y - P1Y) * (P3Z - P1Z) - (P3Y - P1Y) * (P2Z - P1Z)) / (Mathf.Pow(a, 0.5f));var cosny = ((P3X - P1X) * (P2Z - P1Z) - (P2X - P1X) * (P3Z - P1Z)) / (Mathf.Pow(a, 0.5f));var cosnz = ((P2X - P1X) * (P3Y - P1Y) - (P3X - P1X) * (P2Y - P1Y)) / (Mathf.Pow(a, 0.5f));var s = cosnz * ((points[points.Count - 1][0]) * (P1Y) - (P1X) * (points[points.Count - 1][1])) + cosnx * ((points[points.Count - 1][1]) * (P1Z) - (P1Y) * (points[points.Count - 1][2])) + cosny * ((points[points.Count - 1][2]) * (P1X) - (P1Z) * (points[points.Count - 1][0]));for (int i = 0; i < points.Count - 1; i++){var p1 = points[i];var p2 = points[i + 1];var ss = cosnz * ((p1[0]) * (p2[1]) - (p2[0]) * (p1[1])) + cosnx * ((p1[1]) * (p2[2]) - (p2[1]) * (p1[2])) + cosny * ((p1[2]) * (p2[0]) - (p2[2]) * (p1[0]));s += ss;}return Mathf.Abs(s / 2.0f);}
}
👉二、测量平面和测量空间切换
👉2-1 平面测量
只需要把加了高度的代码取消注释,默认是不加高度的,根据需要修改添加
其实代码是一样的只需要在点击的位置上添加一个高度,要不然测量平面上的时候就会被模型遮挡线段,

👉2-1 空间测量面积效果
测量空间面积
👉三、unity测量角度的方法
👉3-1 准备工作
首先还是先制作预制体,上面创建的小球的预制体和lineRender预制体还能继续使用
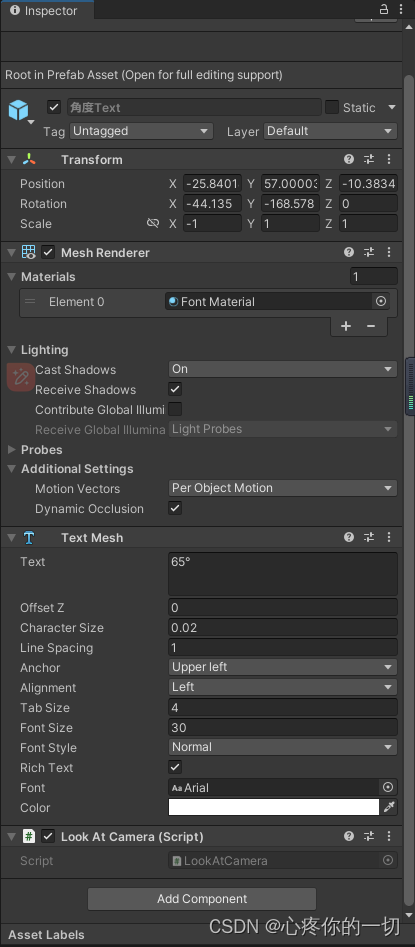
👉3-2 字体显示
在创建一个3D字体的预制体
截图如下
👉3-3 实现代码如下
下面是代码
using System.Collections;
using System.Collections.Generic;
using UnityEngine;
using UnityEngine.EventSystems;public class LineAngleController : MonoBehaviour
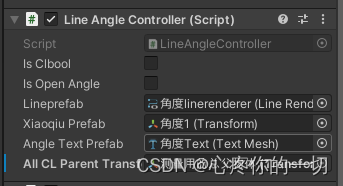
{public bool isClbool;public bool isOpenAngle;private Vector3 posOne, posTwo;private int distanceInt; //计数控制public LineRenderer lineprefab; //线的预制体public Transform xiaoqiuPrefab; //点击点的预制体public TextMesh angleTextPrefab; //显示角度的预制体public Transform allCLParentTransform; //所有预制体生成的父节点private Transform dian1, dian2, dian3; //临时接出来的物体private LineRenderer lineobj; //临时接出来的物体private TextMesh textobj; //临时接出来的物体// Start is called before the first frame updatevoid Start(){}public void OpenCLLLLLL(){isClbool = true;isOpenAngle = true;}public void CloseCLLLLLL(){distanceInt = 0;isClbool = false;isOpenAngle = false;if (allCLParentTransform.childCount == 0) return;if (allCLParentTransform.childCount > 0){for (int i = 0; i < allCLParentTransform.childCount; i++){Destroy(allCLParentTransform.GetChild(i).gameObject);}}}// Update is called once per framevoid Update(){if (isClbool && !EventSystem.current.IsPointerOverGameObject()){if (Input.GetMouseButtonDown(0)){posOne = Input.mousePosition;}Ray ray = Camera.main.ScreenPointToRay(Input.mousePosition);RaycastHit hit;//角度if (isOpenAngle){if (Input.GetMouseButtonUp(0)){posTwo = Input.mousePosition;if (Physics.Raycast(ray, out hit) && posOne == posTwo){if (distanceInt == 0){distanceInt++;//鼠标点击克隆物体dian1 = Instantiate(xiaoqiuPrefab, allCLParentTransform);lineobj = Instantiate(lineprefab, allCLParentTransform);dian1.transform.position = hit.point;lineobj.positionCount = 2;lineobj.SetPosition(0, hit.point);}else if (distanceInt == 1){distanceInt++; //鼠标点击克隆物体dian2 = Instantiate(xiaoqiuPrefab, allCLParentTransform); lineobj.positionCount = 3;lineobj.SetPosition(1, hit.point);dian2.position = hit.point;//生成3DTexttextobj = Instantiate(angleTextPrefab, allCLParentTransform);textobj.transform.position = hit.point;}else if (distanceInt == 2){distanceInt++;//鼠标点击复制物体dian3 = Instantiate(xiaoqiuPrefab, allCLParentTransform);lineobj.positionCount = distanceInt;lineobj.SetPosition(2, hit.point);dian3.position = hit.point;//算角度Vector3 v1 = dian1.transform.position - dian2.transform.position;Vector3 v2 = dian3.transform.position - dian2.transform.position;textobj.text = Mathf.Round(Vector3.Angle(v1, v2)) + "°";distanceInt = 0;}}}if (distanceInt == 1){if (Physics.Raycast(ray, out hit, 1000, ~(1 << 7))){lineobj.SetPosition(1, hit.point);}}if (distanceInt == 2){if (Physics.Raycast(ray, out hit, 1000, ~(1 << 7))){ lineobj.SetPosition(2, hit.point);//算角度Vector3 v1 = dian1.transform.position - dian2.transform.position;Vector3 v2 = hit.point - dian2.transform.position;textobj.text = Mathf.Round(Vector3.Angle(v1, v2)) + "°";}}}}}
}代码挂载截图
👉3-4 效果展示
最后放上录屏效果
测量角度
欢迎留言评论,指正不足
👉壁纸分享


上一篇关于测量距离的实现链接
👉总结
本次总结的就是测量面积和角度的实现,有需要会继续添加新的
如能帮助到你,就帮忙点个赞吧,三连更好哦,谢谢
你的点赞就是对博主的支持,有问题记得留言评论哦!
不定时更新Unity开发技巧,觉得有用记得一键三连哦。么么哒