icp备案 网站负责人兰州网络seo公司
注意每次修改配置文件后必须项目重启
Structs2=structs1+xwork
Struct2框架预先实现了一些功能:
1.请求数据的封装;2.文件上传的功能3.对国际化功能的简化4.文件效验功能
1.开发Structs框架的步骤:
1)引入8大jar包
commons-fileupload-1.2.2.jar 【文件上传相关包】
commons-io-2.0.1.jar
struts2-core-2.3.4.1.jar 【struts2核心功能包】
xwork-core-2.3.4.1.jar 【Xwork核心包】
ognl-3.0.5.jar 【Ognl表达式功能支持表】
commons-lang3-3.1.jar 【struts对java.lang包的扩展】
freemarker-2.3.19.jar 【struts的标签模板库jar文件】
javassist-3.11.0.GA.jar 【struts对字节码的处理相关jar】
2)配置web.xml
主要配置filter Struct过滤器,StructsPrepareAndExecuteFilter核心过滤器
//引入struct核心过滤器
struct2
org.apache.struts2.dispatcher.ng.filter.StrutsPrepareAndExecuteFilter
struct2
/*
3)开发Action
方法满足:无参数,放回值为String,public修饰
编写普通类1.继承ActionSupport有数据效验时必须继承;2.或者实现action接口
3.什么都不写,直接return ”success”再从structs.xml中找到对应的返回页面
例如:
public String register() {
System.out.println("register()" + userName);
return "register";
}
再配置文件中配置
/index.jsp
可以使用通配符优化配置
/{1}.jsp
public class HelloAction extends ActionSupport {
// 处理请求
public String execute() throws Exception {}
}
4)配置struct.xml
/p>
"-//Apache Software Foundation//DTD Struts Configuration 2.0//EN"
"http://struts.apache.org/dtds/struts-2.0.dtd">
/index.jsp
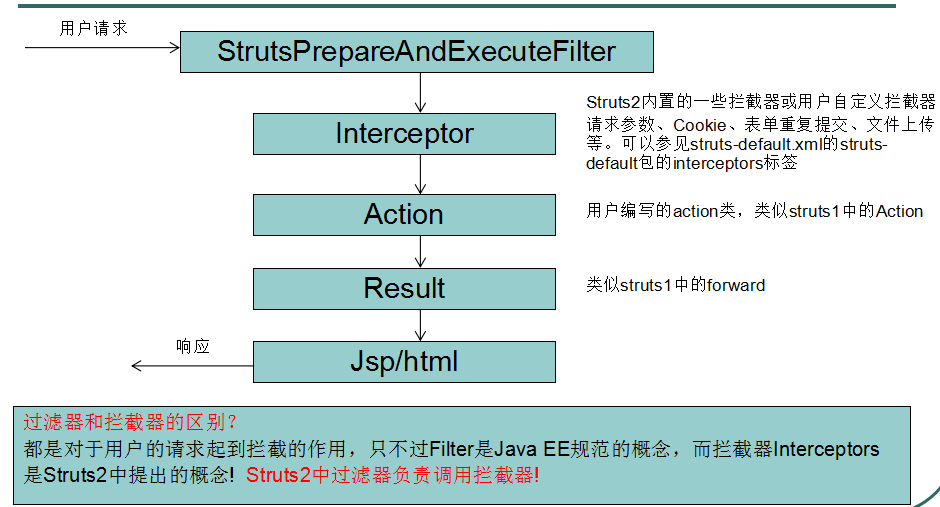
2.访问流程:
tomcat服务器启动-》读取web,xml-》读取struct2核心过滤器-》初始化过滤器-》init方法(这里分别读取了struct-default.xml核心功能初始化有拦截器等;struct-plugin.xml:struct相关插件;struct.xml用户编写的xml)-》读取到struct.xml后找到action类-》读取structs.properties用户自定义配置文件会覆盖Structs.xml中的常量设置-》加载到内存中等待访问再实例化action类
3.一些配置文件详解
struct-default.xml


目录:struts2-core-2.3.4.1.jar/ struts-default.xml
内容:
1. bean节点指定struts在运行的时候创建的对象类型
2.指定struts-default包 【用户写的package(struts.xml)一样要继承此包 】
package struts-default 包中定义了:
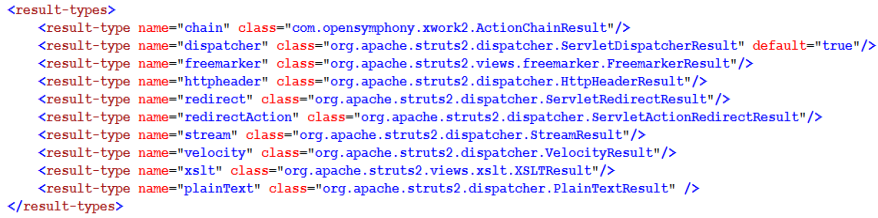
a. 跳转的结果类型
dispatcher 转发,不指定默认为转发
redirect 重定向
redirectAction 重定向到action资源
stream (文件下载的时候用)
b. 定义了所有的拦截器
定义了32个拦截器!
为了拦截器引用方便,可以通过定义栈的方式引用拦截器,
此时如果引用了栈,栈中的拦截器都会被引用!
defaultStack
默认的栈,其中定义默认要执行的18个拦截器!
c. 默认执行的拦截器栈、默认执行的action
View Code
自己的struct。xml配置
1)两种方便访问action的方法“通配符”“动态配置”
通配符:可以使用* 和{1}来优化配置
动态配置:这个访问方式action名字!action类中的需要访问的方法名例如:hello!add.action
/struct2/hello!add.action:用这个只有在常量设置中设置
/{1}.jsp
2)路径匹配原则
/Struts2_01/hello_a/a/b/helloWorld.action
/Struts2_01/hello_a/a/b找package->没找到/Struts2_01/hello_a/a-》没找到/Struts2_01/hello_a没找到/Struts2_01/-报404错
3)常量
所有的初始化全局变量配置都在Structs-core-2.3.4-1.jar/org.apache.structs/default.properities
#
# $Id: default.properties 1132110 2011-06-05 08:45:32Z lukaszlenart $
#
# Licensed to the Apache Software Foundation (ASF) under one
# or more contributor license agreements. See the NOTICE file
# distributed with this work for additional information
# regarding copyright ownership. The ASF licenses this file
# to you under the Apache License, Version 2.0 (the
# "License"); you may not use this file except in compliance
# with the License. You may obtain a copy of the License at
#
# http://www.apache.org/licenses/LICENSE-2.0
#
# Unless required by applicable law or agreed to in writing,
# software distributed under the License is distributed on an
# "AS IS" BASIS, WITHOUT WARRANTIES OR CONDITIONS OF ANY
# KIND, either express or implied. See the License for the
# specific language governing permissions and limitations
# under the License.
#
### START SNIPPET: complete_file
### Struts default properties
###(can be overridden by a struts.properties file in the root of the classpath)
###
### Specifies the Configuration used to configure Struts
### one could extend org.apache.struts2.config.Configuration
### to build one's customize way of getting the configurations parameters into Struts
# struts.configuration=org.apache.struts2.config.DefaultConfiguration
### This can be used to set your default locale and encoding scheme
# struts.locale=en_US
struts.i18n.encoding=UTF-8
### if specified, the default object factory can be overridden here
### Note: short-hand notation is supported in some cases, such as "spring"
### Alternatively, you can provide a com.opensymphony.xwork2.ObjectFactory subclass name here
# struts.objectFactory = spring
### specifies the autoWiring logic when using the SpringObjectFactory.
### valid values are: name, type, auto, and constructor (name is the default)
struts.objectFactory.spring.autoWire = name
### indicates to the struts-spring integration if Class instances should be cached
### this should, until a future Spring release makes it possible, be left as true
### unless you know exactly what you are doing!
### valid values are: true, false (true is the default)
struts.objectFactory.spring.useClassCache = true
### ensures the autowire strategy is always respected.
### valid values are: true, false (false is the default)
struts.objectFactory.spring.autoWire.alwaysRespect = false
### if specified, the default object type determiner can be overridden here
### Note: short-hand notation is supported in some cases, such as "tiger" or "notiger"
### Alternatively, you can provide a com.opensymphony.xwork2.util.ObjectTypeDeterminer implementation name here
### Note: By default, com.opensymphony.xwork2.util.DefaultObjectTypeDeterminer is used which handles type detection
### using generics. com.opensymphony.xwork2.util.GenericsObjectTypeDeterminer was deprecated since XWork 2, it's
### functions are integrated in DefaultObjectTypeDeterminer now.
### To disable tiger support use the "notiger" property value here.
#struts.objectTypeDeterminer = tiger
#struts.objectTypeDeterminer = notiger
### Parser to handle HTTP POST requests, encoded using the MIME-type multipart/form-data
# struts.multipart.parser=cos
# struts.multipart.parser=pell
struts.multipart.parser=jakarta
# uses javax.servlet.context.tempdir by default
struts.multipart.saveDir=
struts.multipart.maxSize=2097152
### Load custom property files (does not override struts.properties!)
# struts.custom.properties=application,org/apache/struts2/extension/custom
### How request URLs are mapped to and from actions
#struts.mapper.class=org.apache.struts2.dispatcher.mapper.DefaultActionMapper
### Used by the DefaultActionMapper
### You may provide a comma separated list, e.g. struts.action.extension=action,jnlp,do
### The blank extension allows you to match directory listings as well as pure action names
### without interfering with static resources, which can be specified as an empty string
### prior to a comma e.g. struts.action.extension=, or struts.action.extension=x,y,z,,
struts.action.extension=action,,
### Used by FilterDispatcher
### If true then Struts serves static content from inside its jar.
### If false then the static content must be available at/struts
struts.serve.static=true
### Used by FilterDispatcher
### This is good for development where one wants changes to the static content be
### fetch on each request.
### NOTE: This will only have effect if struts.serve.static=true
### If true -> Struts will write out header for static contents such that they will
### be cached by web browsers (using Date, Cache-Content, Pragma, Expires)
### headers).
### If false -> Struts will write out header for static contents such that they are
### NOT to be cached by web browser (using Cache-Content, Pragma, Expires
### headers)
struts.serve.static.browserCache=true
### Set this to false if you wish to disable implicit dynamic method invocation
### via the URL request. This includes URLs like foo!bar.action, as well as params
### like method:bar (but not action:foo).
### An alternative to implicit dynamic method invocation is to use wildcard
### mappings, such asstruts.enable.DynamicMethodInvocation = true
### Set this to true if you wish to allow slashes in your action names. If false,
### Actions names cannot have slashes, and will be accessible via any directory
### prefix. This is the traditional behavior expected of WebWork applications.
### Setting to true is useful when you want to use wildcards and store values
### in the URL, to be extracted by wildcard patterns, such as
###to match "/foo/edit" or
### "/foo/save".
struts.enable.SlashesInActionNames = false
### use alternative syntax that requires %{} in most places
### to evaluate expressions for String attributes for tags
struts.tag.altSyntax=true
### when set to true, Struts will act much more friendly for developers. This
### includes:
### - struts.i18n.reload = true
### - struts.configuration.xml.reload = true
### - raising various debug or ignorable problems to errors
### For example: normally a request to foo.action?someUnknownField=true should
### be ignored (given that any value can come from the web and it
### should not be trusted). However, during development, it may be
### useful to know when these errors are happening and be told of
### them right away.
struts.devMode = false
### when set to true, resource bundles will be reloaded on _every_ request.
### this is good during development, but should never be used in production
struts.i18n.reload=false
### Standard UI theme
### Change this to reflect which path should be used for JSP control tag templates by default
struts.ui.theme=xhtml
struts.ui.templateDir=template
#sets the default template type. Either ftl, vm, or jsp
struts.ui.templateSuffix=ftl
### Configuration reloading
### This will cause the configuration to reload struts.xml when it is changed
struts.configuration.xml.reload=false
### Location of velocity.properties file. defaults to velocity.properties
struts.velocity.configfile = velocity.properties
### Comma separated list of VelocityContext classnames to chain to the StrutsVelocityContext
struts.velocity.contexts =
### Location of the velocity toolbox
struts.velocity.toolboxlocation=
### used to build URLs, such as the UrlTag
struts.url.http.port = 80
struts.url.https.port = 443
### possible values are: none, get or all
struts.url.includeParams = none
### Load custom default resource bundles
# struts.custom.i18n.resources=testmessages,testmessages2
### workaround for some app servers that don't handle HttpServletRequest.getParameterMap()
### often used for WebLogic, Orion, and OC4J
struts.dispatcher.parametersWorkaround = false
### configure the Freemarker Manager class to be used
### Allows user to plug-in customised Freemarker Manager if necessary
### MUST extends off org.apache.struts2.views.freemarker.FreemarkerManager
#struts.freemarker.manager.classname=org.apache.struts2.views.freemarker.FreemarkerManager
### Enables caching of FreeMarker templates
### Has the same effect as copying the templates under WEB_APP/templates
struts.freemarker.templatesCache=false
### Enables caching of models on the BeanWrapper
struts.freemarker.beanwrapperCache=false
### See the StrutsBeanWrapper javadocs for more information
struts.freemarker.wrapper.altMap=true
### maxStrongSize for MruCacheStorage for freemarker
struts.freemarker.mru.max.strong.size=100
### configure the XSLTResult class to use stylesheet caching.
### Set to true for developers and false for production.
struts.xslt.nocache=false
### Whether to always select the namespace to be everything before the last slash or not
struts.mapper.alwaysSelectFullNamespace=false
### Whether to allow static method access in OGNL expressions or not
struts.ognl.allowStaticMethodAccess=false
### Whether to throw a RuntimeException when a property is not found
### in an expression, or when the expression evaluation fails
struts.el.throwExceptionOnFailure=false
### Logs as Warnings properties that are not found (very verbose)
struts.ognl.logMissingProperties=false
### Caches parsed OGNL expressions, but can lead to memory leaks
### if the application generates a lot of different expressions
struts.ognl.enableExpressionCache=true
### END SNIPPET: complete_file
View Code
1.Struct中默认访问后缀
Struct1:.do;Struct2:.action
2.在Struct.xml通过常量修改
指定访问后缀为action/do/没有访问后缀都可以
value="action,do,"不带后缀
value="action,do"访问后缀action或do
value="action" 后缀只能是action
3.常量在struct.xml中配置
4)resultType
1.在action中想要获得request对象:
ServletActionContext.getRequest();ServletActionContext是action重要对象

2.其中type的设置有
3.result全局结果
当多个action中使用了相同的result,为了避免result的重复,我们可以设置全局结果;但是局部权限大于全局

4.数据封装
1)struts对数据封装,当访问action时,参与核心过滤器,访问default-struts.xml->strut.xml,在default-struts.xml中有32个拦截器,其中Parameters拦截器对数据进行封装
2)String-》基本数据类型转换是自动的
String-》Date日期类型的转换是有条件的
3)转换原理过程
1.表单中的name值自动映射到Action中的一个属性;2.还可以映射到一个集合
3.Struts对HttpServetRequest,HttpSession,ServletContext进行了封装,构造了三个Map对象,可通过ServletActionContext来访问三个对象
4)在action中两种获得数据的方法
1.ServletApi 2.通过ServletActionContext获得ActionContext对象得到三个封装好的Map对象3.实现三个接口RequestAware, SessionAware, ApplicationAwar也可以
方式一:通过Servlet Api
HttpServletRequest request =ServletActionContext.getRequest();
HttpSession session=request.getSession();
ServletContext application=ServletActionContext.getServletContext();//操作
request.setAttribute("request_data", "request_data1");
session.setAttribute("session_data", "session_data1");
application.setAttribute("application_data", "application_data1");
方式二:推荐这个方法
//Struts中对数据操作,方式2: 通过ActionContext类
ActionContext ac =ActionContext.getContext();//得到Struts对HttpServletRequest对象进行了封装,封装为一个map//拿到表示request对象的map
Map request =ac.getContextMap();//拿到表示session对象的map
Map session =ac.getSession();//拿到表示servletContext对象的map
Map application =ac.getApplication();//数据
request.put("request_data", "request_data1_actionContext");
session.put("session_data", "session_data1_actionContext");
application.put("application_data", "application_data1_actionContext");
/**
* 数据处理, 方式3: 实现接口的方法
* @author Jie.Yuan
**/
public classDataAction extends ActionSupport implements RequestAware, SessionAware, ApplicationAware{private Maprequest;private Mapsession;private Mapapplication;//struts运行时候,会把代表request的map对象注入
public void setRequest(Maprequest) {this.request =request;
}//注入session
public void setSession(Mapsession) {this.session =session;
}//注入application
public void setApplication(Mapapplication) {this.application =application;
}publicString execute() throws Exception {//数据
/**
// Struts中对数据操作,方式1: 直接拿到ServletApi, 执行操作
HttpServletRequest request = ServletActionContext.getRequest();
HttpSession session = request.getSession();
ServletContext application = ServletActionContext.getServletContext();
// 操作
request.setAttribute("request_data", "request_data1");
session.setAttribute("session_data", "session_data1");
application.setAttribute("application_data", "application_data1");*/
//【推荐:解耦的方式实现对数据的操作】//Struts中对数据操作,方式2: 通过ActionContext类
ActionContext ac =ActionContext.getContext();//得到Struts对HttpServletRequest对象进行了封装,封装为一个map//拿到表示request对象的map
Map request =ac.getContextMap();//拿到表示session对象的map
Map session =ac.getSession();//拿到表示servletContext对象的map
Map application =ac.getApplication();//数据
request.put("request_data", "request_data1_actionContext");
session.put("session_data", "session_data1_actionContext");
application.put("application_data", "application_data1_actionContext");//
returnSUCCESS;
}
}
View Code
5.类型转换
前面说了数据转换String->基本类型类型自动的,日期需要条件
1)是Parameters拦截器做的类似于: Beanutils工具
2)自定义类型转换器
1.继承StrutsTypeConverter
2.全局转换,局部转换配置
例子:
/**
* 自定义类型转换器类
*
* @author Jie.Yuan
**/
public classMyConverter extends StrutsTypeConverter {//新需求: 要求项目中要支持的格式,如: yyyy-MM-dd/yyyyMMdd/yyyy年MM月dd日..//先定义项目中支持的转换的格式
DateFormat[] df = { new SimpleDateFormat("yyyy-MM-dd"),new SimpleDateFormat("yyyyMMdd"),new SimpleDateFormat("yyyy年MM月dd日") };/**
* 把String转换为指定的类型 【String To Date】
*
* @param context
* 当前上下文环境
* @param values
* jsp表单提交的字符串的值
* @param toClass
* 要转换为的目标类型*/@OverridepublicObject convertFromString(Map context, String[] values, Class toClass) {//判断: 内容不能为空
if (values == null || values.length == 0) {return null;
}//判断类型必须为Date
if (Date.class !=toClass) {return null;
}//迭代:转换失败继续下一个格式的转换; 转换成功就直接返回
for (int i=0; i
}catch(ParseException e) {continue;
}
}return null;
}
@OverridepublicString convertToString(Map context, Object o) {return null;
}
}
View Code
局部配置:在自定义转化器添加(自定义转换器名字-conversion.properties):MyConverter-conversion.properties
在其中写:需要转换的字段名=自定义转换器类的权限定名birth=type.MyConverter
全局配置:在项目src目录下建立固定文件xwork-conversion.properties
在其中写:需要转换的类类型=转换器类的权限定名 :java.util.Date=type.MyConverter(java.util.Date是birth的类型)
3)struts-default.xml
该拦截器负责对错误信息处理
6.文件支持
1)文件上传
1.核心类:FileItemFactory;ServletFileUpload;FileItem
2.struts处理上传文件:
获得上传文件的file,对应的fileName,fileContextType,之后再execute中执行对上传文件的处理;
上传文件默认都是被缓存到.me_tcat\work\Catalina\localhost\struts02\upload_5bd0b60c_15c3369eeb3__8000_00000005.tmp中
我们要做的是把文件得到存到我们指定的位置
3.配置action:在action子栏中添加。。。等信息
在default-struts中有拦截器fileUpload,而在ServletFileUpload类中文件属性我们都可以在自己写的拦截器中添加
txt,jpg,jar
1024
当文件上传错误时,会自动放回字符串input,我们可以在action中配置跳转到指定页面,这个页面想要显示错误信息可以通过引用struts标签,显示
4.上传例子
1.jsp
用户名:文件:
2.actionpublic classFileUpload extends ActionSupport {/**
**/
private static final long serialVersionUID = 1L;//对应表单:
privateFile file1;//文件名
privateString file1FileName;//文件的类型(MIME)
privateString file1ContentType;public voidsetFile1(File file1) {this.file1 =file1;
}public voidsetFile1FileName(String file1FileName) {this.file1FileName =file1FileName;
}public voidsetFile1ContentType(String file1ContentType) {this.file1ContentType =file1ContentType;
}//上面的代码是通过拦截器对数据自动封装到这三个属性中的
@OverridepublicString execute() throws Exception {/******拿到上传的文件,进行处理******/
//把文件上传到upload目录
System.out.println(file1FileName);
System.out.println(file1ContentType);//获取上传的目录路径
String path = ServletActionContext.getServletContext().getRealPath("/upload");
System.out.println(path);//创建目标文件对象
File destFile = newFile(path,file1FileName);//把上传的文件,拷贝到目标文件中
FileUtils.copyFile(file1, destFile);returnSUCCESS;
}
}
View Code
2)文件下载
访问连接down_down.action就是到down_list的action中找到类,对应的list方法,下面的例子是list方法返回list字符串在action中就找到对于的result放回到list.jsp中,在这里通过点击下载-》又发送连接down_down?fileName=文件名.txt-》找到down_down的action找到对应的类里面的down方法开始下载-》随后在对应的action中找到result,这个result的为属于下载业务功能,需要特殊设置:
type="stream";之后在子项中添加四个param子标签
application/octet-stream
attrInputStream
attachment;filename=${downFileName}
1024
之后我们需要在action类中再写 1.放回流属性的getAttrInputStream()方法放回要下载文件的流;
2.返回下载头包含浏览器显示的文件名:getDownFileName()
上传下载的整体例子
上传
1.file.xml中的配置<?xml version="1.0" encoding="UTF-8" ?>
/p>
"http://struts.apache.org/dtds/struts-2.0.dtd">
txt,jpg,jar
2097152
/e/success.jsp
/e/error.jsp
e/list.jsp
application/octet-stream
attrInputStream
attachment;filename=${downFileName}
1024
2.FileUpload.java代码
package fileupload;
import java.io.File;
import org.apache.commons.io.FileUtils;
import org.apache.struts2.ServletActionContext;
import com.opensymphony.xwork2.ActionSupport;/**
* 文件上传
* @author Administrator
**/
public classFileUpload extends ActionSupport{/**
**/
private static final long serialVersionUID = 1L;privateFile file1;privateString file1FileName;//上面的代码是通过拦截器对数据自动封装到这三个属性中的
public voidsetFile1(File file1) {this.file1 =file1;
}public voidsetFile1FileName(String file1FileName) {this.file1FileName =file1FileName;
}
@OverridepublicString execute() throws Exception {
String path=ServletActionContext.getServletContext().getRealPath("/upload");
File destDir=newFile(path,file1FileName);
FileUtils.copyDirectory(file1, destDir);
System.out.println("上传成功");returnSUCCESS;
}
}3.提交上传的表单jsp
Insert title here文件:View Code
下载
1.DownAction.java
package fileupload;
import java.io.File;
import java.io.InputStream;
import java.io.UnsupportedEncodingException;
import java.net.URLEncoder;
import java.util.Map;
import org.apache.struts2.ServletActionContext;
import com.opensymphony.xwork2.ActionContext;
import com.opensymphony.xwork2.ActionSupport;public classDownAction extends ActionSupport{/**
**/
private static final long serialVersionUID = 1L;/************显示所有需要下载的文件*************/
publicString list(){
String path=ServletActionContext.getServletContext().getRealPath("/upload");
File file=newFile(path);
String[] fileNames= file.list();//得到所有下载的文件名//保存
ActionContext ac=ServletActionContext.getContext();
Map request=(Map) ac.get("request");
request.put("fileNames", fileNames);return "list";
}/***************2.文件下载****************/
/*1。获得要下载的文件名字*/
privateString fileName;public voidsetFileName(String fileName){//这里提交时get提交存在乱码问题需要解决下
try{
fileName=new String(fileName.getBytes("ISO8859-1"),"UTF-8");
}catch(UnsupportedEncodingException e) {//TODO Auto-generated catch block
e.printStackTrace();
}this.fileName=fileName;
}/*2.下载提交业务*/
publicString down(){return "download";
}/*3.返回文件流的方法*/
publicInputStream getAttrInputStream(){return ServletActionContext.getServletContext().getResourceAsStream("/upload"+fileName);
}/*4.下载显示的文件名*/
publicString getDownFileName(){//需要中文编码
try{
fileName=URLEncoder.encode(fileName,"UTF-8");
}catch(UnsupportedEncodingException e) {//TODO Auto-generated catch block
e.printStackTrace();
}returnfileName;
}
}2.显示所有下载文件的list.jsp
String basePath= request.getScheme()+"://"+request.getServerName()+":"+request.getServerPort()+path+"/";%>
下载列表| 编号 | 文件名 | 操作 |
| ${vs.count} | ${fileName} | 下载 |
3。访问方式:先访问list,再下载
View Code
6.拦截器
a) 想出拦截器原因
用户想要给action什么功能的时候可以通过拦截器自由组装,基于组件的设计
b) 知识点:拦截器在struts-default中定义了32种拦截器,18中默认拦截器
拦截器栈:组合多个拦截器,默认使用strut-default的18个默认拦截器defaultStack
一旦用户指定哪个拦截器,默认拦截器就不起作用了
c) 拦截器的配置
在struts-default中定义所有的拦截器其中默认拦截器
dojo\..*,^struts\..*,^session\..*,^request\..*,^application\..*,^servlet(Request|Response)\..*,parameters\...*
input,back,cancel,browse
input,back,cancel,browse
View Code
自己在struts中定义拦截器
1.定义拦截器和拦截器栈
1.1定义拦截器
1.2定义拦截器栈
引用上面的或其他的拦截器
2.默认执行拦截器(栈)
e) 拦截器核心api
Interceptor接口
AbstractInterceptor 拦截器默认实现的抽象类,一般自定义开发继承它就行了
ActionInvacation 拦截器的执行状态,调用下一个拦截器或者action
f) 拦截器和过滤器的区别
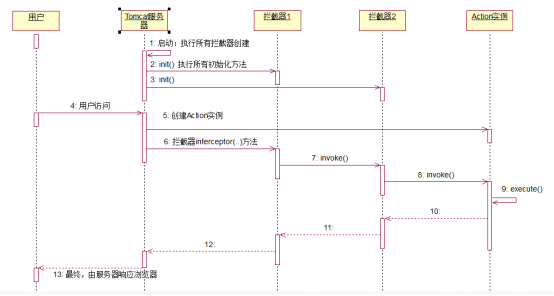
g) 拦截器的生命周期
服务器启动-》过滤器创建-》初始化init()创建所有拦截器对象-》客户端访问-》创建action实例-》拦截器interceptor方法拦截-》下一个拦截-》。。。》到达action执行execute()->返回给用户结果
h) 自定义拦截器例子
1.写一个拦截器类
package interceptor;
import com.opensymphony.xwork2.ActionInvocation;
import com.opensymphony.xwork2.interceptor.Interceptor;/**
* 拦截器定义
* @author Administrator
**/
public classHelloInterceptor implements Interceptor{/**
**/
private static final long serialVersionUID = 1L;
@Overridepublic voiddestroy() {//TODO Auto-generated method stub
System.out.println("销毁。。。。。");
}
@Overridepublic voidinit() {//TODO Auto-generated method stub
System.out.println("自定义拦截器初始化成功");
}/**
* 拦截器业务处理:在访问action时执行,在excute之前执行*/@OverridepublicString intercept(ActionInvocation arg0) throws Exception {
System.out.println("拦截器开始执行");//执行业务逻辑//执行下一个拦截器
String aa=arg0.invoke();//拦截器结束
System.out.println("拦截器结束");returnaa;
}
}
View Code
2.配置struts配置拦截器分3步
a) 定义自定义拦截器
b) 定义我们的拦截器栈:其中引用默认拦截器栈要放在第一位
c) 执行拦截器:
/index.jsp
View Code
7.国际化
a) Serlvelt中的国际化
写资源文件
基础名.properties【默认的语言环境设置】
基础名_语言简称_国家简称.properties
读取资源文件再使用
程序:ResourceBundle
Jsp: jstl提供的格式化与国际化标签库。
b) Struts中的国际化
写资源文件(同servlet)
读取资源文件再使用
程序:ResourceBundle
Jsp: 1)jstl表亲啊 (同servlet)
2)struts标签获取资源文件内容
c) 注意
还可以在页面加载
标签必须放到标签体中。
d) 区别
Struts2加载资源文件更加简单!通过常量加载即可!再在jsp页面直接使用
à1. 写资源文件
Msg.properties 默认的语言环境; 找不到配置就找它
Msg_en_US.properties 美国
-à2. 加载
à3. 使用:标签name值直接写配置文件中的key
8.Ognl表达式语言与Struts标签
深刻理解Ognl,Struct2传输模式
http://blog.sina.com.cn/s/blog_7ffb8dd5010141pd.html
1.ActionContext装饰OgnlContext2.OgnlValueStack值栈对象包含了OgnlContext,root对象3.OgnlContext中包含了所有域对象,全局属性,action对象等等4.Struts2数据传输DataTransfer的核心对象是OgnlValueStack、 OgnlContext
这里主要需要知道的是“值栈对象”生成过程和内部成员,调用方式
a) Ognl表达式:Object Graphic Navigation Language(对象图导航语言)的缩写是一个开源项
b) 优势:
支持对象方法调用,如xxx.doSomeSpecial();
支持类静态的方法调用和值访问,表达式的格式:@[类全名(包括包路径)]@[方法名|值名]例如:@java.lang.String@format('foo %s', 'bar')
支持赋值操作和表达式串联,如price=100, discount=0.8,calculatePrice(),这个表达式会返回80
访问OGNL上下文(OGNL context)和ActionContext;
操作集合对象
c) OgnlContext对象
是Ognl表达式的核心
访问Ognl表达式中值Ognl.getValue(ognl表达式,ActionContext ac,ognl的root)
例子:主要看我们对ActionContext上下文对象如何处理,ac中直接添加键值对,创建ognl表达式时要加#,ac添加root时,创建表达式就不需要了
当我们调用工具类的一个方法时,创建ognl表达式:Ognl.parseExpression("@[类名]@[方法调用]")如:@Math@floor(10.9)
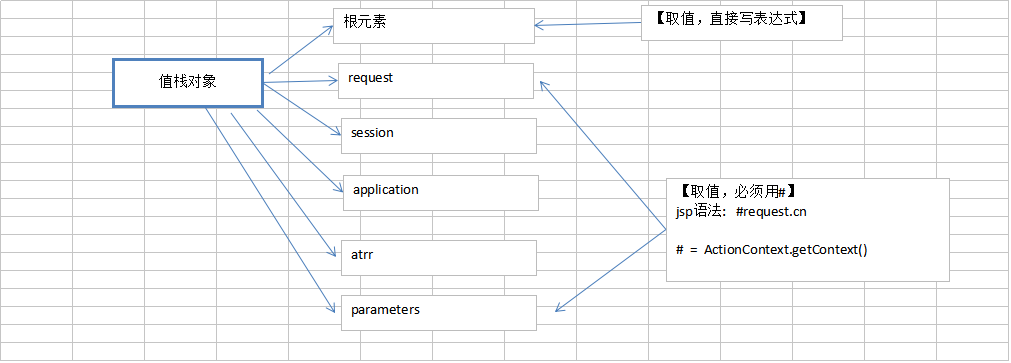
1. Ognl表达式语言语言取值,取非根元素的值,必须用#号
public voidtestOgnl() throws Exception {//创建一个Ognl上下文对象
OgnlContext context = newOgnlContext();//放入数据
User user = newUser();
user.setId(100);
user.setName("Jack");//【往非根元素放入数据, 取值的时候表达式要用"#"】
context.put("user", user);//获取数据(map)//先构建一个Ognl表达式, 再解析表达式
Object ognl = Ognl.parseExpression("#user.name");
Object value=Ognl.getValue(ognl, context, context.getRoot());
System.out.println(value);
}
View Code
2. Ognl表达式语言语言取值,取根元素的值,不用带#号
public voidtestOgn2() throws Exception {//创建一个Ognl上下文对象
OgnlContext context = newOgnlContext();//放入数据
User user = newUser();
user.setId(100);
user.setName("Jack");//【往根元素放入数据】
context.setRoot(user);//获取数据(map)//先构建一个Ognl表达式, 再解析表达式
Object ognl = Ognl.parseExpression("address.province");
Object value=Ognl.getValue(ognl, context, context.getRoot());
System.out.println(value);
}
View Code
3.Ognl对 静态方法调用的支持
public voidtestOgn3() throws Exception {//创建一个Ognl上下文对象
OgnlContext context = newOgnlContext();//Ognl表单式语言,调用类的静态方法//Object ognl = Ognl.parseExpression("@Math@floor(10.9)");//由于Math类在开发中比较常用,所以也可以这样写
Object ognl = Ognl.parseExpression("@@floor(10.9)");
Object value=Ognl.getValue(ognl, context, context.getRoot());
System.out.println(value);
}
View Code
4.Ognl运用在jsp页面:数据存到request中后自然就存到OgnlContext中了,在jsp页面通过#request.list就能访问到OgnlContext中的list对象和里面的值,OgnlContext就相当于一个容器,存放了所有的域对象和自己存进去的键值对
map迭代
View Code
不是根Obnl的根对象都是用#开头才能访问到
d) ValueStack对象
用户访问action时,创建action对象,之后再将很多信息,action对象、全局属性、域对象、等等存入值栈对象中,之后值栈对象就有了很多内容,我们取值都可以从这里取
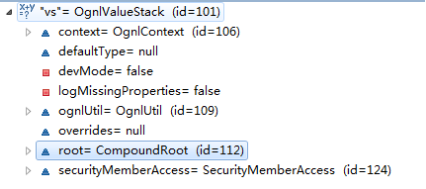
值栈对象,是struts数据存储中心,或者说是中转站
访问action时,创建了action对象、值栈对象、ActionContext对象;将action对象放入值栈对象,再将值栈对象存入request中传到jsp中
ActionContext类装饰OgnlContext类
获取值栈对象2种方式:
1.因为action对象放入值栈对象,值栈对象又存入request对象,所有想要获得ValueStack对象可以从request对象中获得
ValueStack vs1 = (ValueStack) request.getAttribute("struts.valueStack");
2.直接从ActionContext对中获得
ac..getValueStack();
e) Struts标签
Struct标签就是用了Ognl表达式语言
9.验证
代码验证
package validation;
import com.opensymphony.xwork2.ActionSupport;/**
* 验证需要实现接口或者继承ActionSupport
* @author Administrator
**/
public classUserAction extends ActionSupport{private static final long serialVersionUID = 1L;//封装数据的请求
privateUser user;publicUser getUser() {returnuser;
}public voidsetUser(User user) {this.user =user;
}//重写数据验证的方法
/*public void validateRegister() {
if(user.getUserName()==null||"".equals(user.getUserName())){
//保存错误信息
super.addFieldError("userName","用户名必须重写");
}
// 密码
if (user.getPwd() == null || "".equals(user.getPwd())) {
super.addFieldError("pwd", "密码必填");
}
}*/
//业务方法
publicString register(){
System.out.println(user);
System.out.println(1);returnSUCCESS;
}//列表展示
publicString list(){returnSUCCESS;
}
}
View Code
xml验证
/p>
"http://struts.apache.org/dtds/xwork-validator-1.0.3.dtd">
用户名不能为空
密码不能为空!
6
8
密码必须为6-8位!
日期格式不对!
邮件格式不对
View Code
1)验证原理
通过拦截器验证
2)配置验证步骤
写一个类继承ActionSuppert或者实现Validate接口重写validate()方法即可
要注意的是:想要验证指定的方法只需只需验证名称规则:validate+要验证的方法名(public void validateRegister())
3)验证action的方法
1)代码验证
重写验证方法,注意命名规则可以指定特定的方法验证
validate+要验证的方法名
public void validateRegister() {
只会验证当前action的register方法!
2)XML方式验证
1.将错误信息显示在jsp页面:
2.代码验证缺点:设计很多重复的验证逻辑!例如:非空验证、数值验证、email、日期等。
3.Struts对于常用的验证进行了封装
Struts提供的所有的验证器:xwork-core-2.3.4.1.jar/com.opensymphony.xwork2.validator.validators/default.xml
都在这里了
View Code
XML文件名称语法:
指定的是所有验证:ActionClassName-validation.xml;
指定特定的方法命名规则:ActionClassName-ActionName-validation.xml
注意:此XML需要与当前要验证的acton同在一个目录
举例:UserAction-validation.xml/UserAction-register-validation.xml
例如:xml中的规则在dtd文件在xwork-core-2.3.4.1.jar下慢慢找吧dtd文件
/p>
"http://struts.apache.org/dtds/xwork-validator-1.0.3.dtd">
用户名不能为空
密码不能为空!
6
8
密码必须为6-8位!
日期格式不对!
邮件格式不对
View Code
3)验证总结
代码:
重写validate() , 验证action所有方法
Validate方法名(), 验证指定“方法名”的方法
Xml:
验证所有方法: ActionClassName-validation.xml
验证指定方法: ActionClassName-actionName-validation.xml
代码验证,
比较灵活,可以满足所有的需求.
比较繁琐,要写重复的验证判断逻辑!
适合: 表单字段较少的情况用!
XML验证:
通用,但不够灵活; 可以验证特定简单的业务。
适合: 验证表单字段较多,可以大大简化代码!
(配置文件过多)
4)显示错误信息:
1.方式一:
2.方式二:这样弄因为显示错写信息时会自动生成ui,ul标签
ul li{display: inline;color: red;}
3.修改标签定义的模板
找到fielderror标签定义的模板文件:Struts-core.jar\template\simple\ fielderror.ftl
把修改后的文件放到src/ template/ simple/fielderror.ftl
这样样式就修改好了
View Code
10.struts简单的UI标签
用户名:密码:name="struts.ui.theme" value="simple">
11.Struts中几种特殊符号(jsp页面)
#:获取非根元素值、map集合
$:配置文件取值
%:提供一个ognl表示的运行环境
例子:
获取request域数据
国家:
View Code
12.Struts中常用的几个技术
1)数据回显
必须使用struts标签:
进入修改页面时-》将数据信息存入request域Map中,或者存入栈值对中,在jsp页面,通过struts标签就能获得obnl标签值
两种数据存入方式
1.通过request域Map
2.通过ValueStack存入头对象,能直接访问
例子:
Action中://进入修改页面
publicString viewUpdate() {//模拟一个对象(先获取一个id,再根据id调用service查询,把查到的结果保存到域)
User userInfo = newUser();
userInfo.setUserName("Jack");
userInfo.setEmail("yuanjie@itcast.cn");
ActionContext ac=ActionContext.getContext();//Map request = (Map) ac.get("request");//request.put("userInfo", userInfo);
/************* 数据回显***************/
//获取值栈
ValueStack vs =ac.getValueStack();
vs.pop();//移除栈顶元素
vs.push(userInfo); //入栈//进入修改页面
return "viewUpdate";
}
JSP页面:
用户名:邮箱:
View Code
2)模型驱动,属性驱动
模型驱动就是直接将对象封装,属性驱动就是将属性赋值给对象的属性
@OverridepublicString intercept(ActionInvocation invocation) throws Exception {
Object action=invocation.getAction();if(action instanceof ModelDriven) {
ModelDriven modelDriven=(ModelDriven) action;
ValueStack stack=invocation.getStack();
Object model=modelDriven.getModel();if (model != null) {
stack.push(model);
}if(refreshModelBeforeResult) {
invocation.addPreResultListener(newRefreshModelBeforeResult(modelDriven, model));
}
}returninvocation.invoke();
}
View Code
prams拦截器,可以把请求数据自动填充的action的属性中
就是数据封装的关键拦截器
4.表单重复提交拦截器
Struts2知识进阶
1.继承了ActionSupport的类,想要给前台页面发送信息处了可以通过域对象发送;还可以通过以下三种方式提交信息
this.addActionMessage("message");
this.addActionError(anErrorMessage);
this.addFieldError(fieldName, errorMessage)
之后在前台界面使用
;来显示数据信息