自适应网站会影响推广怎么做网络营销平台
前言
本篇文章属于学习笔记,来源于B站教学视频,相关代码工程请从源地址自行下载。这位Up讲解得很好,适合同学们一起学习,在这里推荐给大家。本文为个人学习笔记,只能做参考,细节方面建议观看视频,肯定受益匪浅。
51单片机入门教程-2020版 程序全程纯手打 从零开始入门_哔哩哔哩_bilibili https://www.bilibili.com/video/BV1Mb411e7re?p=1
一、环境搭建
1、开发软件Keil5C51

2、烧录软件stc-isp
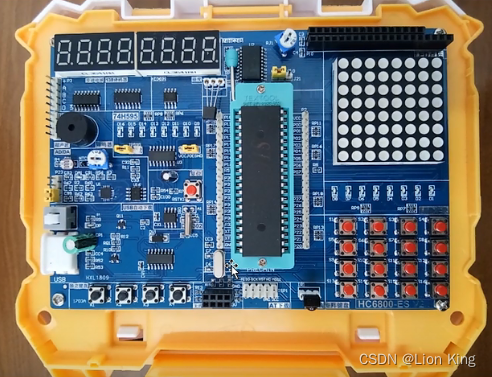
3、普中51单片机开发板
二、单片机介绍
1、单片机(Micro Controller Unit ,即MCU)
2、本篇所使用的单片机为STC89C52单片机
所属系列为8051,即51单片机。8051最开始指在80年代生产的8051内核的单片机。后延伸为只要是8051内核的单片机,都统称为51单片机。
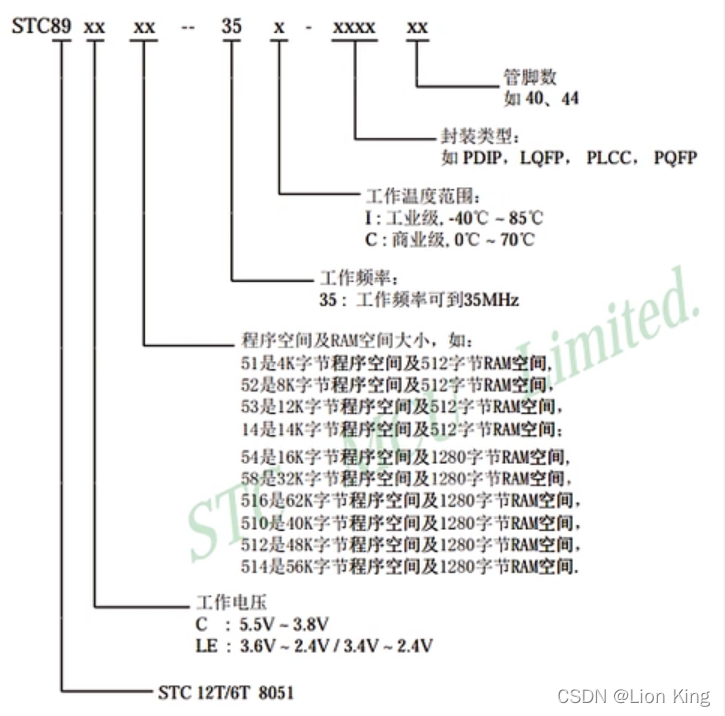
3、51单片机命名规则
4、51单片机结构

三、单片机实操一:点亮一个LED
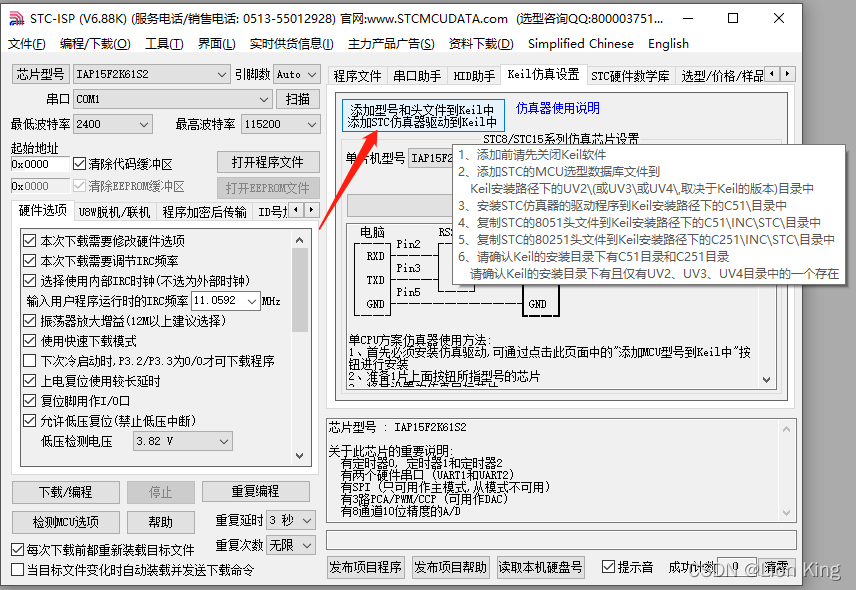
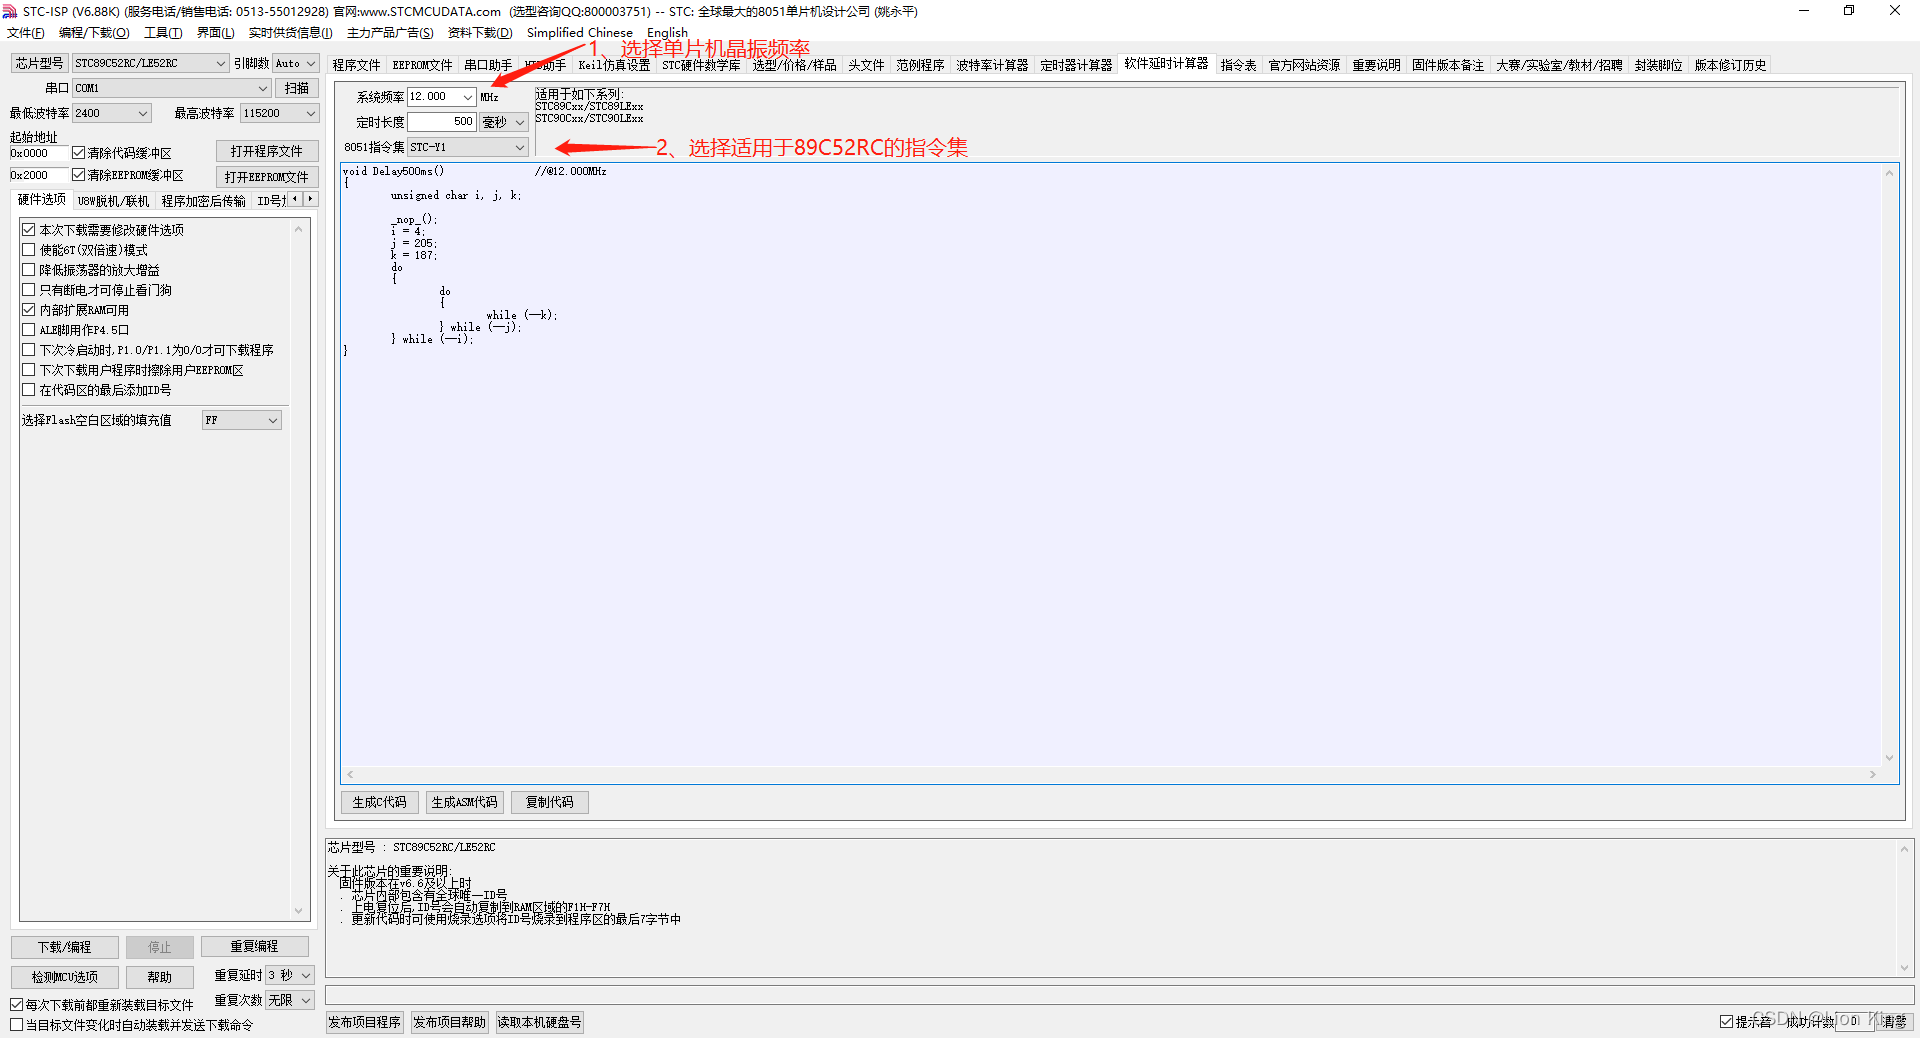
1、打开STC-ISP添加芯片包到开发环境
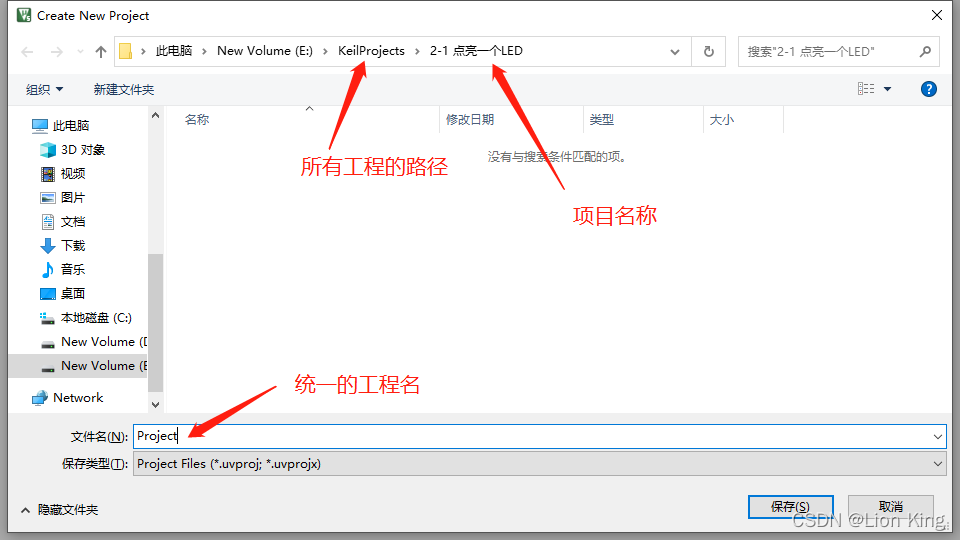
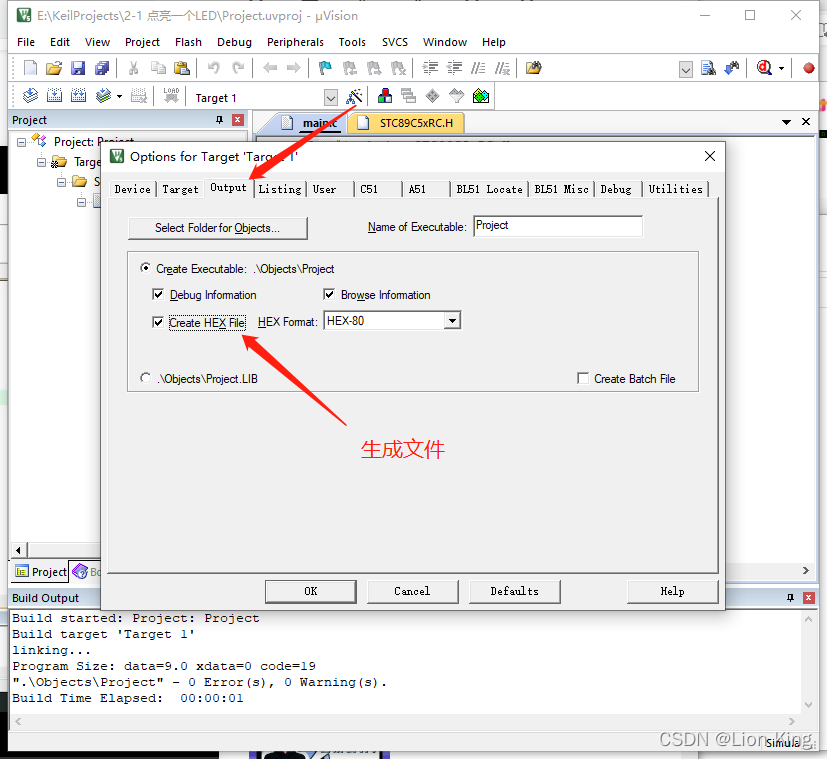
2、创建工程

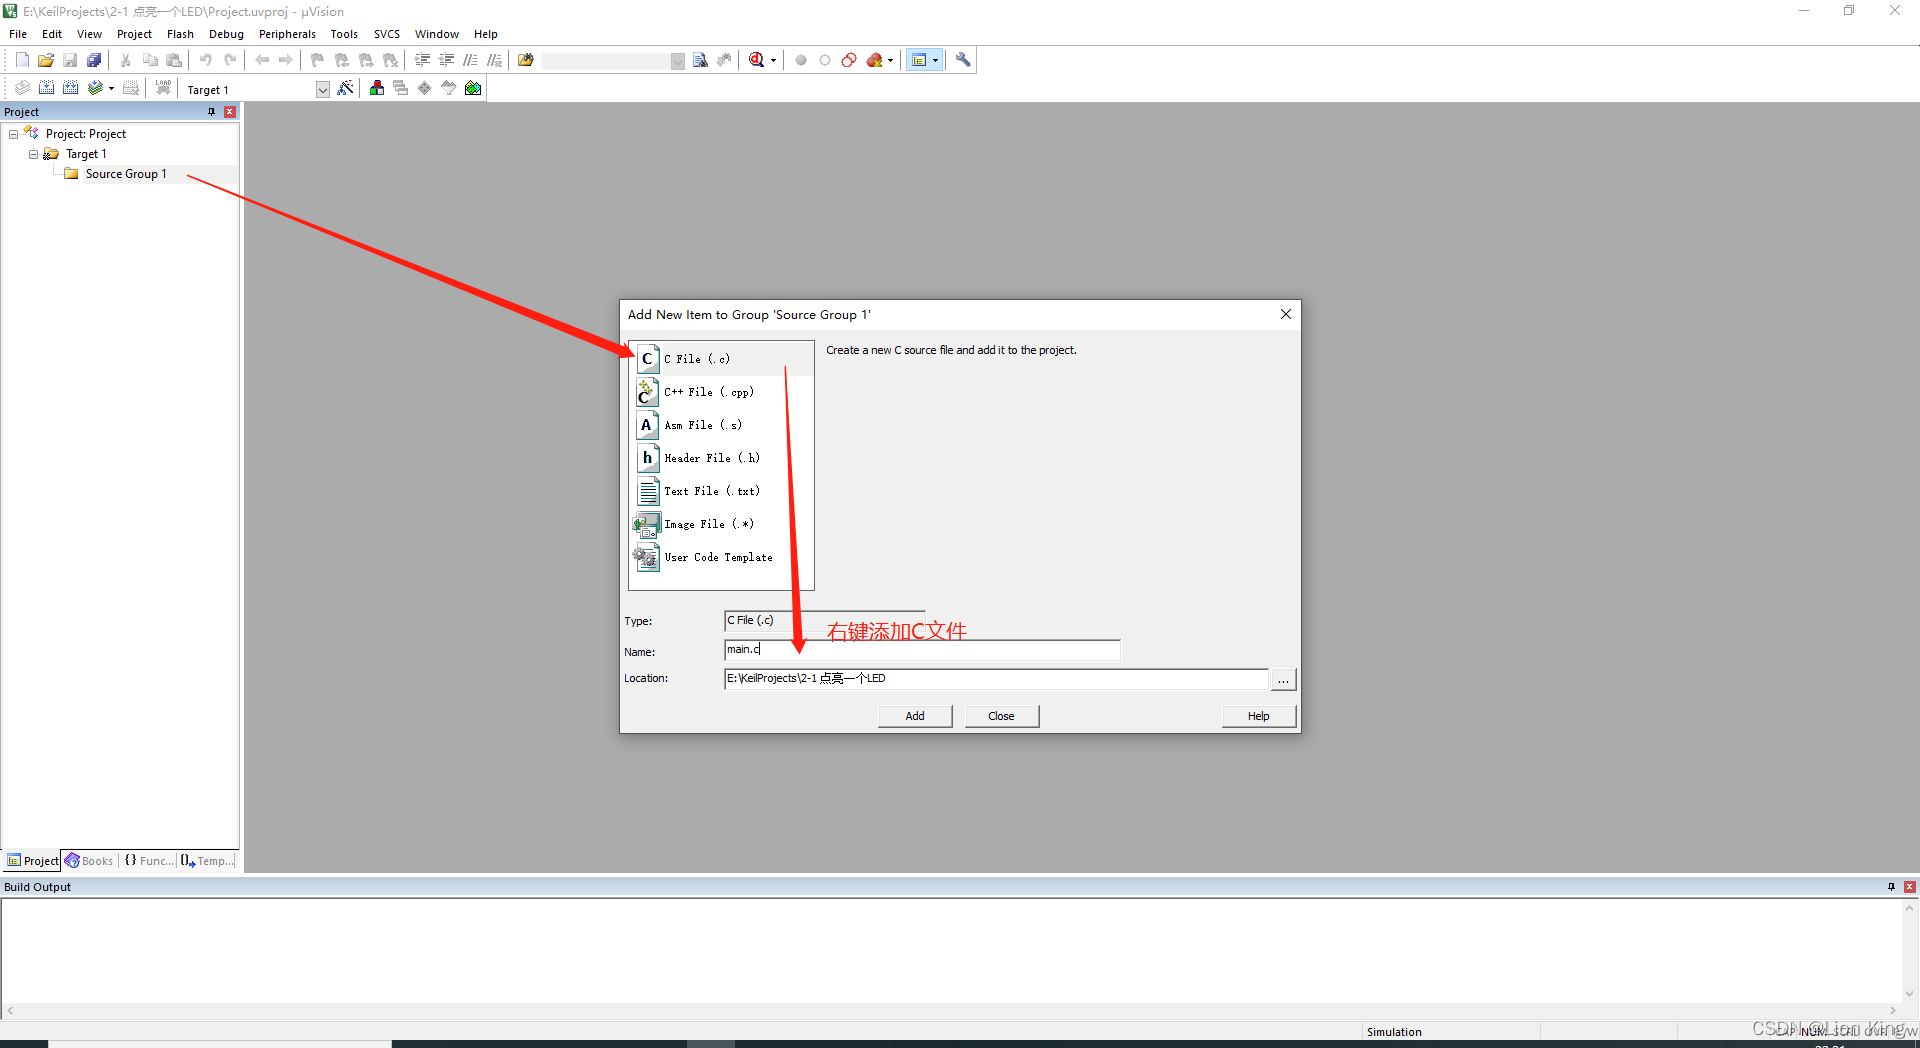
3、创建文件
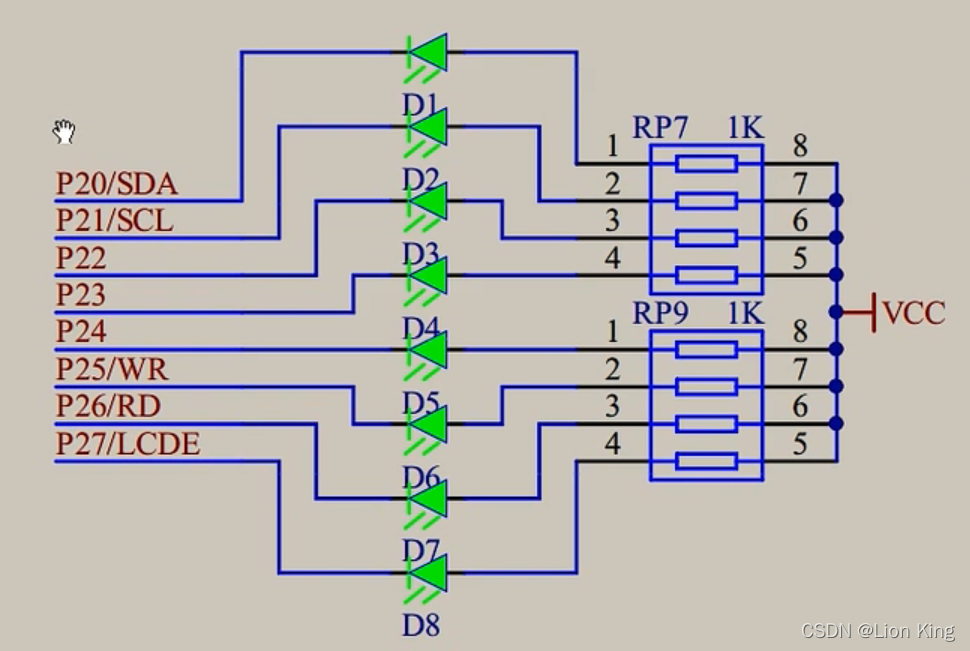
4、LED的硬件原理图
在下面的图中,我们可以看到LED最终连上了单片机的管脚。而单片机需要通过CPU控制寄存器的值,进而通过驱动器加大控制力度,由控制电路输出高低电平(对应寄存器1/0)。因此,程序需要在对应的寄存器上写1或0,即可控制LED的亮灭。
5、编写程序
根据硬件原理图和寄存器定义,来对操作寄存器地址,实现灯的点亮
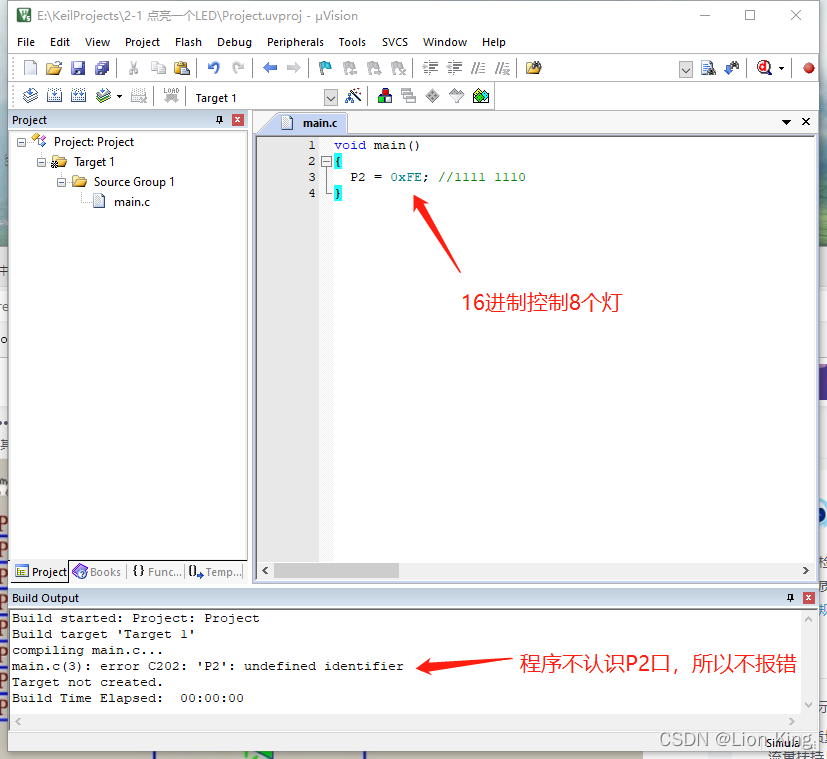
#include <STC89C5xRC.H>void main()
{P2 = 0xFE; //1111 1110
}
6、实验过程与代码解释
(1)点击F7编译单个文件,编译失败,给出P2不认识的提示
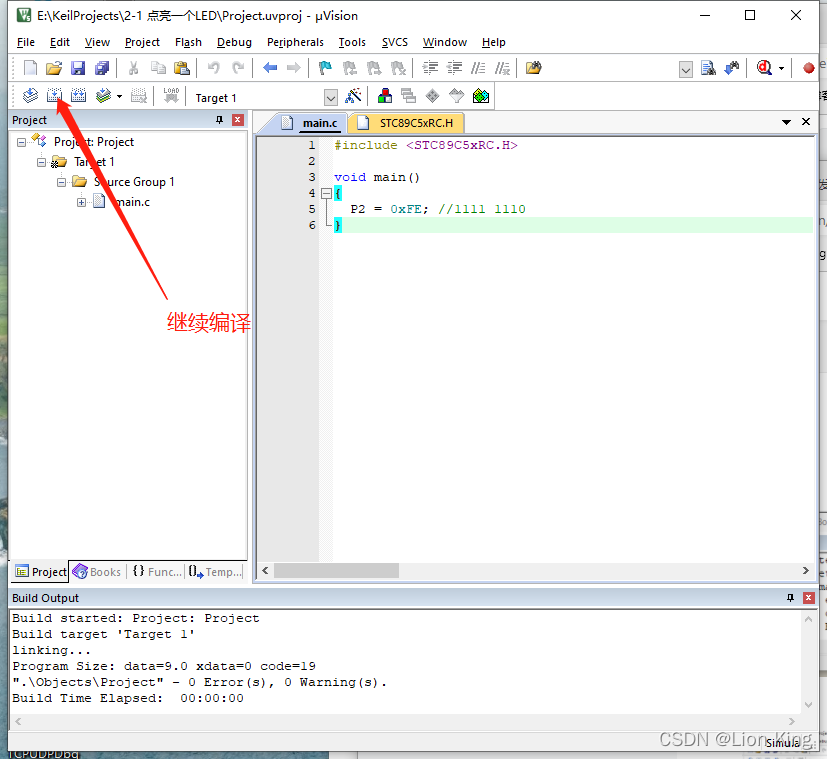
(2)添加H文件,继续编译,编译通过 ,说明头文件定义了P2
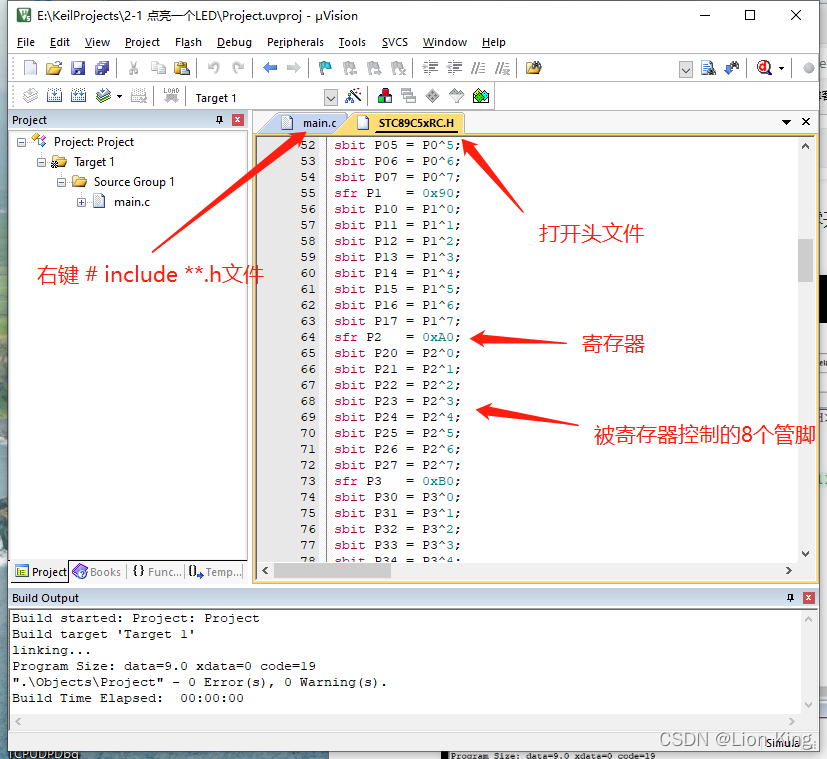
(3)为什么控制的是P2?因为硬件原理图以及头文件的定义,拉低电平即可点亮一盏灯!
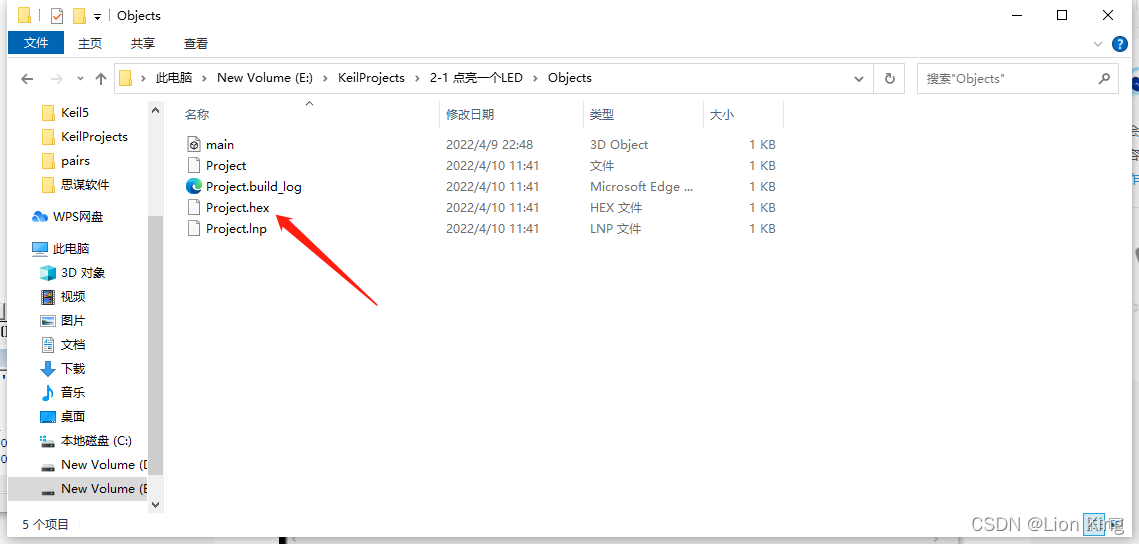
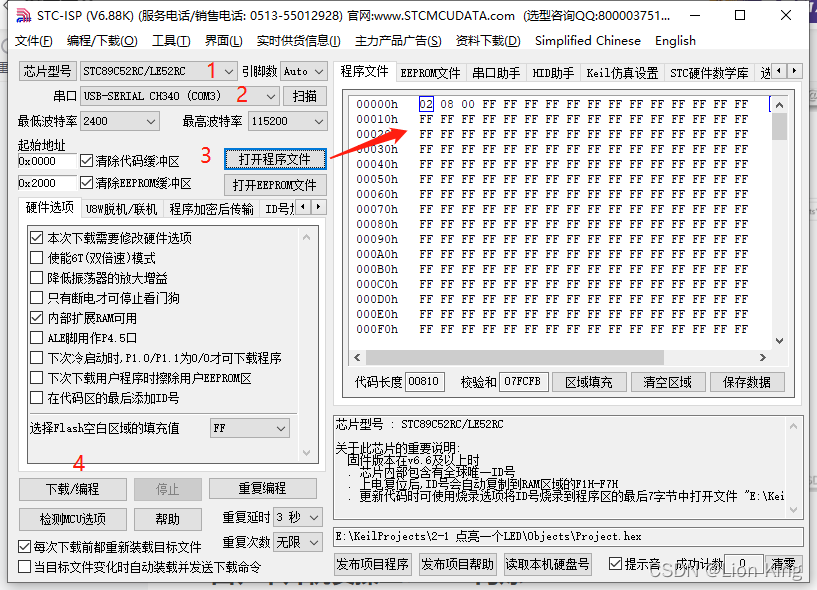
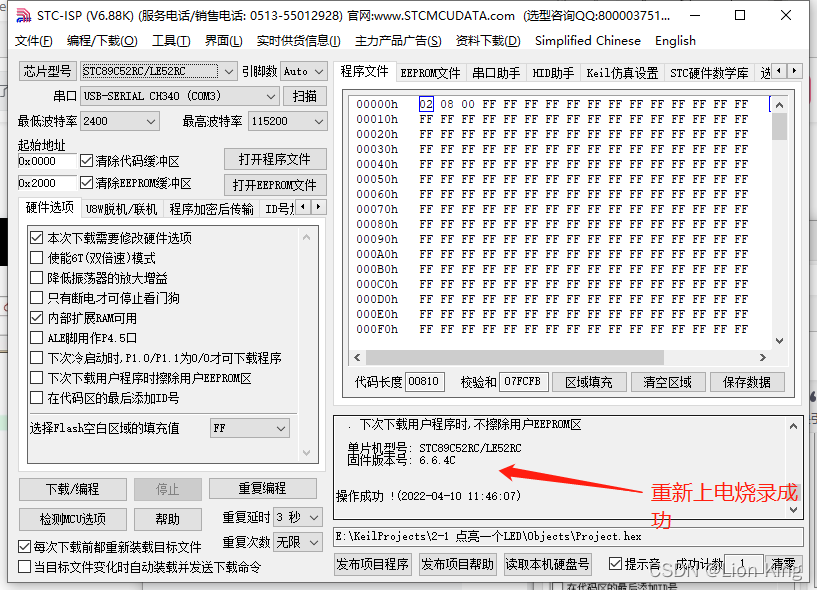
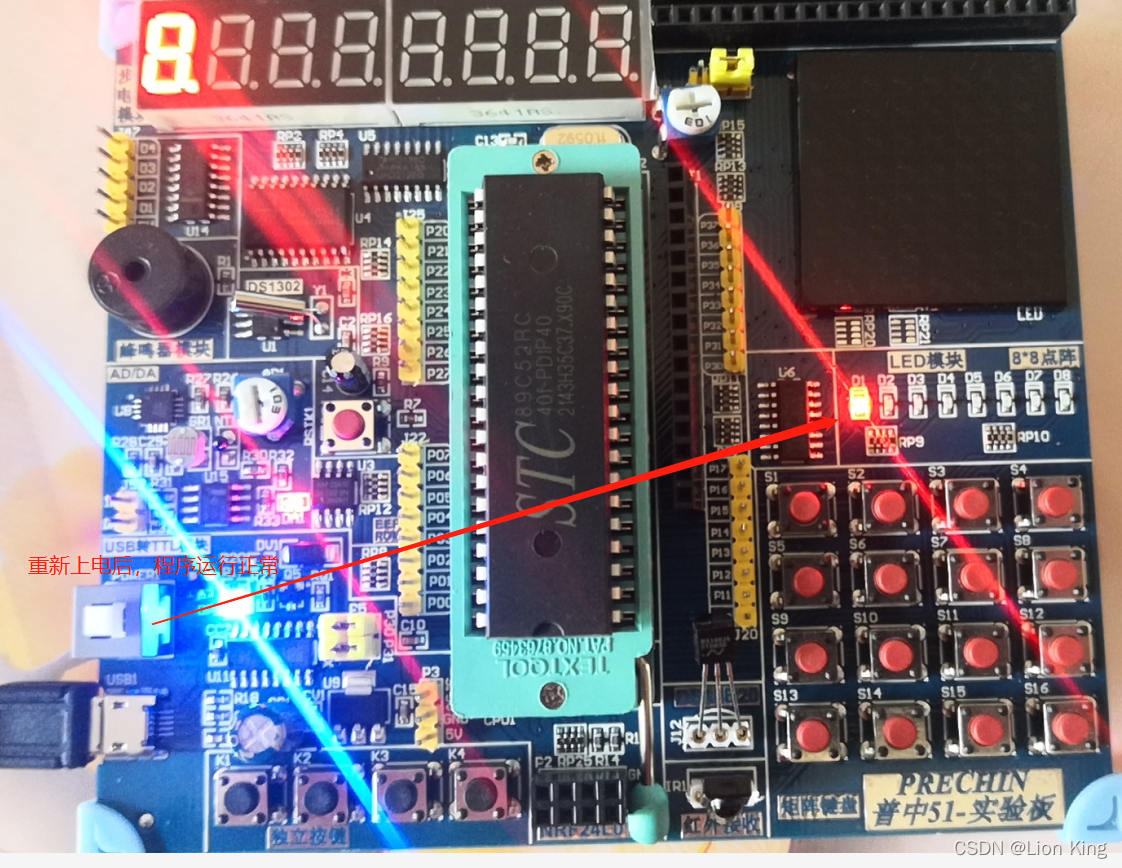
7、生成文件,下载到板子上,重新上电之后可运行该程序
四、单片机实操二:LED闪烁
1、在指定路径下创建工程并添加新文件
2、通过STC-ISP拷贝延时代码
3、编写程序
加入延时,方便观察灯的闪烁
#include <STC89C5xRC.H>
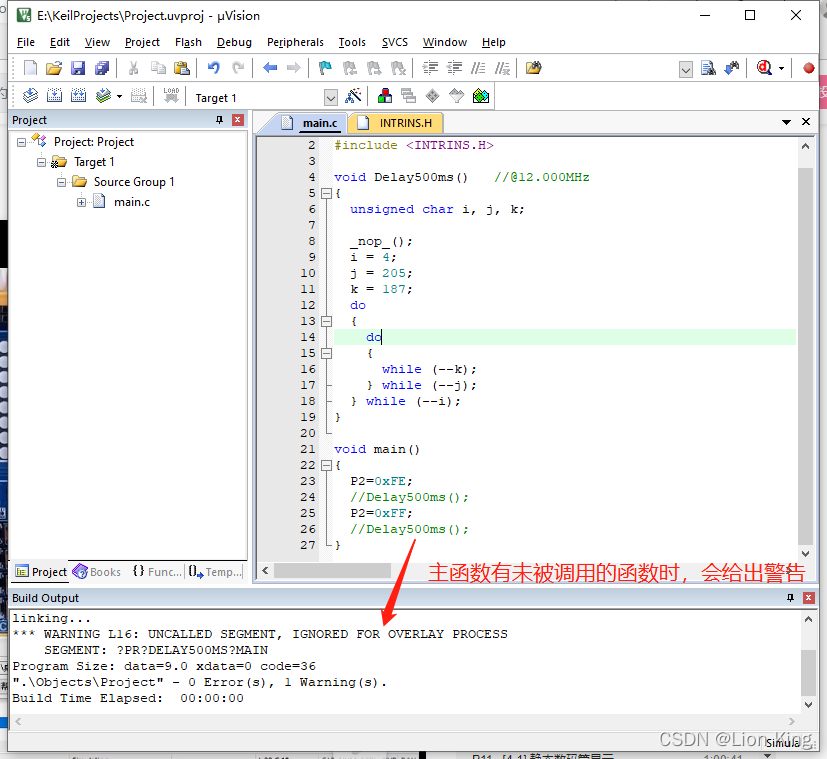
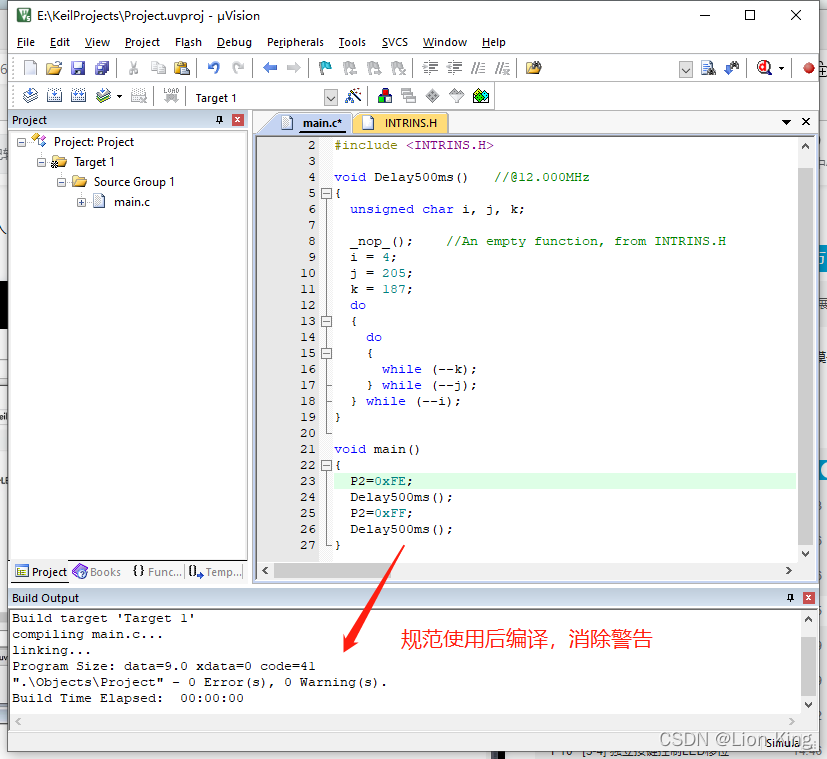
#include <INTRINS.H>void Delay500ms() //@12.000MHz
{unsigned char i, j, k;_nop_(); //An empty function, from INTRINS.Hi = 4;j = 205;k = 187;do{do{while (--k);} while (--j);} while (--i);
}void main()
{P2=0xFE;Delay500ms();P2=0xFF;Delay500ms();
}4、实验过程
五、单片机实操三:LED流水灯
1、在指定路径下创建工程并添加新文件
2、编写程序
让LED循环点亮,像流水一样
#include <STC89C5xRC.H>
#include <INTRINS.H>void Delay500ms()		//@12.000MHz
{unsigned char i, j, k;_nop_();i = 4;j = 205;k = 187;do{do{while (--k);} while (--j);} while (--i);
}void main()
{while(1){P2=0xFE;  //1111 1110Delay500ms();P2=0xFD;  //1111 1101Delay500ms();P2=0xFB;  //1111 1011Delay500ms();P2=0xF7;  //1111 0111Delay500ms();P2=0xEF;  //1110 1111Delay500ms();P2=0xDF;  //1101 1111Delay500ms();P2=0xBF;  //1011 1111Delay500ms();P2=0x7F;  //0111 1111Delay500ms();}
}
六、单片机实操四:LED流水灯Plus
1、在指定路径下创建工程并添加新文件
2、编写程序
将延时函数参数化。
#include <STC89C5xRC.H>
#include <INTRINS.H>void Delayxms(unsigned int xms) //@12.000MHz
{unsigned char i, j;while(xms){i = 2;j = 239;do{while (--j);} while (--i);xms--; //xms=xms-1}
}void main()
{while(1){P2=0xFE; //1111 1110Delayxms(500);P2=0xFD; //1111 1101Delayxms(500);P2=0xFB; //1111 1011Delayxms(500);P2=0xF7; //1111 0111Delayxms(500);P2=0xEF; //1110 1111Delayxms(500);P2=0xDF; //1101 1111Delayxms(500);P2=0xBF; //1011 1111Delayxms(500);P2=0x7F; //0111 1111Delayxms(500);}
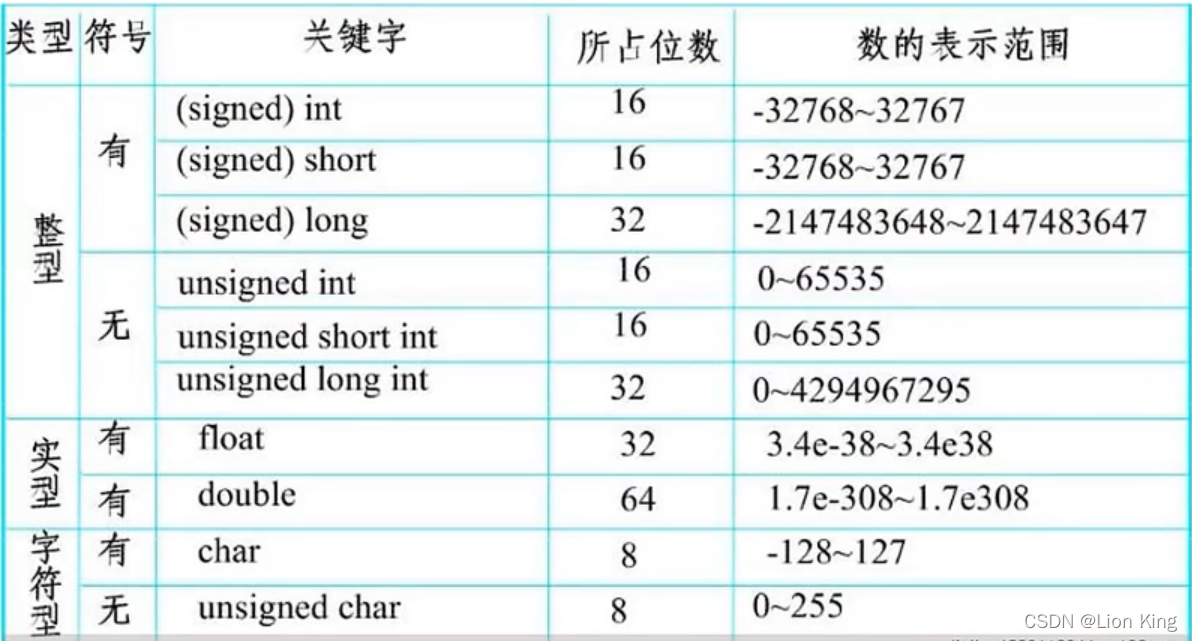
}3、51单片机的数据类型
我们在上面的程序中使用到了数据类型unsigned int xms,即xms在单片机中能表示0~65535
七、单片机实操五:独立按键控制LED灯亮灭
1、在指定路径下创建工程并添加新文件
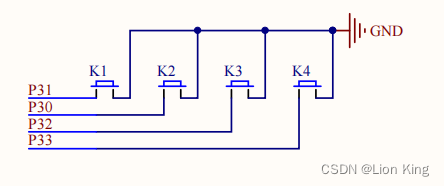
2、独立按键原理图
3、编写程序
按下按键亮灯,松开按键灭灯。
#include <STC89C5xRC.H>void main()
{while(1){if(P30==0){P20=0;}else{P20=1;}}
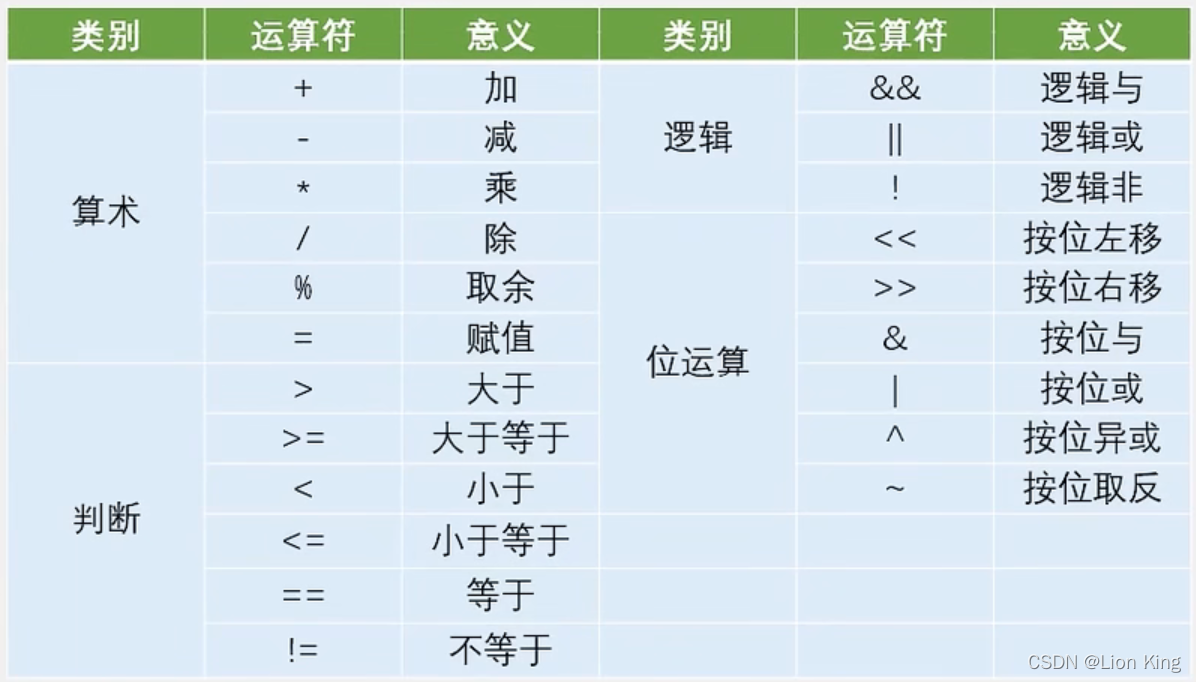
}4、51单片机数据运算
上述代码中,我们使用到了==这个运算符,表示等于。
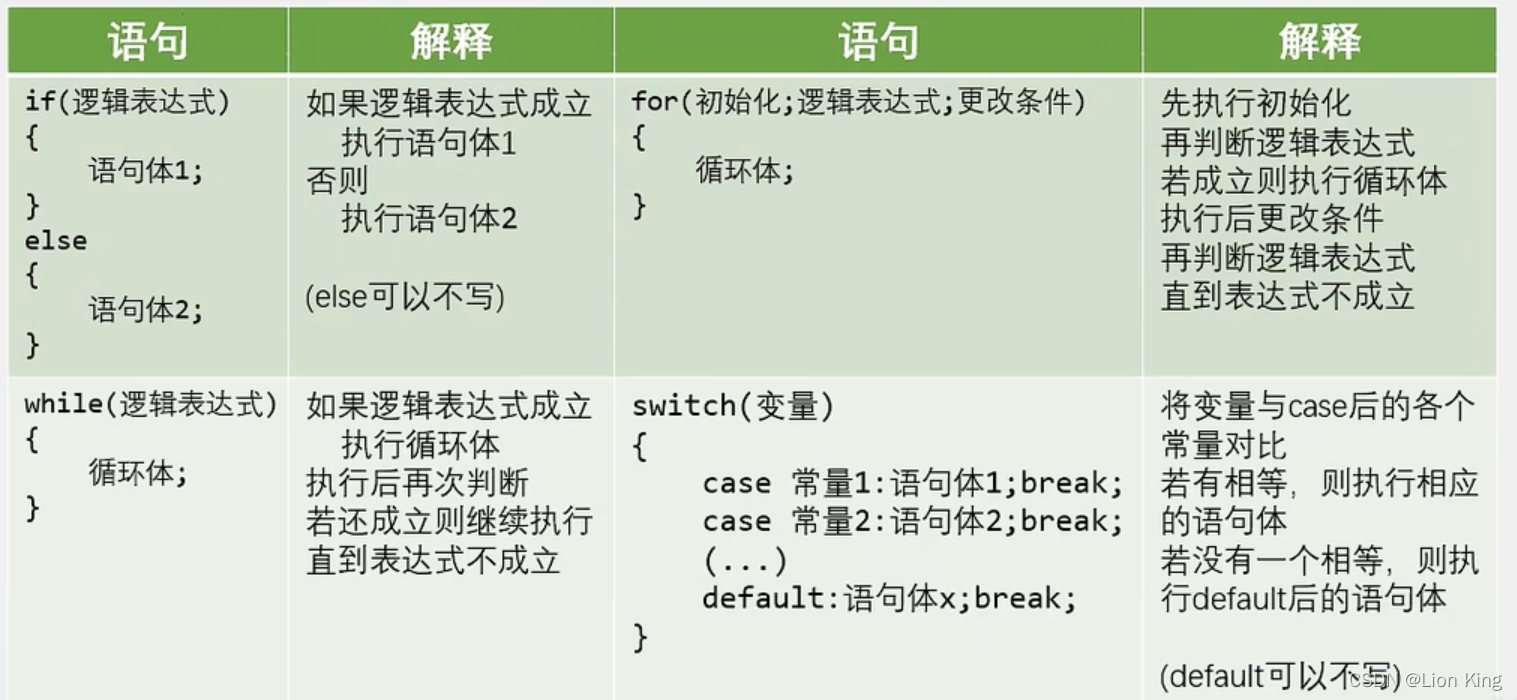
5、51单片机基本语句
上述程序用到了if语句,通过判断按键的动作来实现灯的亮灭
6、注意事项
程序写的是P30独立按键,根据原理图,需要按下K2才能点亮第一盏灯。(原理图设计者并没有按照顺序一一对应按键,这是设计者埋下的小坑)
P30是H文件中定义的,如果是其他H文件可能没有或者用另一个变量表示,这个时候需要你自己去写或者更改变量
八、单片机实操六:独立按键控制LED灯状态
1、在指定路径下创建工程并添加新文件
2、编写程序
按键消抖,检测松手,才改变LED灯的状态,使其松开按键后长亮或长灭。
#include <STC89C5xRC.H>void Delay(unsigned int xms)		//@12.000MHz
{unsigned char i, j;while(xms){i = 2;j = 239;do{while (--j);} while (--i);xms--;}
}void main()
{while(1){if(P31==0){Delay(20);  // Keys away shakingwhile(P31==0);Delay(20);  // Detection of let goP20=~P20;}}
}
九、单片机实操七:独立按键控制LED显示二进制
1、在指定路径下创建工程并添加新文件
2、编写程序
通过不停的按下按键,使得灯以二进制的方式,不断往上加一,达到用灯来表示按键次数
#include <STC89C5xRC.H>void Delay(unsigned int xms)		//@12.000MHz
{unsigned char i, j;while(xms){i = 2;j = 239;do{while (--j);} while (--i);xms--;}
}void main()
{unsigned char LEDNum=0;  // char max num is 255while(1){if(P31==0){Delay(20);while(P31==0);Delay(20);LEDNum++;P2=~LEDNum;}}
}
十、单片机实操八:独立按键控制LED移位
1、在指定路径下创建工程并添加新文件
2、编写程序
按下P31,往左边移一位;按下P30,往右边移一位,以LED灯来展示。
#include <STC89C5xRC.H>
void Delay(unsigned int xms); // must statementunsigned char LEDNum; // The global variablevoid main()
{P2=~0x01; //int P2while(1){if(P31==0){Delay(20);while(P31==0);Delay(20);LEDNum++;if(LEDNum>=8)LEDNum=0;P2=~(0x01<<LEDNum); // 0x01 of P2 need shift to the left LEDNum, and get the not}if(P30==0){Delay(20);while(P30==0);Delay(20);if(LEDNum==0)LEDNum=7;elseLEDNum--;P2=~(0x01<<LEDNum);}}
}void Delay(unsigned int xms) //@12.000MHz
{unsigned char i, j;while(xms){i = 2;j = 239;do{while (--j);} while (--i);xms--;}
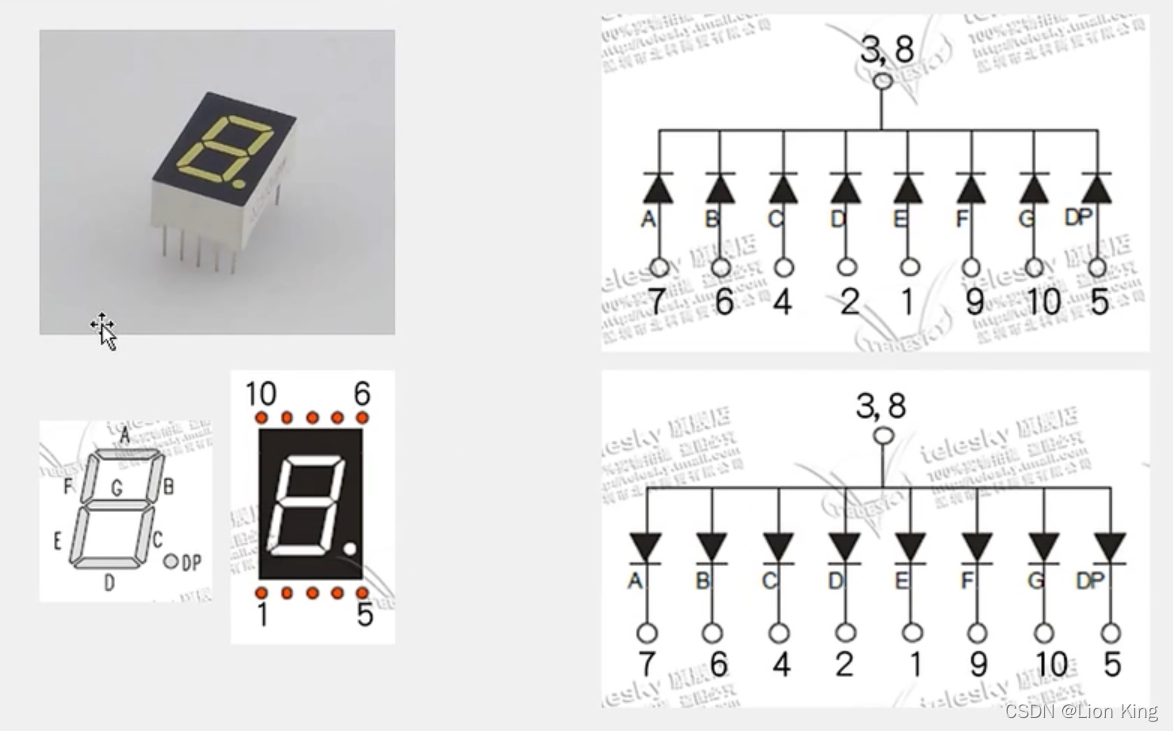
}十一、单片机实操九:静态数码管显示
1、在指定路径下创建工程并添加新文件
2、单个数码管引脚定义
数码管的接法,有共阳和共阴之分。共阴时,拉高电压即可点亮。共阳时,拉低电平点亮。
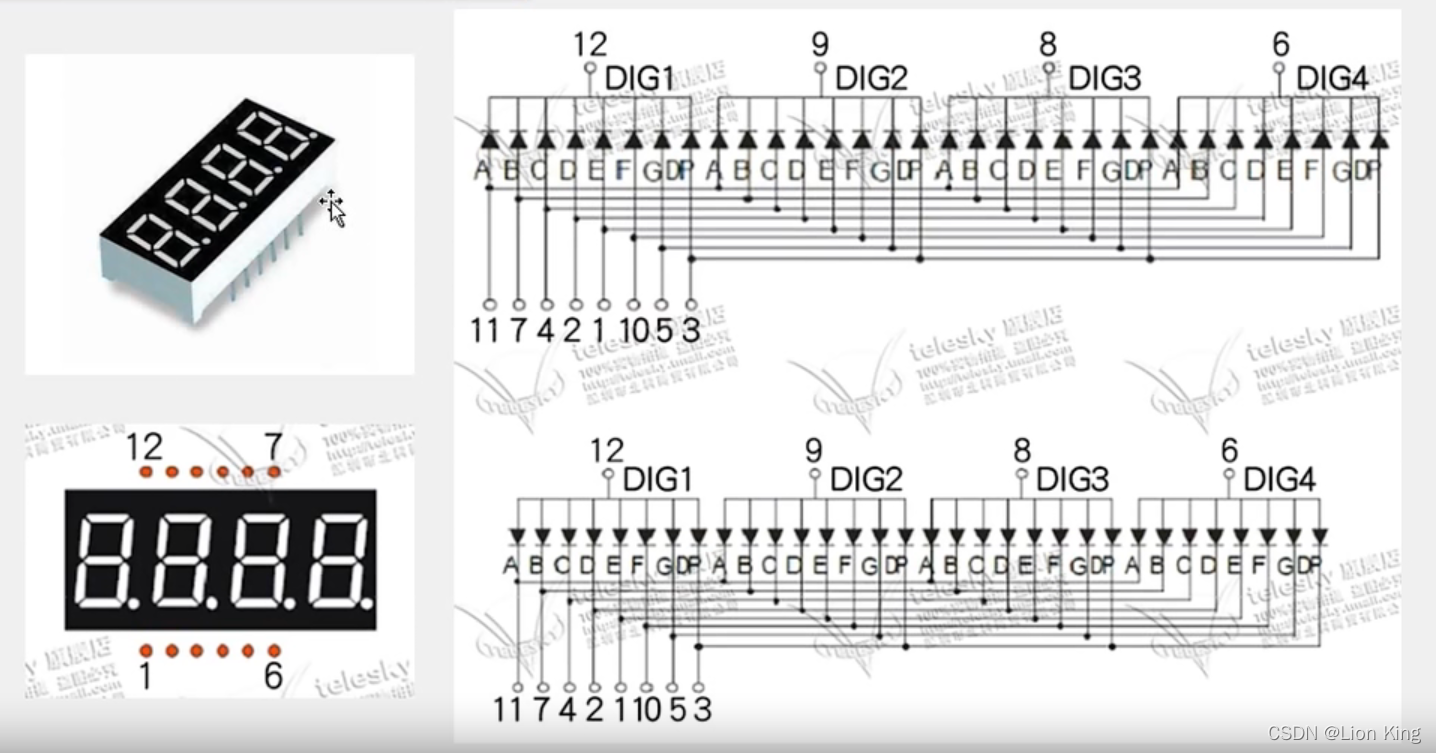
3、开发板四位一体的数码管引脚定义
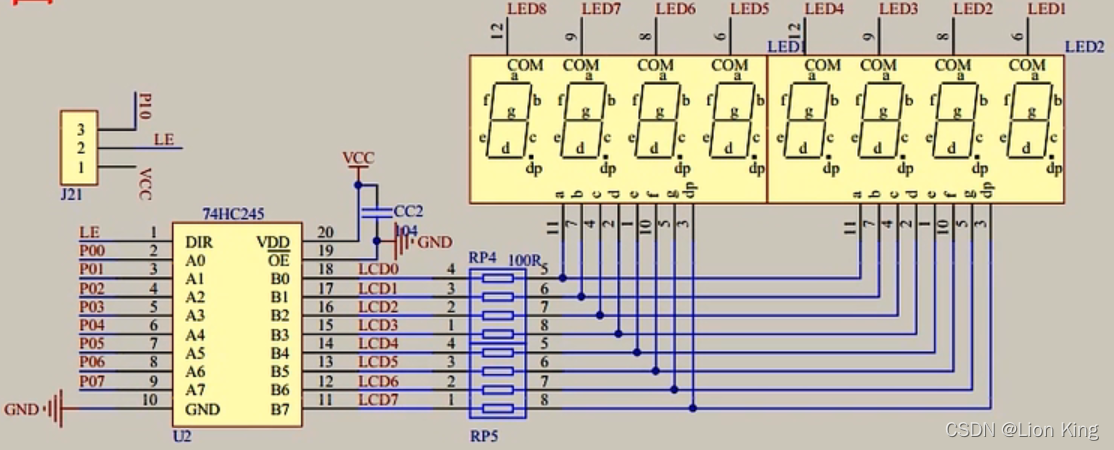
4、硬件原理图
138译码器控制数码管使能(使用3个单片机输入控制8个数码管显示),每个数字的一个笔画由双向数据缓存器245(单片机输出能力有限,需要该芯片提高输入能力)控制亮灭。
因此,首先控制P22~P24来选中数码管,然后选中数码管的笔画,最终呈现数据。

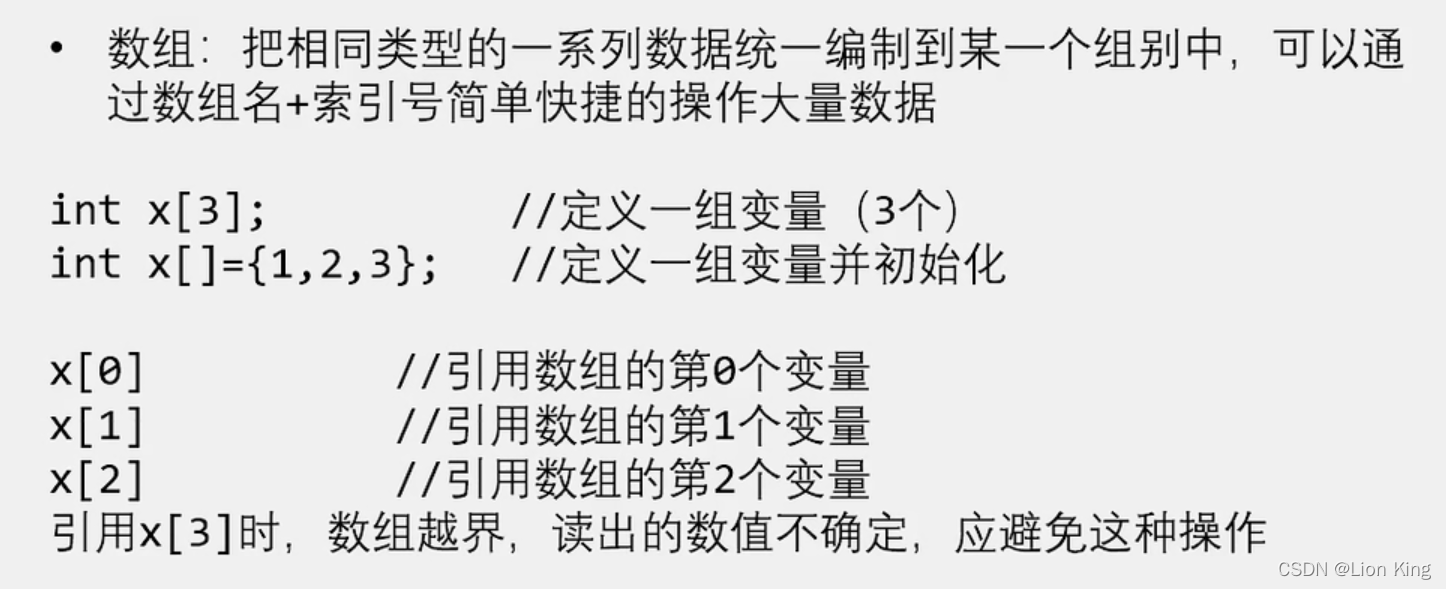
5、C51单片机数组
6、C51单片机子函数
7、数码管段码表(共阴极电路,共阳极则不一样)
8、编写程序
#include <STC89C5xRC.H>unsigned char NixieTable[]={0x3f,0x06,0x5b,0x4f,0x66,0x6d,0x7d,0x07,0x7f,0x6f,0x77,0x7c,0x39,0x5e,0x79,0x71, 0x00};void Nixie(unsigned char Location,Number)
{switch(Location){case 1:P24=1;P23=1;P22=1;break;case 2:P24=1;P23=1;P22=0;break;case 3:P24=1;P23=0;P22=1;break;case 4:P24=1;P23=0;P22=0;break;case 5:P24=0;P23=1;P22=1;break;case 6:P24=0;P23=1;P22=0;break;case 7:P24=0;P23=0;P22=1;break;case 8:P24=0;P23=0;P22=0;break;}P0=NixieTable[Number];
}void main()
{
//	P24=1;  //Controls a nixie tube
//	P23=0;
//	P22=1;
//	P0=0x7D;  //value is 6Nixie(2,3);while(1){}
}
十二、单片机实操十:动态数码管显示
1、在指定路径下创建工程并添加新文件
2、编写程序
动态清零,数字消影,来实现动态数码管显示,这是单片机不断扫描来成像的,将耗费大量CPU资源。因此,硬件电路一般会加1640的芯片来驱动,将大量减少扫描带来的CPU损耗。
#include <STC89C5xRC.H>unsigned char NixieTable[]={0x3f,0x06,0x5b,0x4f,0x66,0x6d,0x7d,0x07,0x7f,0x6f,0x77,0x7c,0x39,0x5e,0x79,0x71, 0x00};void Delay(unsigned int xms)		//@12.000MHz
{unsigned char i, j;while(xms){i = 2;j = 239;do{while (--j);} while (--i);xms--;}
}void Nixie(unsigned char Location,Number)
{switch(Location){case 1:P24=1;P23=1;P22=1;break;case 2:P24=1;P23=1;P22=0;break;case 3:P24=1;P23=0;P22=1;break;case 4:P24=1;P23=0;P22=0;break;case 5:P24=0;P23=1;P22=1;break;case 6:P24=0;P23=1;P22=0;break;case 7:P24=0;P23=0;P22=1;break;case 8:P24=0;P23=0;P22=0;break;}P0=NixieTable[Number];Delay(1);  // Shadow eliminationP0=0x00;  //  reset
}void main()
{while(1){Nixie(1,1);Nixie(2,2);Nixie(3,3);}
}
十三、单片机实操十一:模块化编程
1、在指定路径下创建工程并添加新文件
2、模块化编程
3、模块化编程框图
4、模块化编程注意事项
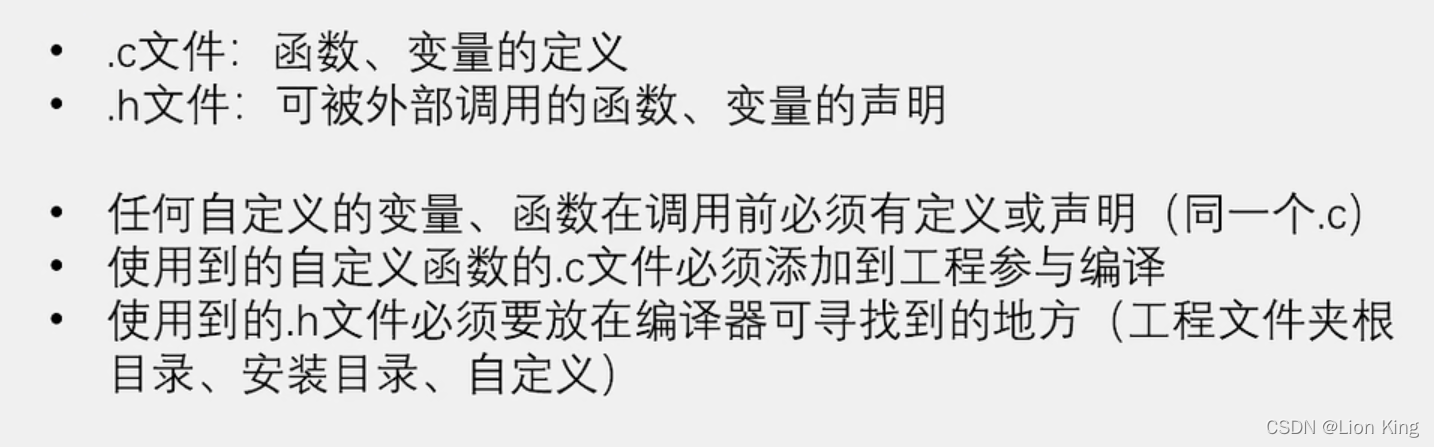
5、C预编译
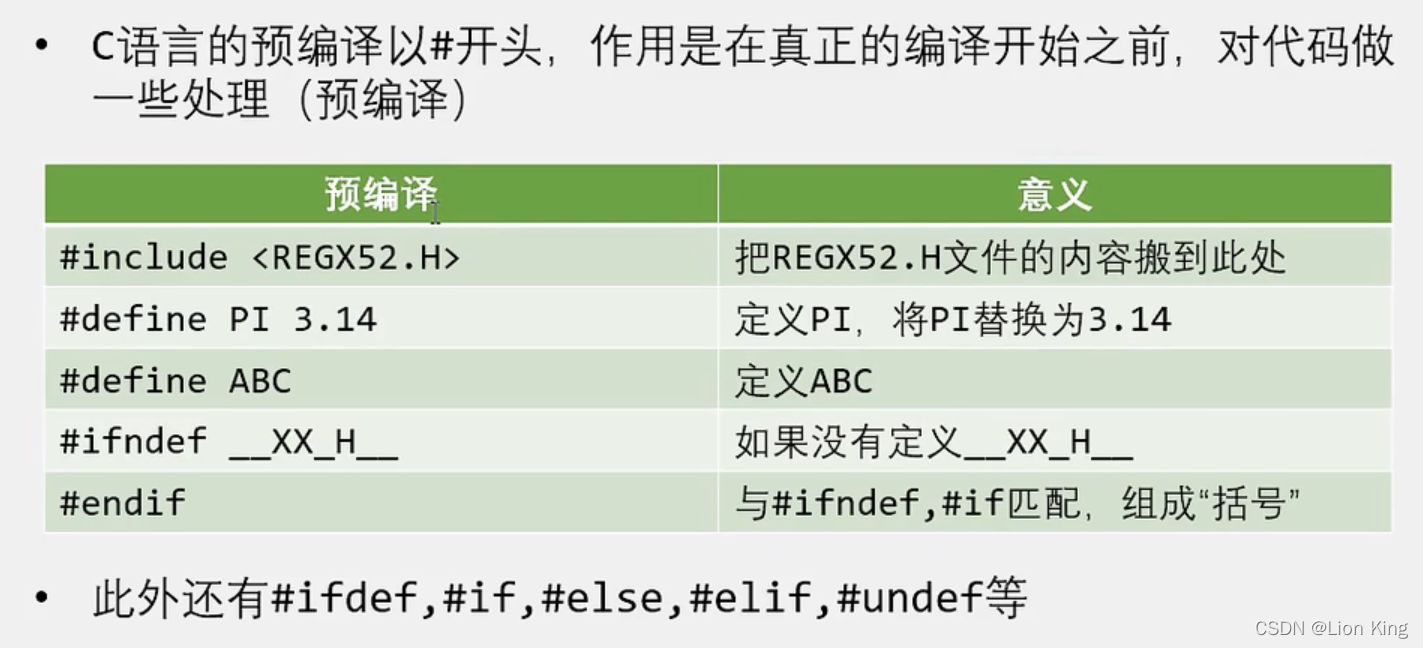
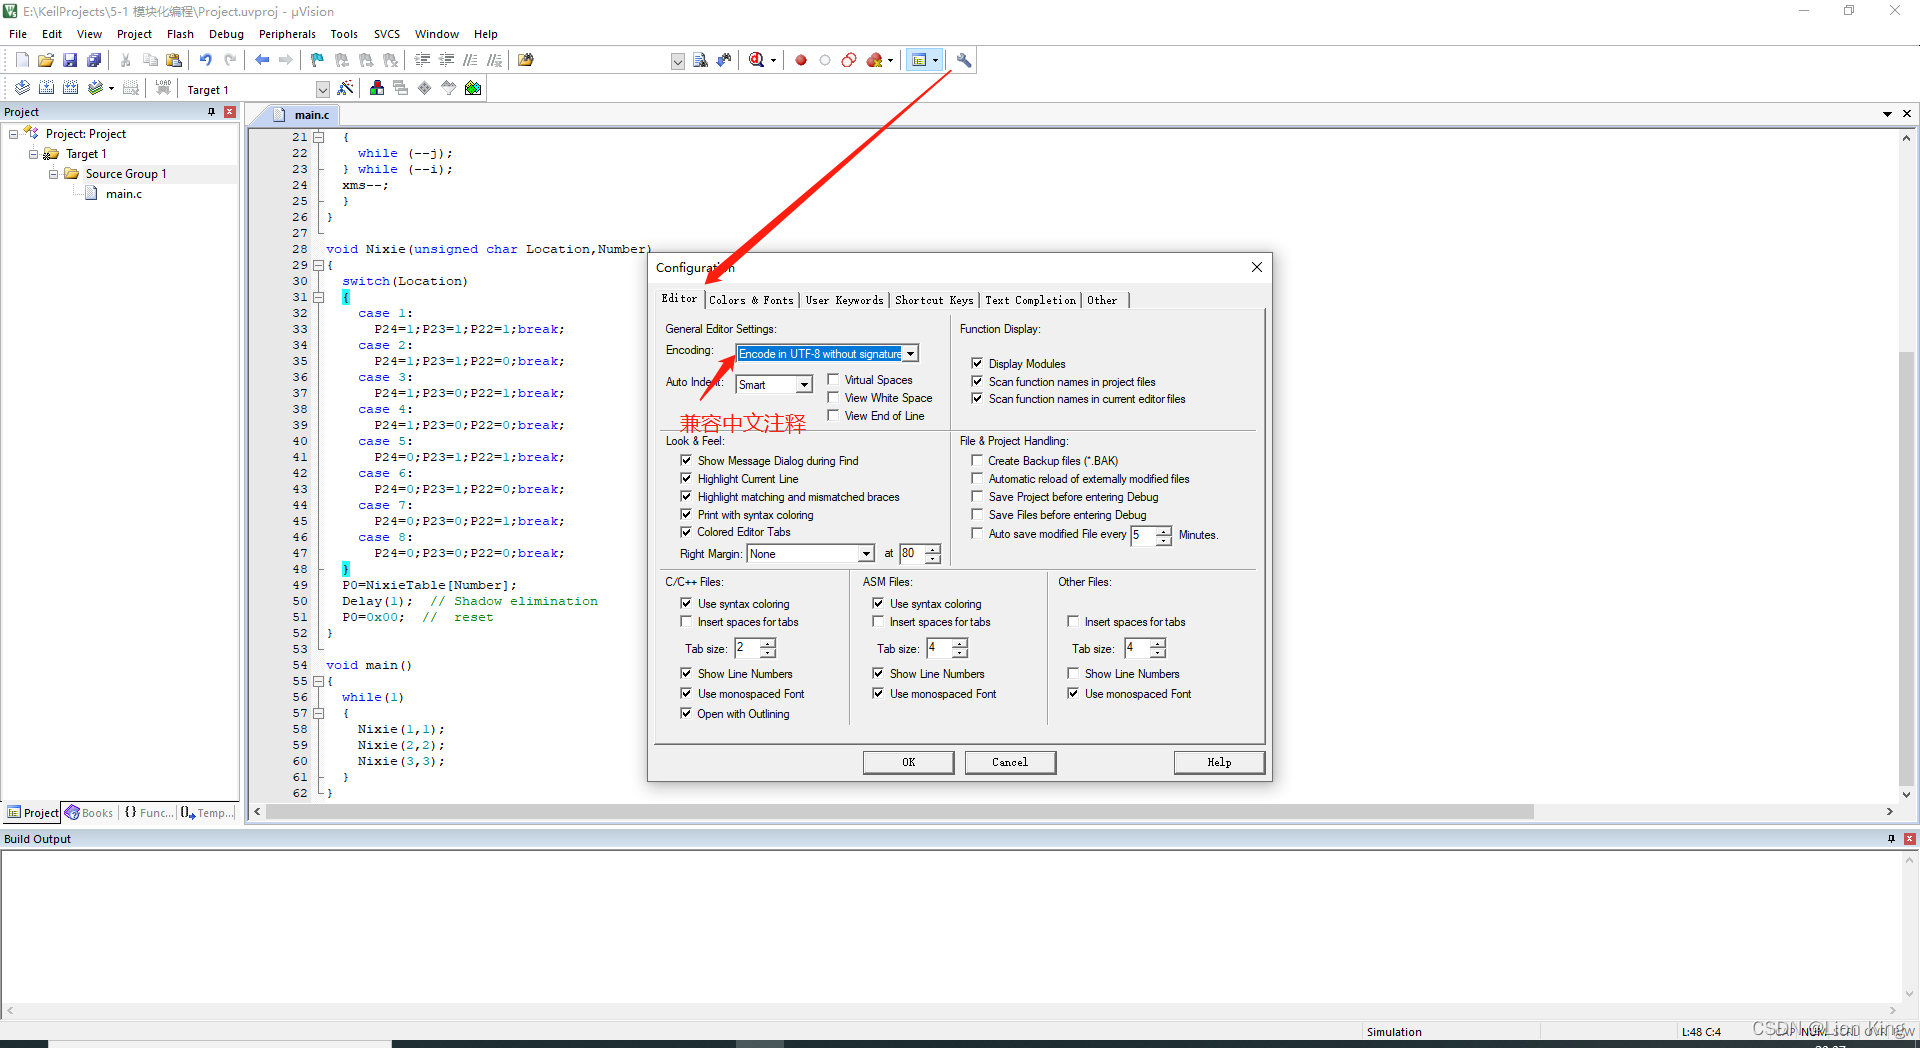
6、增加中文注释
7、编写代码
main.c
#include <STC89C5xRC.H>
#include "Delay.h"  // 使用双引号,优先查询工程目录
#include "Nixie.h" void main()
{while(1){Nixie(1,1);Nixie(2,2);Nixie(3,3);}
}
Delay.c
void Delay(unsigned int xms)		//@12.000MHz
{unsigned char i, j;while(xms){i = 2;j = 239;do{while (--j);} while (--i);xms--;}
}
Delay.h
#ifndef __DELAY_H__
#define __DELAY_H__void Delay(unsigned int xms);#endif
Nixie.c
#include <STC89C5xRC.H>
#include "Delay.h"unsigned char NixieTable[]={0x3f,0x06,0x5b,0x4f,0x66,0x6d,0x7d,0x07,0x7f,0x6f,0x77,0x7c,0x39,0x5e,0x79,0x71, 0x00};void Nixie(unsigned char Location,Number)
{switch(Location){case 1:P24=1;P23=1;P22=1;break;case 2:P24=1;P23=1;P22=0;break;case 3:P24=1;P23=0;P22=1;break;case 4:P24=1;P23=0;P22=0;break;case 5:P24=0;P23=1;P22=1;break;case 6:P24=0;P23=1;P22=0;break;case 7:P24=0;P23=0;P22=1;break;case 8:P24=0;P23=0;P22=0;break;}P0=NixieTable[Number];Delay(1);  // Shadow eliminationP0=0x00;  //  reset
}
Nixie.h
#ifndef __NIXIE_H__
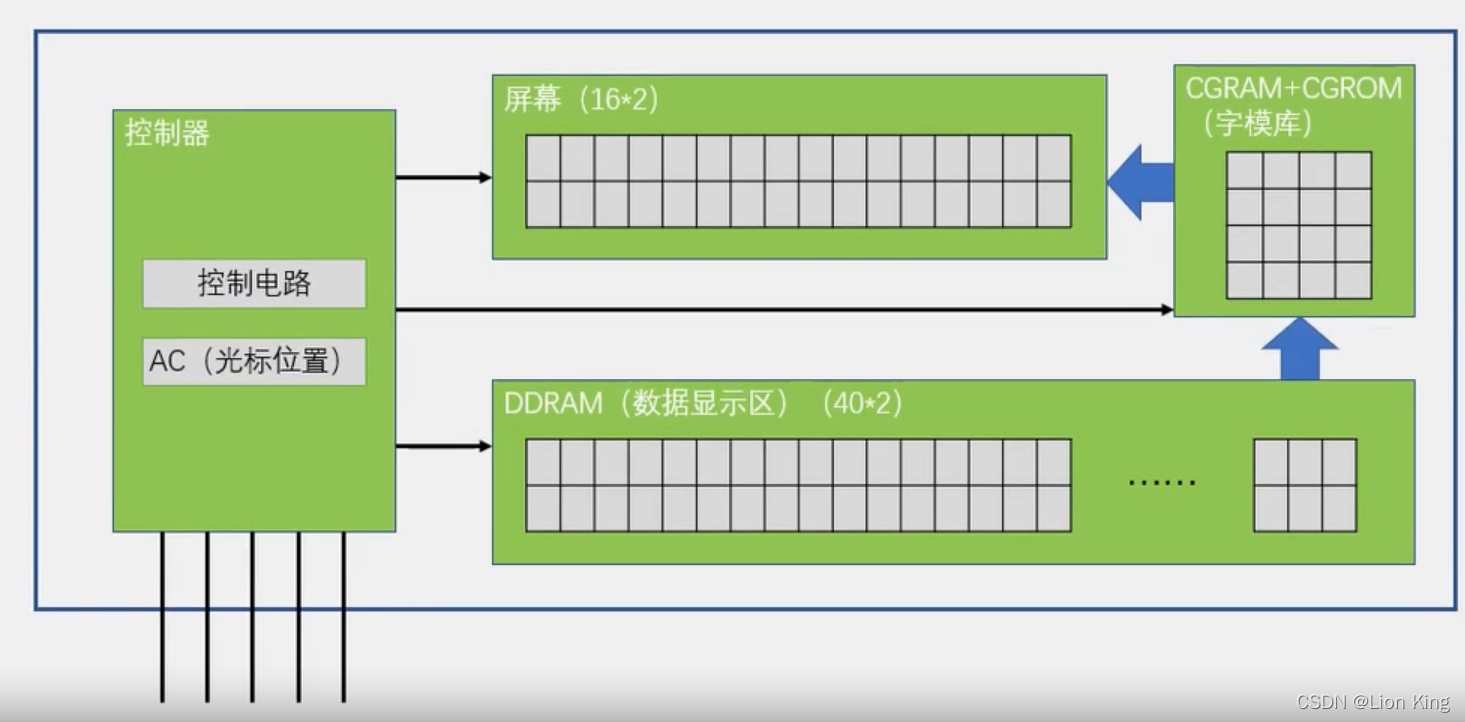
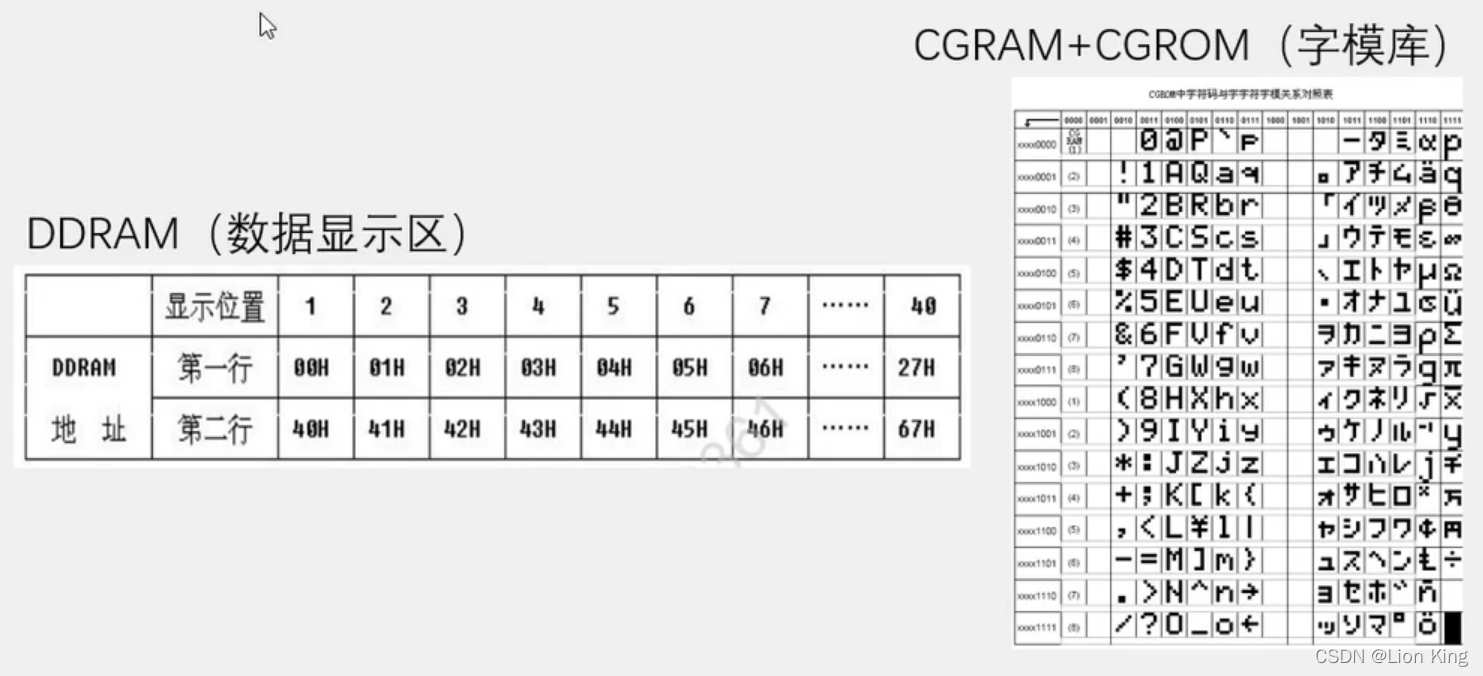
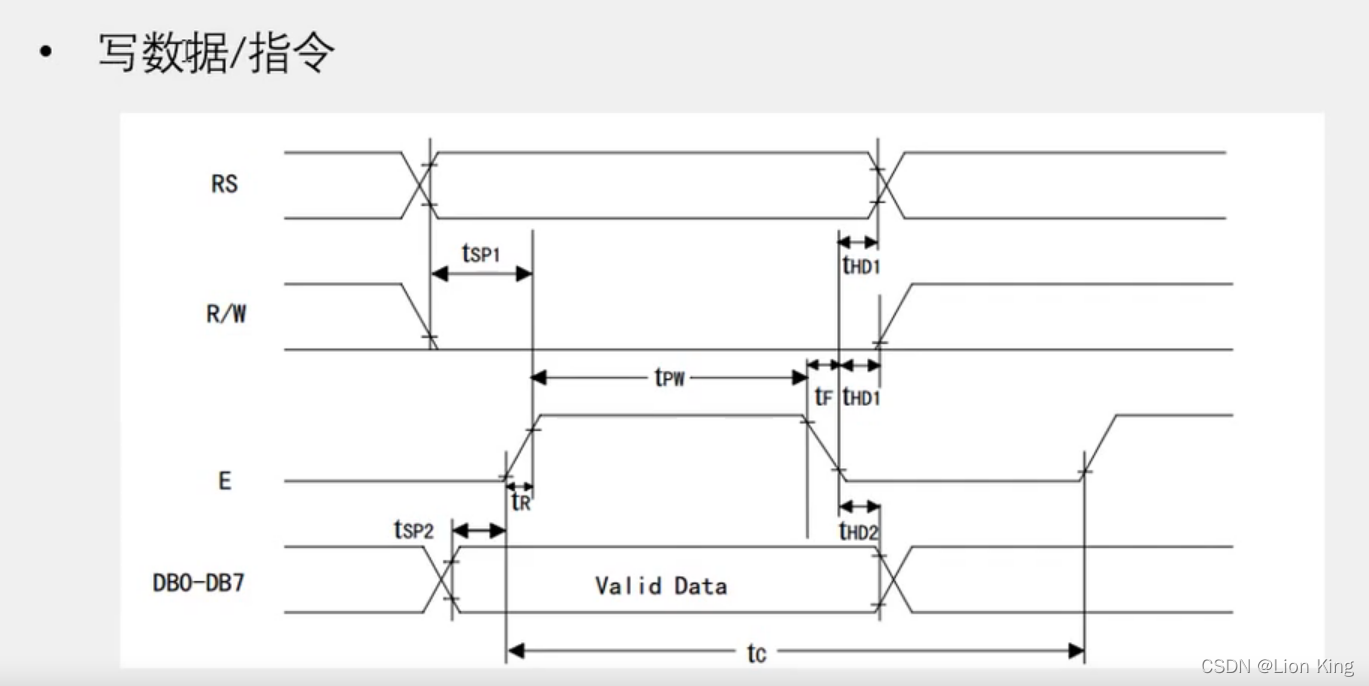
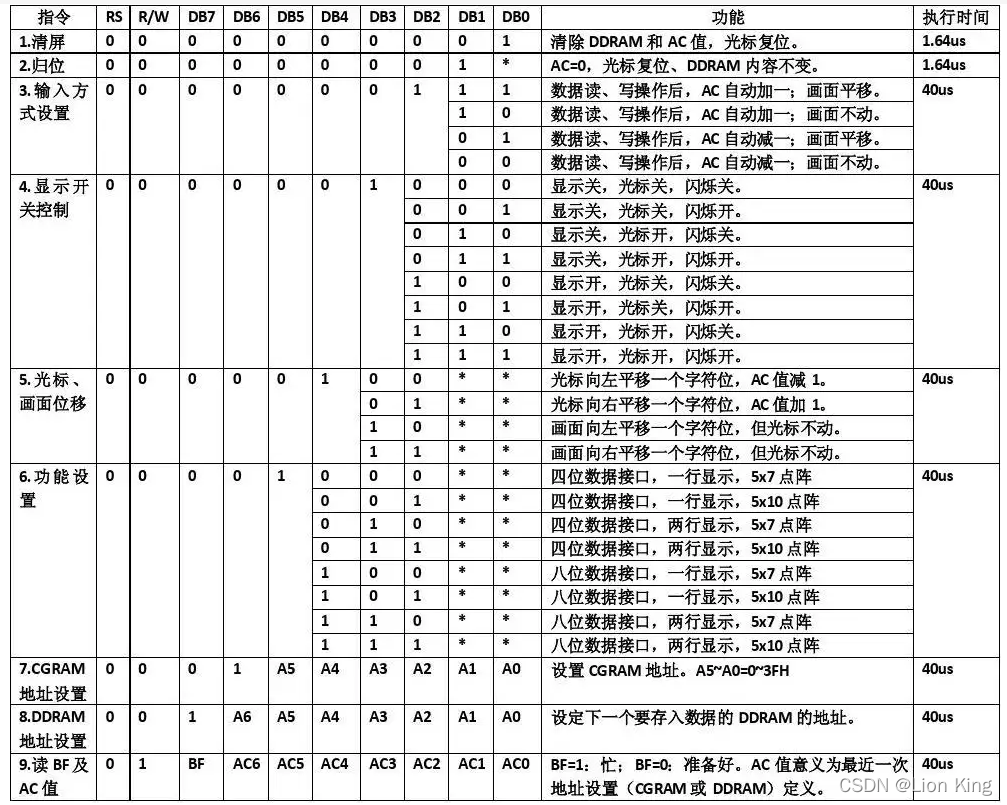
#define __NIXIE_H__void Nixie(unsigned char Location,Number);#endif十四、单片机实操十二:LCD1602调试工具
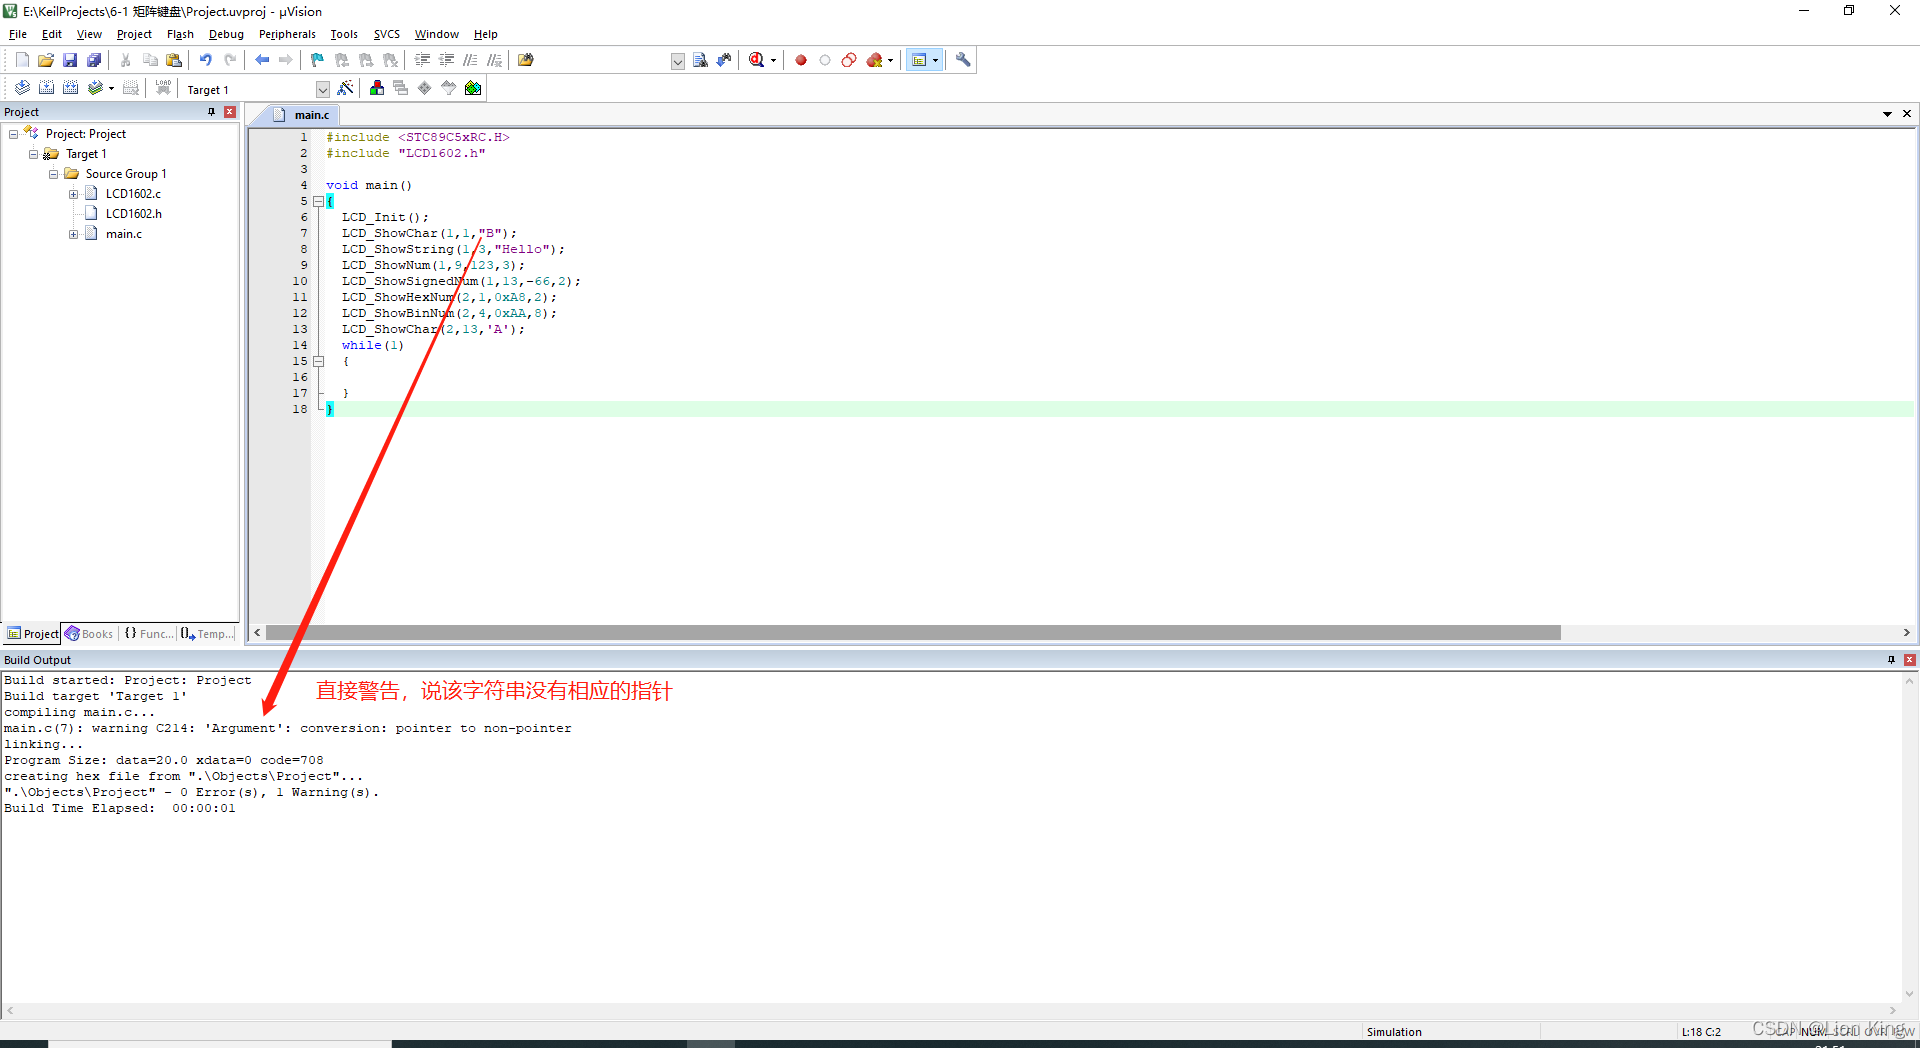
1、在指定路径下创建工程并添加新文件
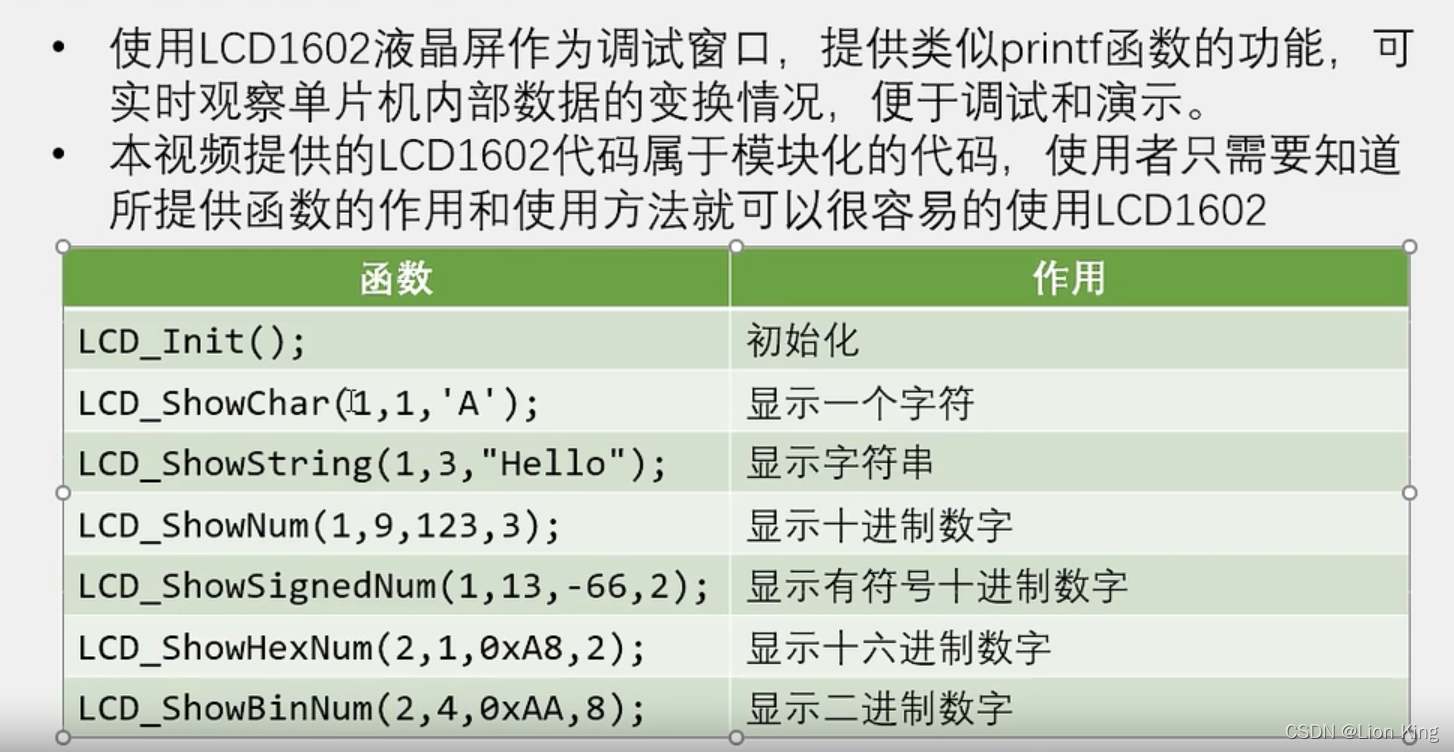
2、LCD1602调试工具
3、编写程序
main.c
#include <STC89C5xRC.H>
#include "LCD1602.h"void main()
{LCD_Init();LCD_ShowChar(1,1,'B');LCD_ShowString(1,3,"Hello");LCD_ShowNum(1,9,123,3);LCD_ShowSignedNum(1,13,-66,2);LCD_ShowHexNum(2,1,0xA8,2);LCD_ShowBinNum(2,4,0xAA,8);LCD_ShowChar(2,13,'A');while(1){}
}
LCD1602.c
#include <STC89C5xRC.H>//引脚配置:
sbit LCD_RS=P2^6;
sbit LCD_RW=P2^5;
sbit LCD_EN=P2^7;
#define LCD_DataPort P0//函数定义:
/*** @brief LCD1602延时函数,12MHz调用可延时1ms* @param 无* @retval 无*/
void LCD_Delay()
{unsigned char i, j;i = 2;j = 239;do{while (--j);} while (--i);
}/*** @brief LCD1602写命令* @param Command 要写入的命令* @retval 无*/
void LCD_WriteCommand(unsigned char Command)
{LCD_RS=0;LCD_RW=0;LCD_DataPort=Command;LCD_EN=1;LCD_Delay();LCD_EN=0;LCD_Delay();
}/*** @brief LCD1602写数据* @param Data 要写入的数据* @retval 无*/
void LCD_WriteData(unsigned char Data)
{LCD_RS=1;LCD_RW=0;LCD_DataPort=Data;LCD_EN=1;LCD_Delay();LCD_EN=0;LCD_Delay();
}/*** @brief LCD1602设置光标位置* @param Line 行位置,范围:1~2* @param Column 列位置,范围:1~16* @retval 无*/
void LCD_SetCursor(unsigned char Line,unsigned char Column)
{if(Line==1){LCD_WriteCommand(0x80|(Column-1));}else if(Line==2){LCD_WriteCommand(0x80|(Column-1+0x40));}
}/*** @brief LCD1602初始化函数* @param 无* @retval 无*/
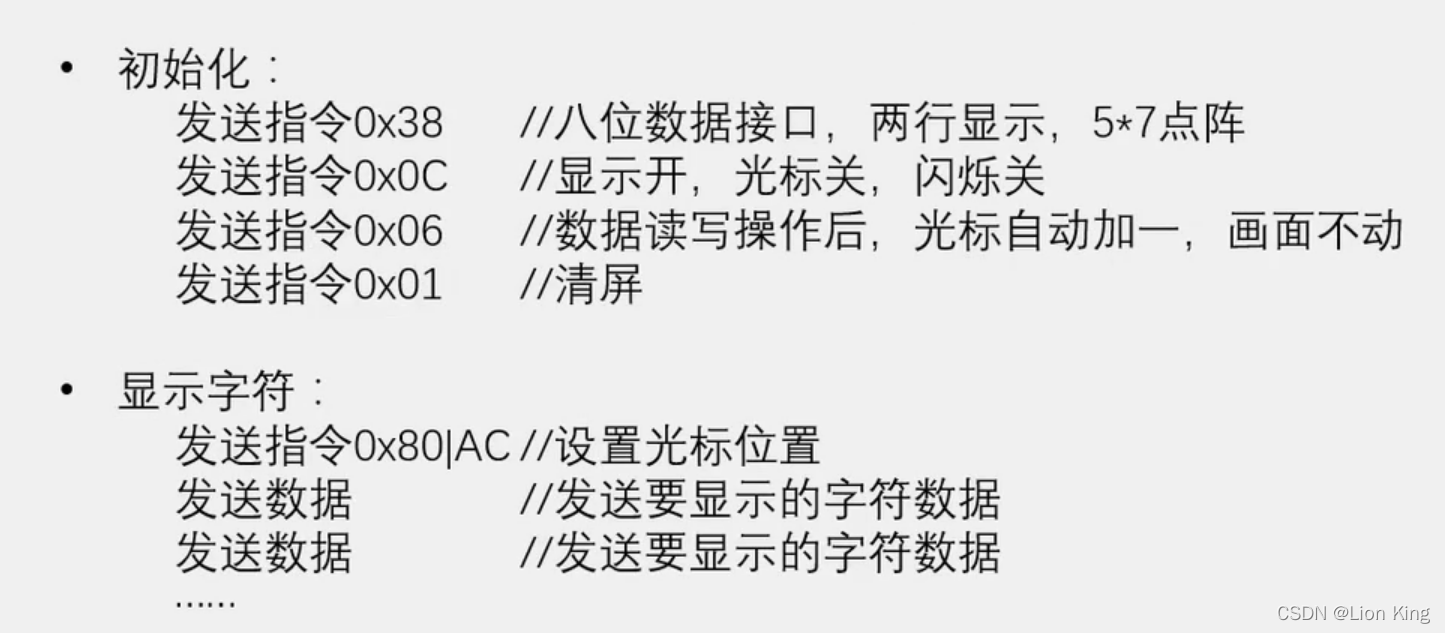
void LCD_Init()
{LCD_WriteCommand(0x38);//八位数据接口,两行显示,5*7点阵LCD_WriteCommand(0x0c);//显示开,光标关,闪烁关LCD_WriteCommand(0x06);//数据读写操作后,光标自动加一,画面不动LCD_WriteCommand(0x01);//光标复位,清屏
}/*** @brief 在LCD1602指定位置上显示一个字符* @param Line 行位置,范围:1~2* @param Column 列位置,范围:1~16* @param Char 要显示的字符* @retval 无*/
void LCD_ShowChar(unsigned char Line,unsigned char Column,char Char)
{LCD_SetCursor(Line,Column);LCD_WriteData(Char);
}/*** @brief 在LCD1602指定位置开始显示所给字符串* @param Line 起始行位置,范围:1~2* @param Column 起始列位置,范围:1~16* @param String 要显示的字符串* @retval 无*/
void LCD_ShowString(unsigned char Line,unsigned char Column,char *String)
{unsigned char i;LCD_SetCursor(Line,Column);for(i=0;String[i]!='\0';i++){LCD_WriteData(String[i]);}
}/*** @brief 返回值=X的Y次方*/
int LCD_Pow(int X,int Y)
{unsigned char i;int Result=1;for(i=0;i<Y;i++){Result*=X;}return Result;
}/*** @brief 在LCD1602指定位置开始显示所给数字* @param Line 起始行位置,范围:1~2* @param Column 起始列位置,范围:1~16* @param Number 要显示的数字,范围:0~65535* @param Length 要显示数字的长度,范围:1~5* @retval 无*/
void LCD_ShowNum(unsigned char Line,unsigned char Column,unsigned int Number,unsigned char Length)
{unsigned char i;LCD_SetCursor(Line,Column);for(i=Length;i>0;i--){LCD_WriteData(Number/LCD_Pow(10,i-1)%10+'0');}
}/*** @brief 在LCD1602指定位置开始以有符号十进制显示所给数字* @param Line 起始行位置,范围:1~2* @param Column 起始列位置,范围:1~16* @param Number 要显示的数字,范围:-32768~32767* @param Length 要显示数字的长度,范围:1~5* @retval 无*/
void LCD_ShowSignedNum(unsigned char Line,unsigned char Column,int Number,unsigned char Length)
{unsigned char i;unsigned int Number1;LCD_SetCursor(Line,Column);if(Number>=0){LCD_WriteData('+');Number1=Number;}else{LCD_WriteData('-');Number1=-Number;}for(i=Length;i>0;i--){LCD_WriteData(Number1/LCD_Pow(10,i-1)%10+'0');}
}/*** @brief 在LCD1602指定位置开始以十六进制显示所给数字* @param Line 起始行位置,范围:1~2* @param Column 起始列位置,范围:1~16* @param Number 要显示的数字,范围:0~0xFFFF* @param Length 要显示数字的长度,范围:1~4* @retval 无*/
void LCD_ShowHexNum(unsigned char Line,unsigned char Column,unsigned int Number,unsigned char Length)
{unsigned char i,SingleNumber;LCD_SetCursor(Line,Column);for(i=Length;i>0;i--){SingleNumber=Number/LCD_Pow(16,i-1)%16;if(SingleNumber<10){LCD_WriteData(SingleNumber+'0');}else{LCD_WriteData(SingleNumber-10+'A');}}
}/*** @brief 在LCD1602指定位置开始以二进制显示所给数字* @param Line 起始行位置,范围:1~2* @param Column 起始列位置,范围:1~16* @param Number 要显示的数字,范围:0~1111 1111 1111 1111* @param Length 要显示数字的长度,范围:1~16* @retval 无*/
void LCD_ShowBinNum(unsigned char Line,unsigned char Column,unsigned int Number,unsigned char Length)
{unsigned char i;LCD_SetCursor(Line,Column);for(i=Length;i>0;i--){LCD_WriteData(Number/LCD_Pow(2,i-1)%2+'0');}
}
LCD1602.h
#ifndef __LCD1602_H__
#define __LCD1602_H__//用户调用函数:
void LCD_Init();
void LCD_ShowChar(unsigned char Line,unsigned char Column,char Char);
void LCD_ShowString(unsigned char Line,unsigned char Column,char *String);
void LCD_ShowNum(unsigned char Line,unsigned char Column,unsigned int Number,unsigned char Length);
void LCD_ShowSignedNum(unsigned char Line,unsigned char Column,int Number,unsigned char Length);
void LCD_ShowHexNum(unsigned char Line,unsigned char Column,unsigned int Number,unsigned char Length);
void LCD_ShowBinNum(unsigned char Line,unsigned char Column,unsigned int Number,unsigned char Length);#endif
4、注意事项
单引号和双引号都有全角和半角之分,全角的又叫中文字符,半角的又称英文字符。在c语言中,全角字符没有任何意义,它就是一个普通字符,没有含义;半角字符才有不同的意义:
双引号用来括起一个字符串,如"China";
单引号原来括起一个字符,如'f'。
二者含义不同,不能混用。
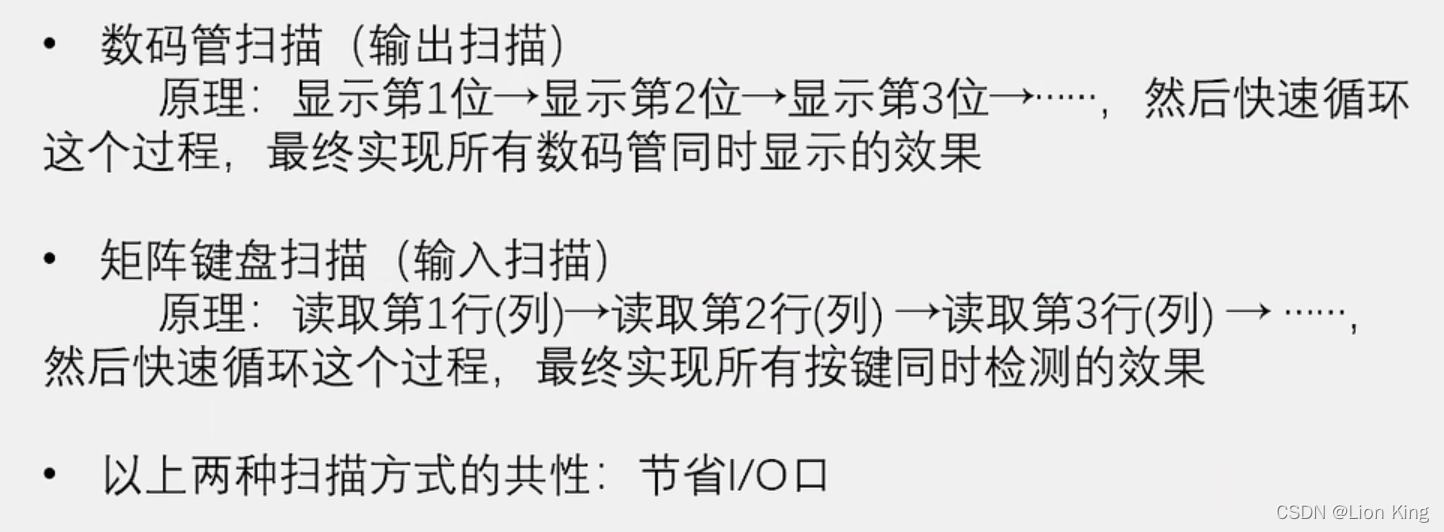
十五、单片机实操十三:矩阵键盘
1、在指定路径下创建工程并添加新文件
2、矩阵键盘介绍
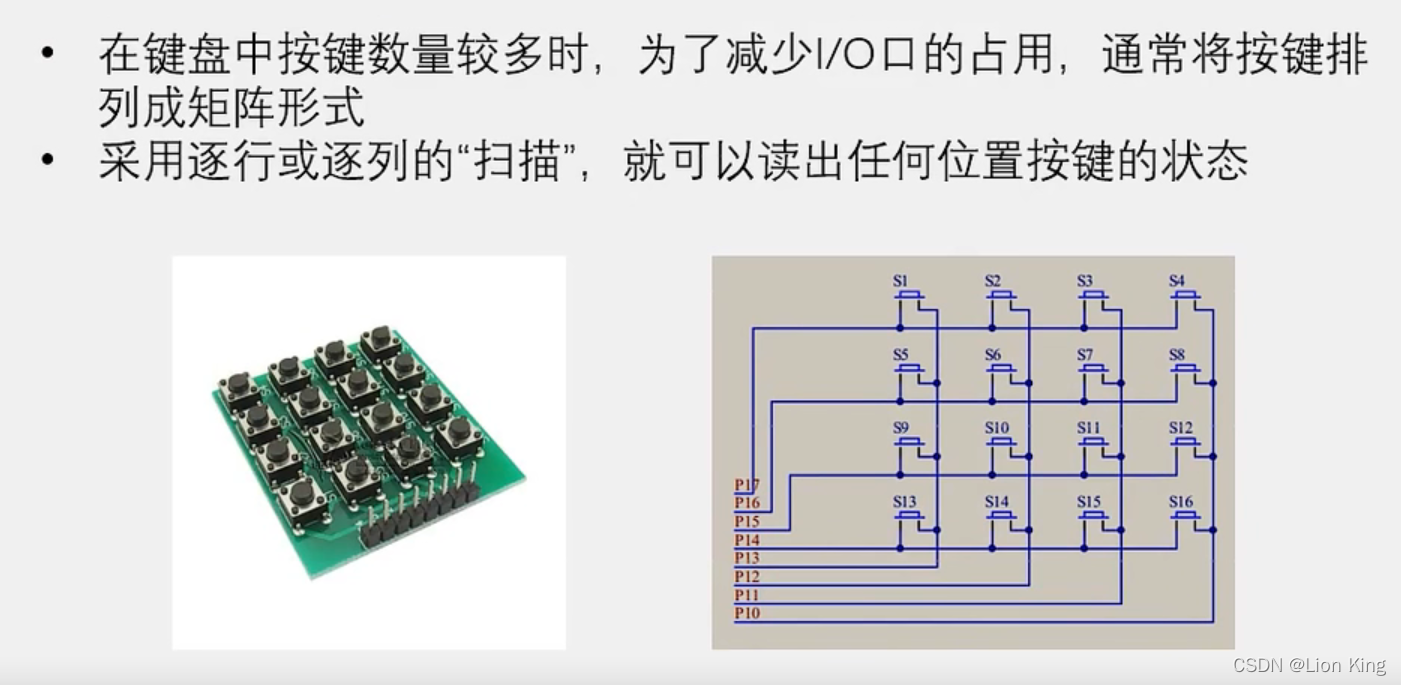
3、扫描的概念
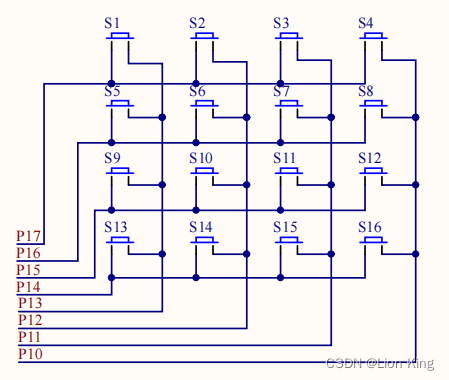
4、硬件连线
我们想选取1、5、9、13,即第一列,可以先把P1全部置为高,即全部拉高;接着让P13拉低,则选中了第一列。其他也这样操作。
5、编写程序
main.c
#include <STC89C5xRC.H>
#include "LCD1602.h"
#include "Delay.h"
#include "MatrixKey.h"unsigned char KeyNum;void main()
{LCD_Init();
//	LCD_ShowChar(1,1,'B');LCD_ShowString(1,3,"MatrixKey:");
//	LCD_ShowNum(1,9,123,3);
//	LCD_ShowSignedNum(1,13,-66,2);
//	LCD_ShowHexNum(2,1,0xA8,2);
//	LCD_ShowBinNum(2,4,0xAA,8);
//	LCD_ShowChar(2,13,'A');while(1){KeyNum=MatrixKey();if(KeyNum){LCD_ShowNum(2,3,KeyNum,2);}}
}
MatrixKey.c
#include <STC89C5xRC.H>
#include "Delay.h"unsigned char MatrixKey()
{unsigned char KeyNumber=0;P1=0xFF;P13=0;if(P17==0){Delay(20);while(P17==0);Delay(20);KeyNumber=1;}if(P16==0){Delay(20);while(P16==0);Delay(20);KeyNumber=5;}if(P15==0){Delay(20);while(P15==0);Delay(20);KeyNumber=9;}if(P14==0){Delay(20);while(P14==0);Delay(20);KeyNumber=13;}P1=0xFF;P12=0;if(P17==0){Delay(20);while(P17==0);Delay(20);KeyNumber=2;}if(P16==0){Delay(20);while(P16==0);Delay(20);KeyNumber=6;}if(P15==0){Delay(20);while(P15==0);Delay(20);KeyNumber=10;}if(P14==0){Delay(20);while(P14==0);Delay(20);KeyNumber=14;}P1=0xFF;P11=0;if(P17==0){Delay(20);while(P17==0);Delay(20);KeyNumber=3;}if(P16==0){Delay(20);while(P16==0);Delay(20);KeyNumber=7;}if(P15==0){Delay(20);while(P15==0);Delay(20);KeyNumber=11;}if(P14==0){Delay(20);while(P14==0);Delay(20);KeyNumber=15;}P1=0xFF;P10=0;if(P17==0){Delay(20);while(P17==0);Delay(20);KeyNumber=4;}if(P16==0){Delay(20);while(P16==0);Delay(20);KeyNumber=8;}if(P15==0){Delay(20);while(P15==0);Delay(20);KeyNumber=12;}if(P14==0){Delay(20);while(P14==0);Delay(20);KeyNumber=16;}return KeyNumber;
}
MatrixKey.h
#ifndef __MATRIXKEY_H__
#define __MATRIXKEY_H__unsigned char MatrixKey();#endif
其它文件:复制之前写的模块即可。
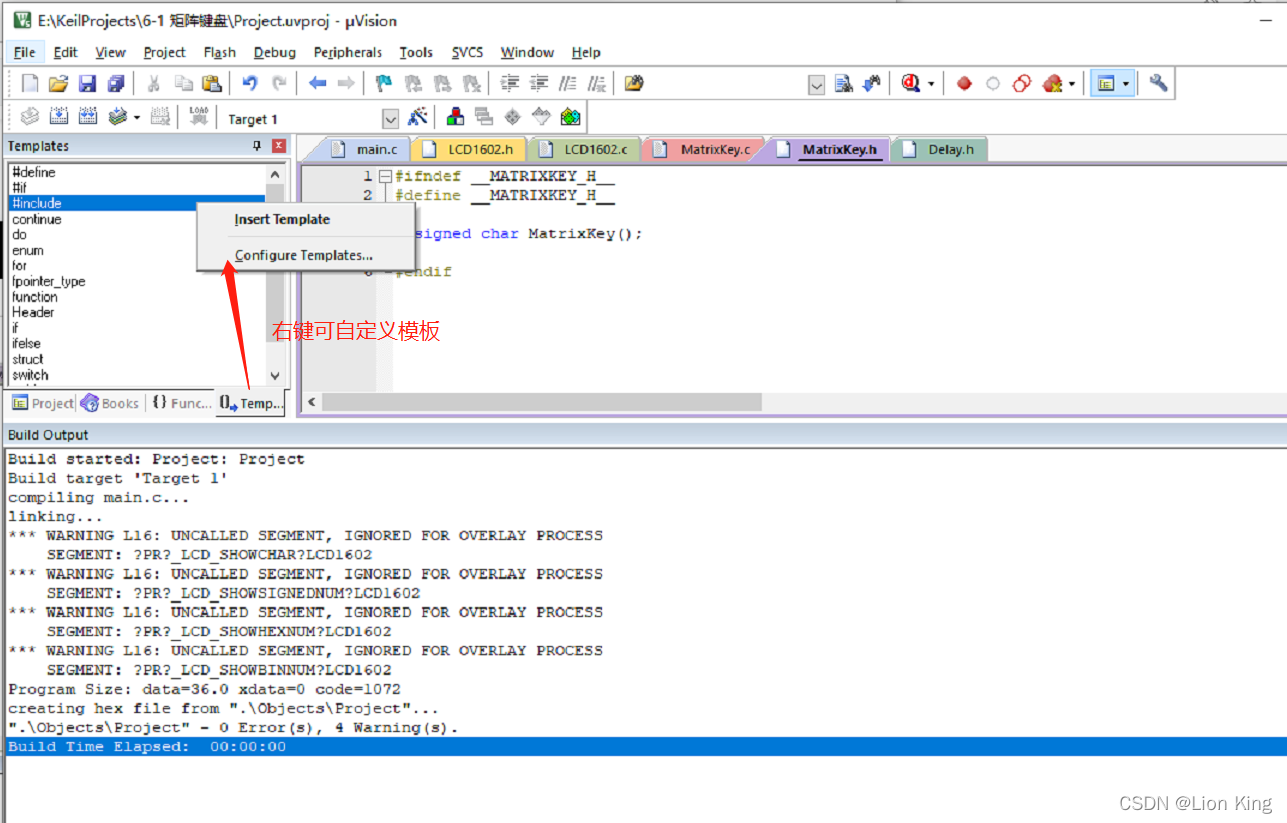
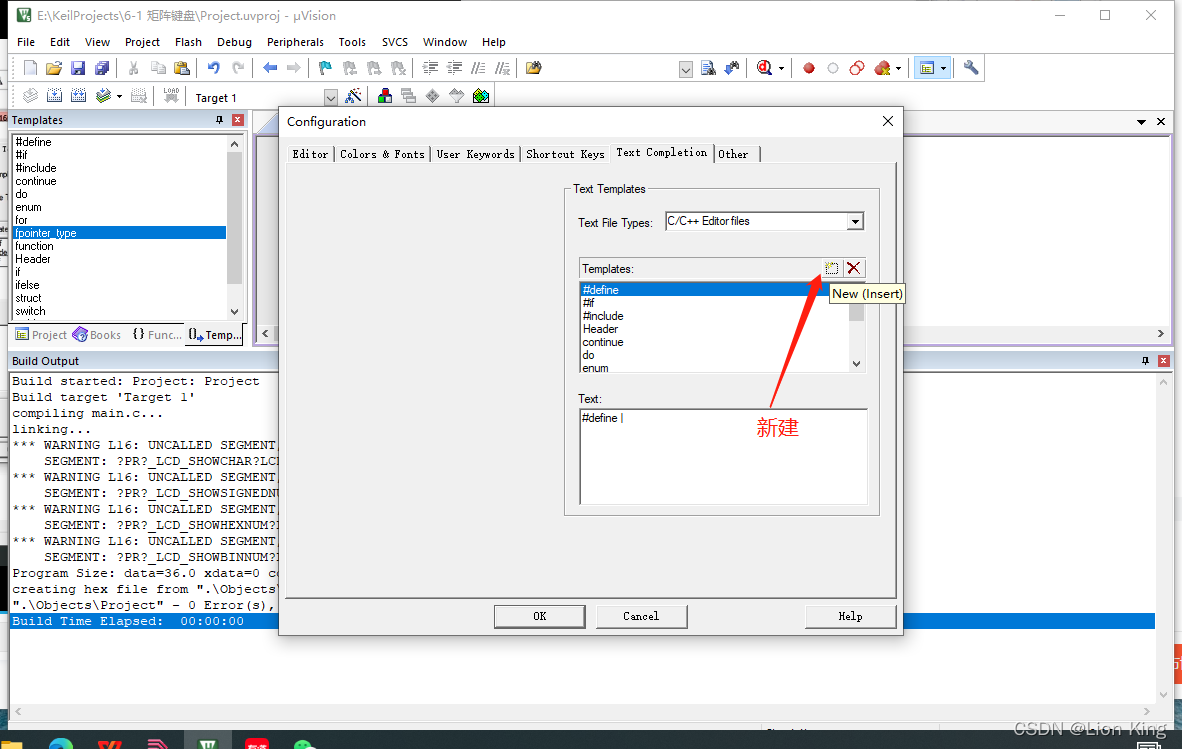
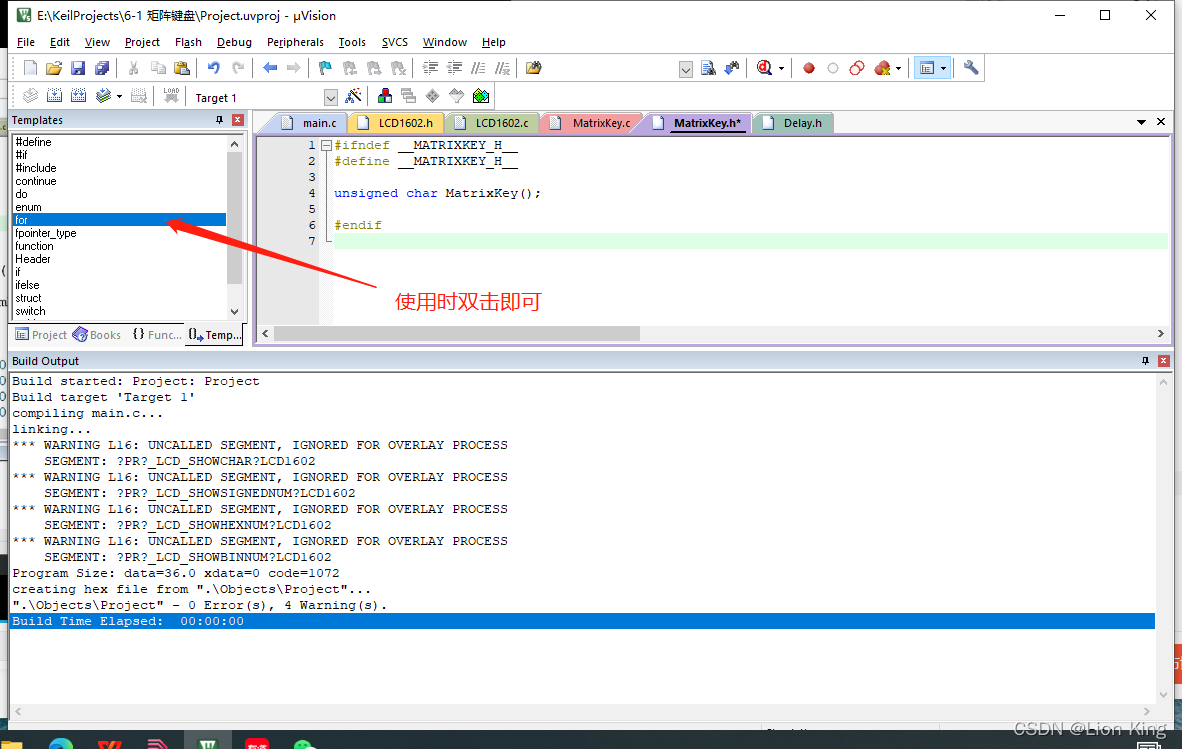
6、软件使用技巧:配置模板
十六、单片机实操十四:矩阵键盘密码锁
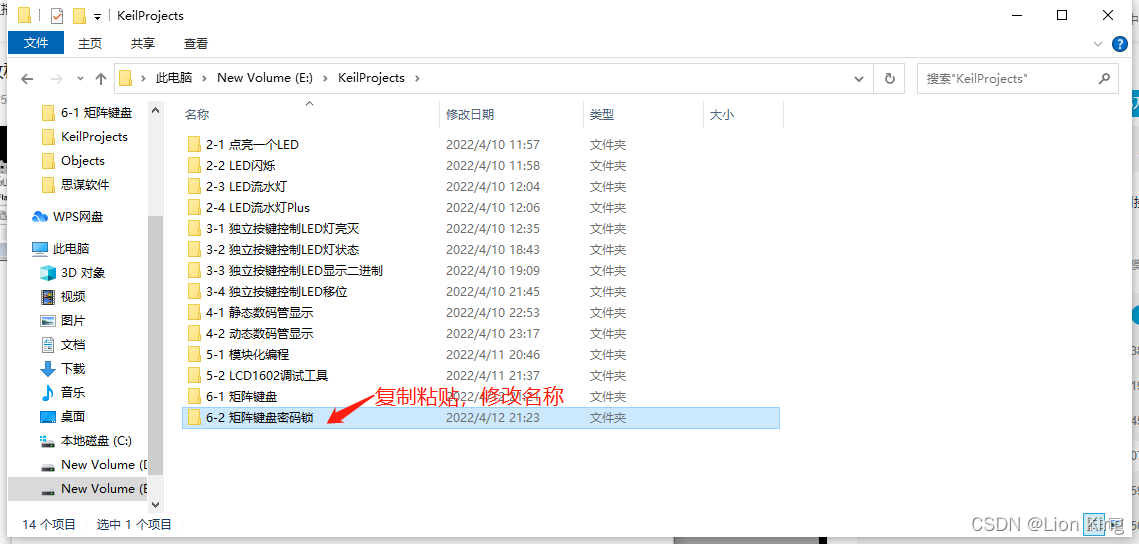
1、复制工程后打开
2、编写程序
main.c
#include <STC89C5xRC.H>
#include "LCD1602.h"
#include "Delay.h"
#include "MatrixKey.h"unsigned char KeyNum;
unsigned int Password, Count;void main()
{LCD_Init();
//	LCD_ShowChar(1,1,'B');LCD_ShowString(1,1,"Password:");
//	LCD_ShowNum(1,9,123,3);
//	LCD_ShowSignedNum(1,13,-66,2);
//	LCD_ShowHexNum(2,1,0xA8,2);
//	LCD_ShowBinNum(2,4,0xAA,8);
//	LCD_ShowChar(2,13,'A');while(1){KeyNum=MatrixKey();if(KeyNum){if(KeyNum<=10)  // 如果S1~S10按键按下,输入密码{if(Count<4)  // 密码四位数{Password*=10;  //  密码左移一位,这样就可以依次输入密码Password+=KeyNum%10;  // 获取一位密码,加入到原密码,此时10为0Count++;}}LCD_ShowNum(2,1,Password,4);if(KeyNum==11)  // 确认{if(Password==1234){LCD_ShowString(1,14,"OK ");Password=0;Count=0;LCD_ShowNum(2,1,Password,4);}else{LCD_ShowString(1,14,"ERR");Password=0;Count=0;LCD_ShowNum(2,1,Password,4);}}if(KeyNum==12)  //取消{Password=0;Count=0;LCD_ShowString(1,14,"   ");LCD_ShowNum(2,1,Password,4);}}}
}
其它文件:复制之前写的模块即可。
十七、单片机实操十五:定时器与按键控制LED流水灯模式
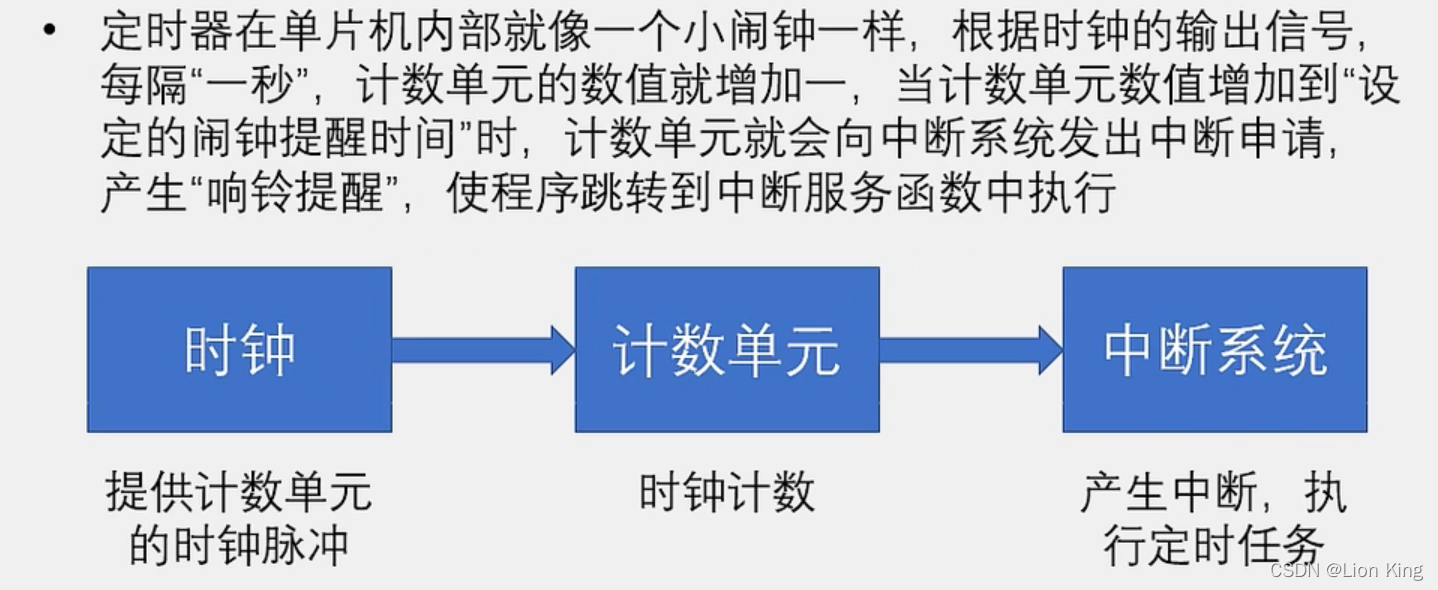
1、定时器介绍
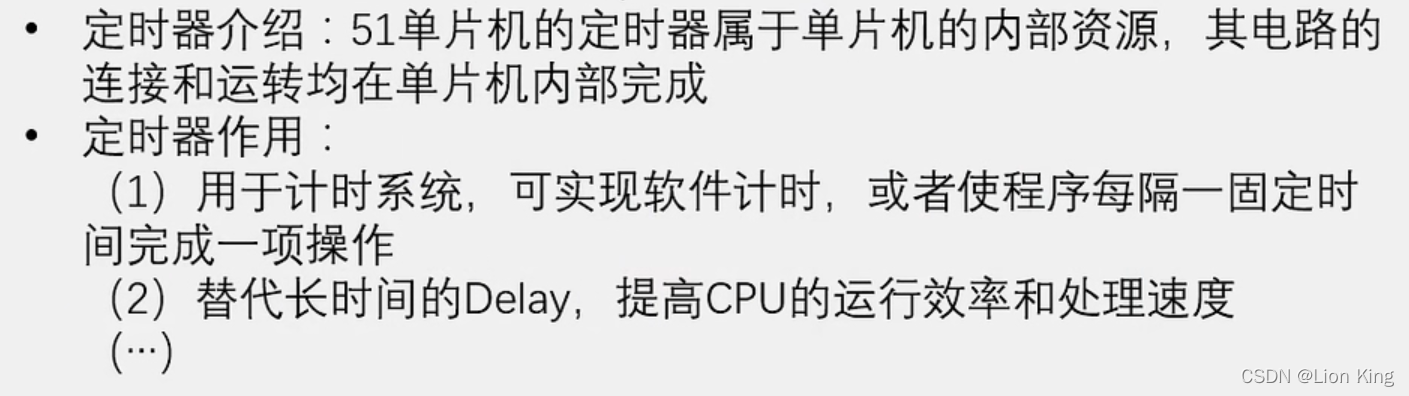
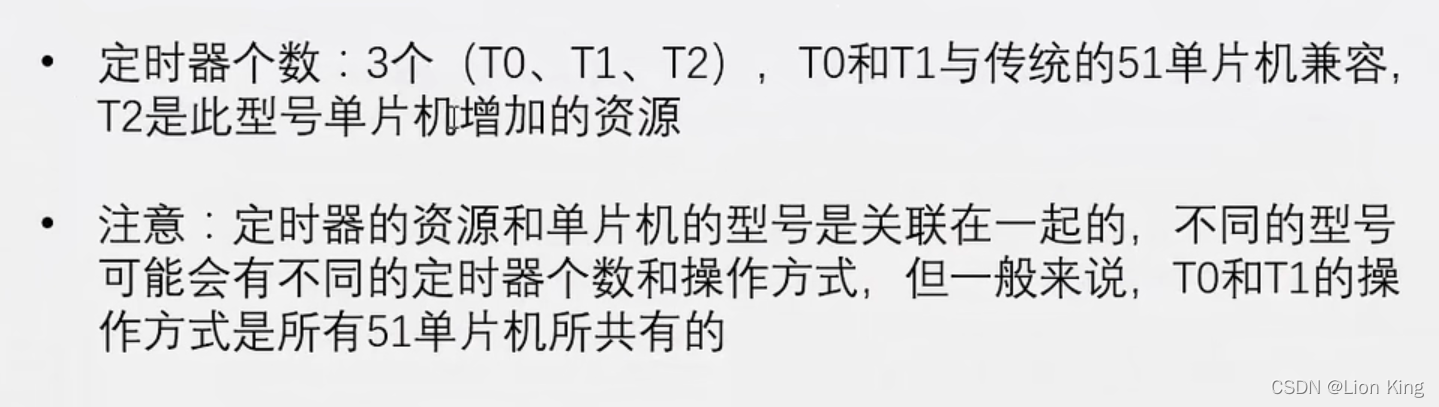
2、STC89C52定时器资源
3、定时器狂框图
4、定时器工作模式

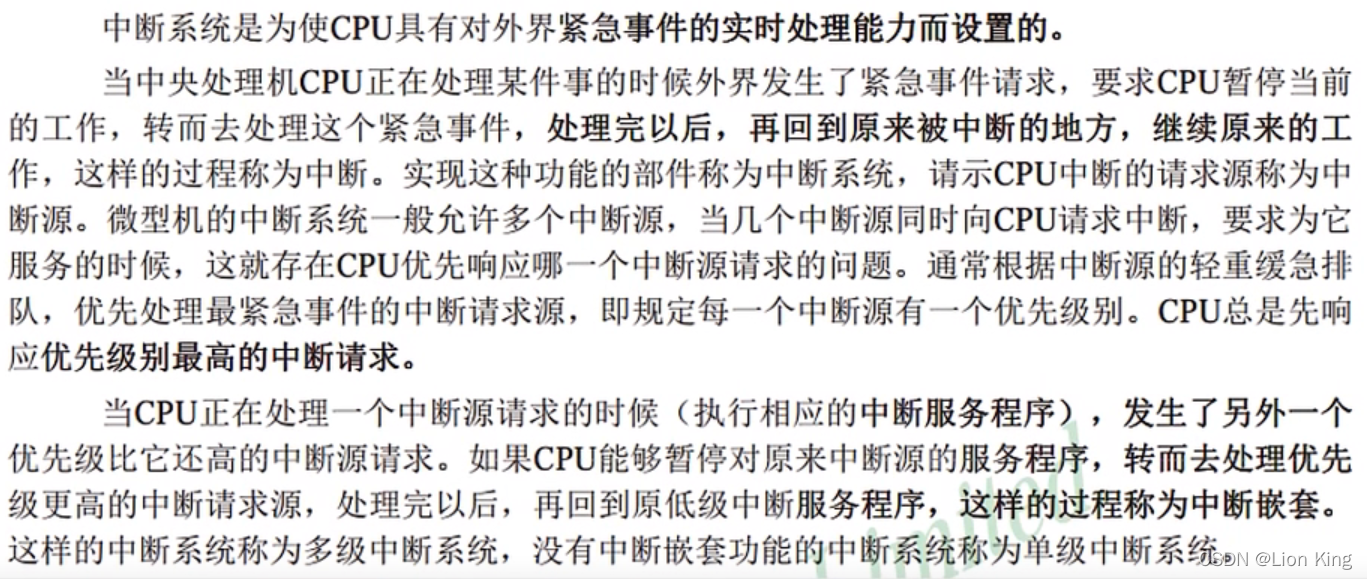
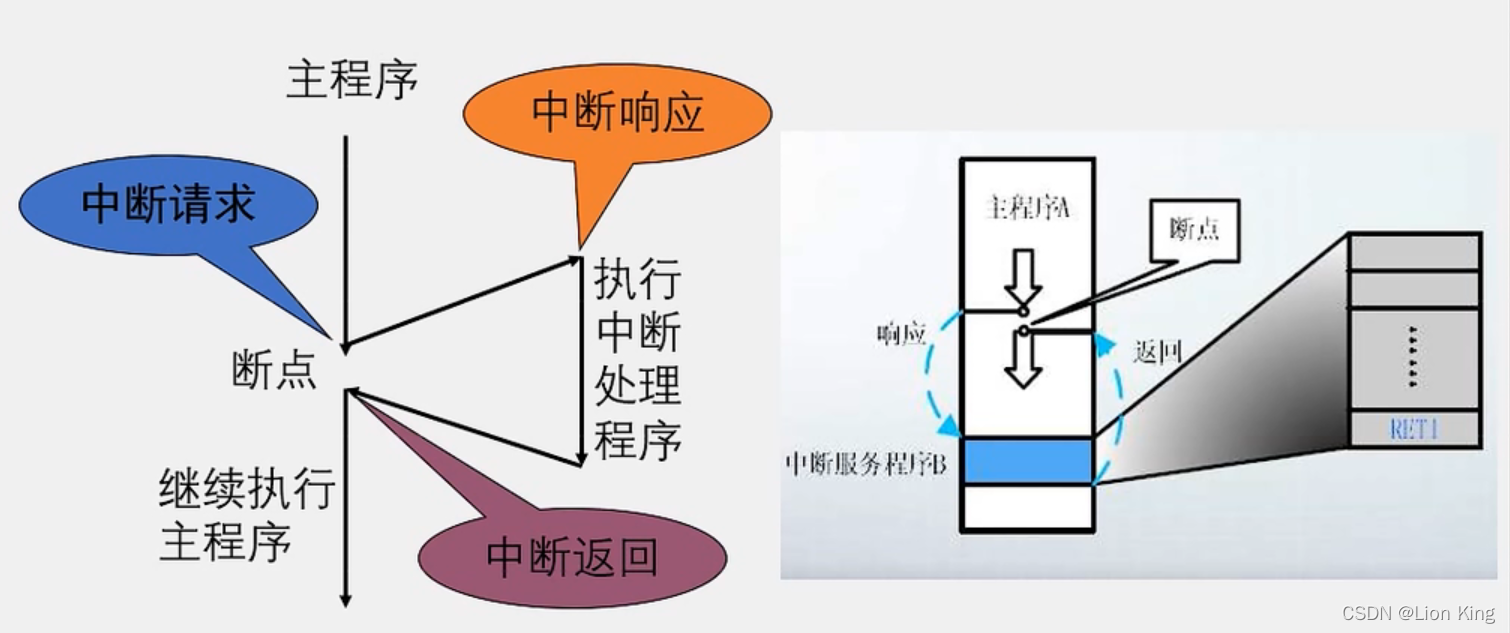
5、中断系统
6、中断程序流程
7、STC89C52中断资源

8、定时器和中断系统
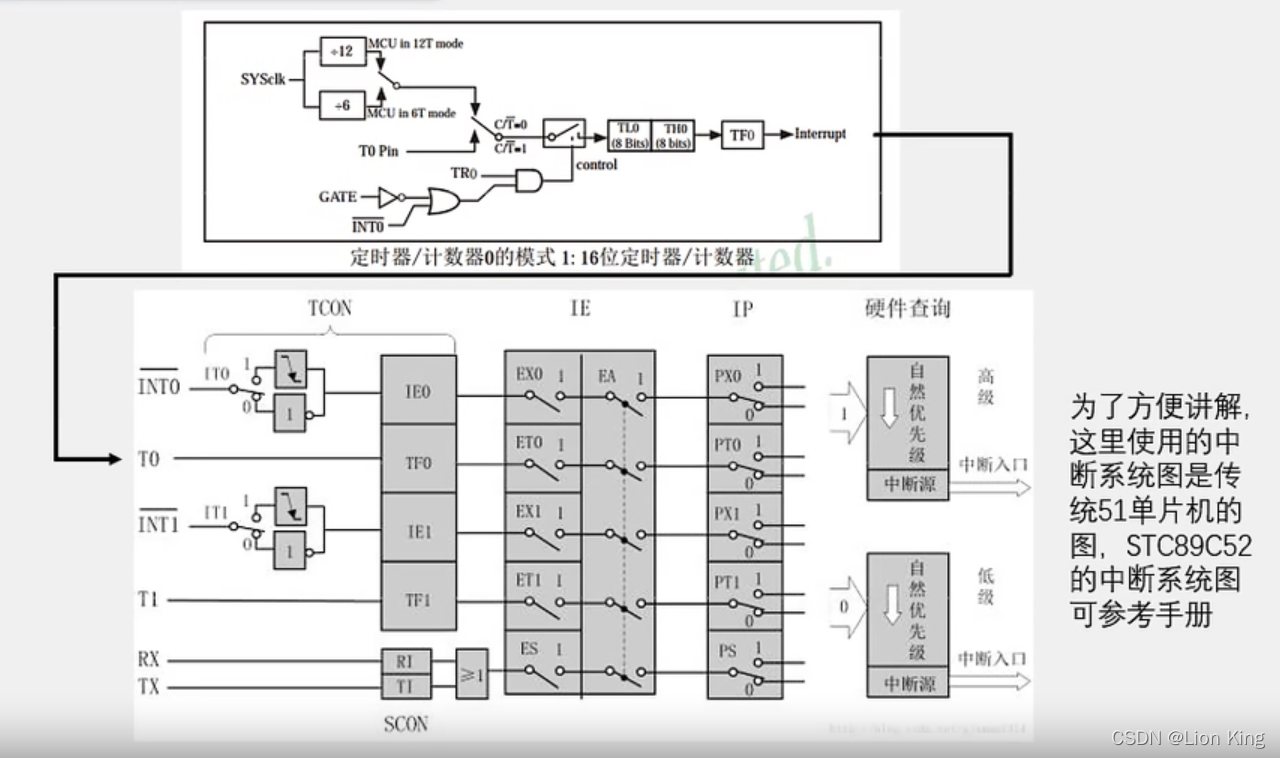
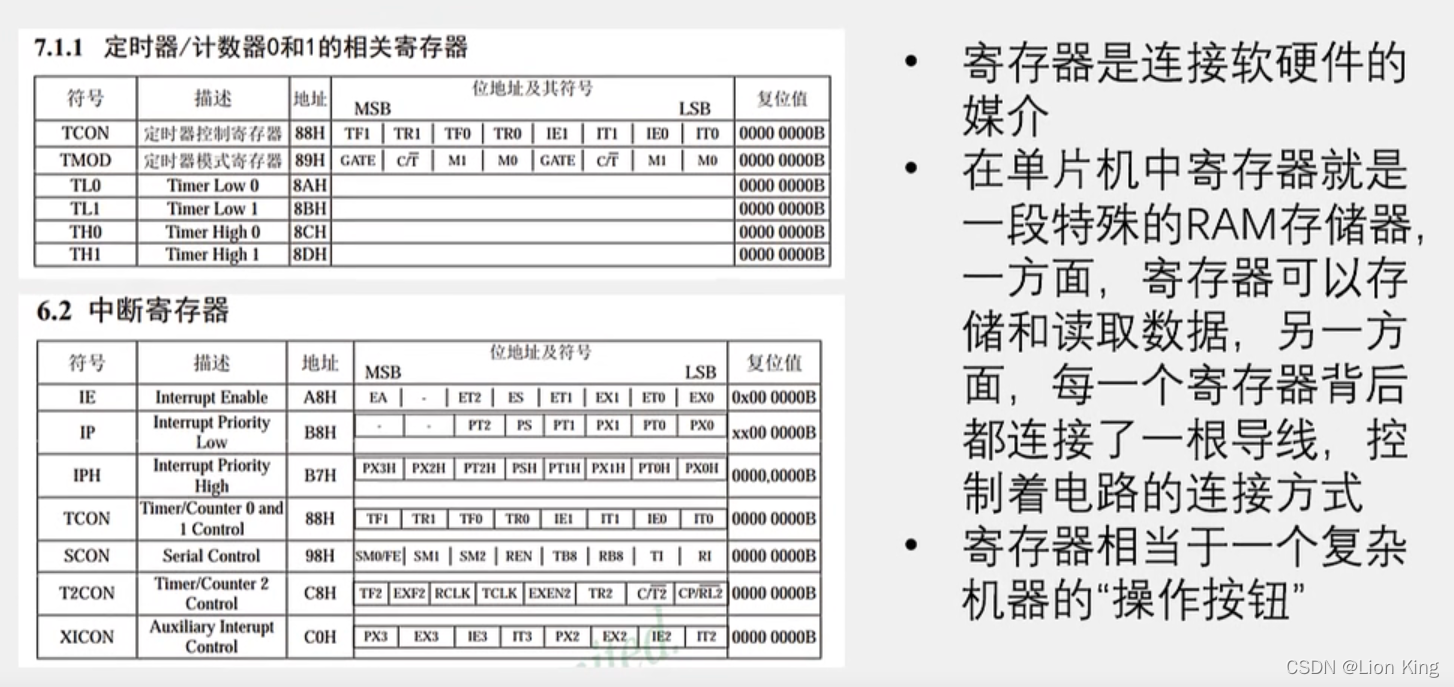
9、定时器相关寄存器
10、编写程序
通过独立按键控制流水灯模式,并由定时器执行流水灯。
main.c
#include <STC89C5xRC.H>
#include "Timer0.h"
#include "Key.h"
#include <INTRINS.H>unsigned char KeyNum,LEDMode;void main()
{P2=0xFE;Timer0Init();while(1){KeyNum=Key();		//获取独立按键键码if(KeyNum)			//如果按键按下{if(KeyNum==1)	//如果K1按键按下{LEDMode++;	//模式切换,按1下按键是模式1,按2下是模式0,默认模式0if(LEDMode>=2)LEDMode=0;}}}
}void Timer0_Routine() interrupt 1  //中断函数标识,含优先级
{static unsigned int T0Count;  //静态变量,拥有局部作用域,全局生命周期TL0 = 0x18;		//设置定时初值TH0 = 0xFC;		//设置定时初值T0Count++;		//T0Count计次,对中断频率进行分频if(T0Count>=500)//分频500次,500ms{T0Count=0;if(LEDMode==0)			//模式判断P2=_crol_(P2,1);	//LED输出(循环左移函数,即使流水灯循环左移)if(LEDMode==1)P2=_cror_(P2,1);}
}
Timer0.c
#include <STC89C5xRC.H>/*** @brief 定时器0初始化,1毫秒@12.000MHz* @param 无* @retval 无*/
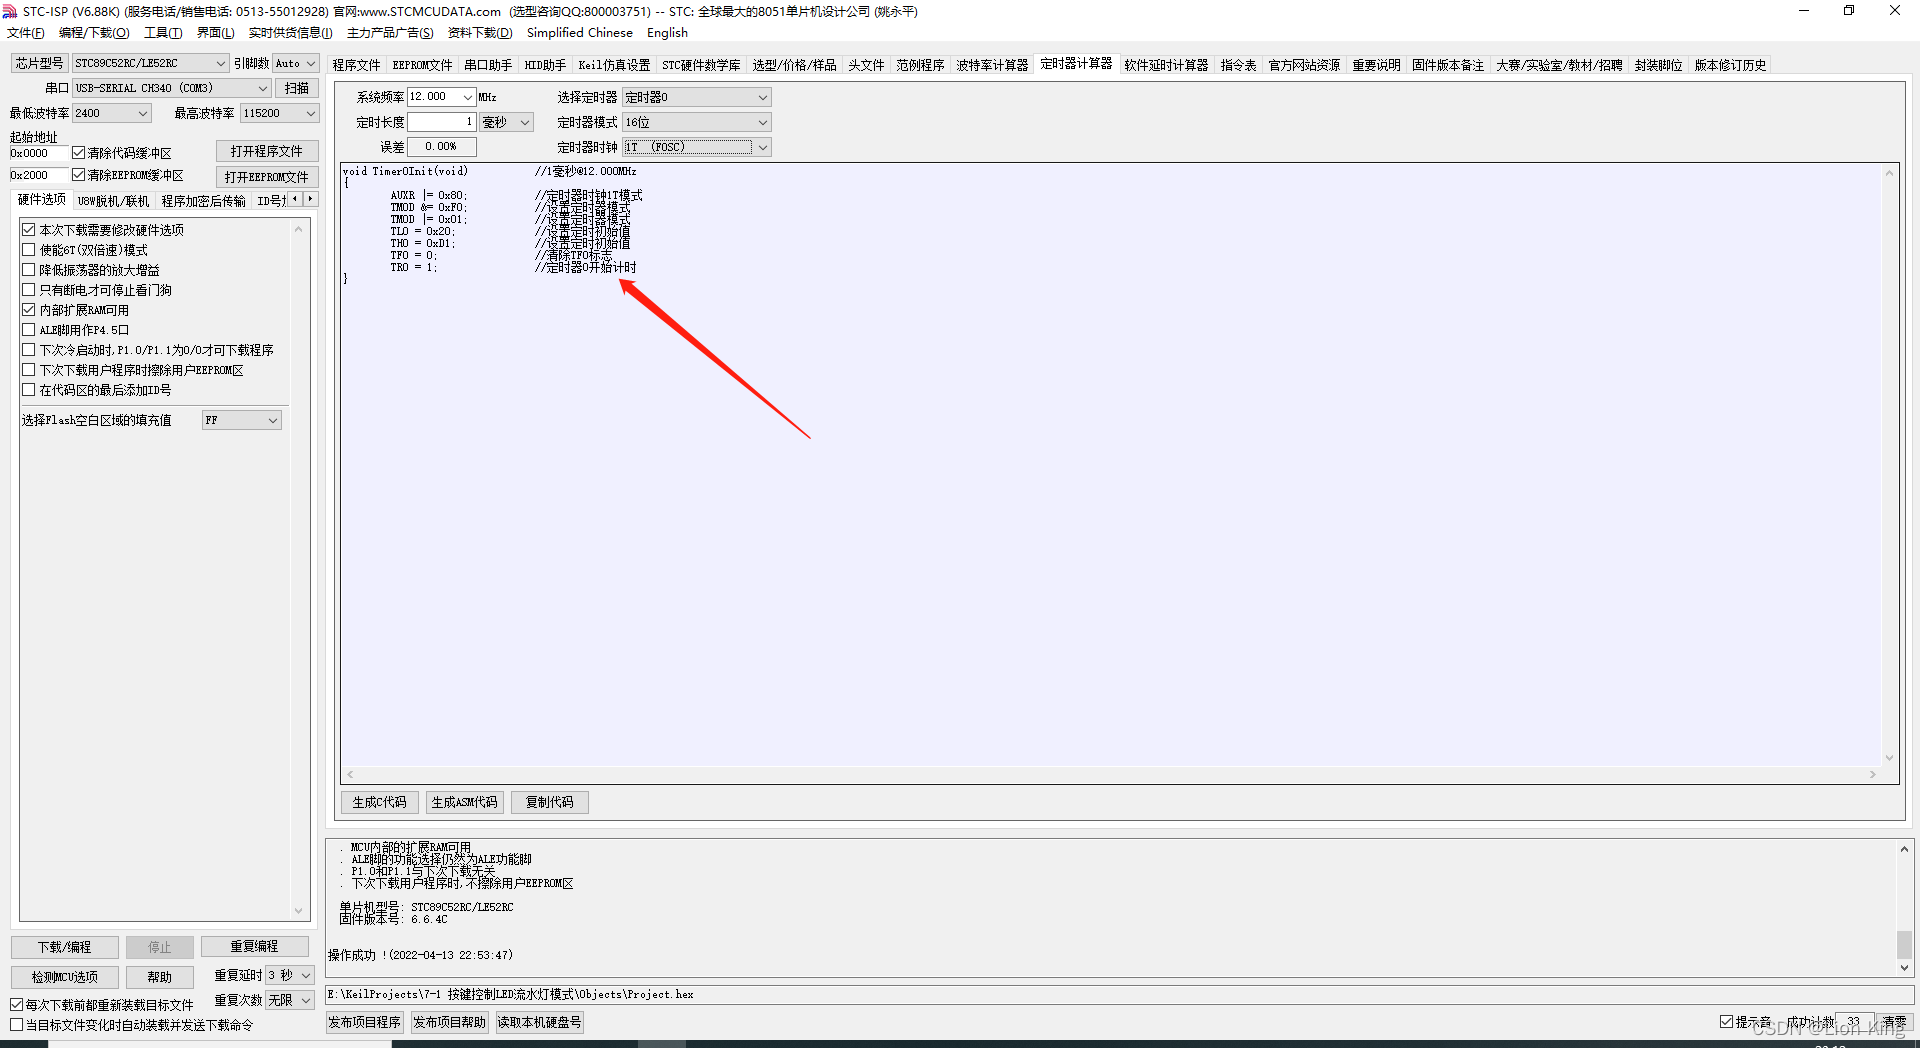
void Timer0Init(void)
{TMOD &= 0xF0; //设置定时器模式,只改变T0,避免T1改变TMOD |= 0x01; //设置定时器模式TL0 = 0x18; //高位设置定时初值 65535/256TH0 = 0xFC; //低位设置定时初值 65535%256TF0 = 0; //清除TF0标志TR0 = 1; //定时器0开始计时ET0=1;EA=1;PT0=0;
}/*定时器中断函数模板
void Timer0_Routine() interrupt 1
{static unsigned int T0Count; //静态变量,拥有局部作用域,全局生命周期TL0 = 0x18; //设置定时初值,像沙漏,重置沙漏时间TH0 = 0xFC; //设置定时初值T0Count++;if(T0Count>=1000){T0Count=0;}
}
*/
Timer0.h
#ifndef __TIMER0_H__
#define __TIMER0_H__void Timer0Init(void);#endif
Key.c
#include <STC89C5xRC.H>
#include "Delay.h"/*** @brief  获取独立按键键码* @param  无* @retval 按下按键的键码,范围:0~4,无按键按下时返回值为0*/
unsigned char Key()
{unsigned char KeyNumber=0;if(P31==0){Delay(20);while(P31==0);Delay(20);KeyNumber=1;}if(P30==0){Delay(20);while(P30==0);Delay(20);KeyNumber=2;}if(P32==0){Delay(20);while(P32==0);Delay(20);KeyNumber=3;}if(P33==0){Delay(20);while(P33==0);Delay(20);KeyNumber=4;}return KeyNumber;
}
Key.h
#ifndef __KEY_H__
#define __KEY_H__unsigned char Key();#endif
其它文件:复制之前写的模块即可。
11、定时器代码获取
十八、单片机实操十六:定时器时钟
1、编写程序
制作一个一天时间的计时器。
main.c
#include <STC89C5xRC.H>
#include "Timer0.h"
#include "Delay.h"
#include "LCD1602.h"unsigned char Sec, Min=59, Hour=23;void main()
{Timer0Init();LCD_Init();LCD_ShowString(1,1,"Clock:");while(1){LCD_ShowNum(2,1,Hour,2);LCD_ShowString(2,3,":");LCD_ShowNum(2,4,Min,2);LCD_ShowString(2,6,":");LCD_ShowNum(2,7,Sec,2);}
}void Timer0_Routine() interrupt 1  //中断函数标识,含优先级
{static unsigned int T0Count;  //静态变量,拥有局部作用域,全局生命周期TL0 = 0x18;		//设置定时初值TH0 = 0xFC;		//设置定时初值T0Count++;		//T0Count计次,对中断频率进行分频if(T0Count>=1000)//1000ms{T0Count=0;Sec++;if(Sec>=60){Sec=0;Min++;if(Min>=60){Min=0;Hour++;if(Hour>=24){Hour=0;}}}}
}
其它文件:复制之前写的模块即可。
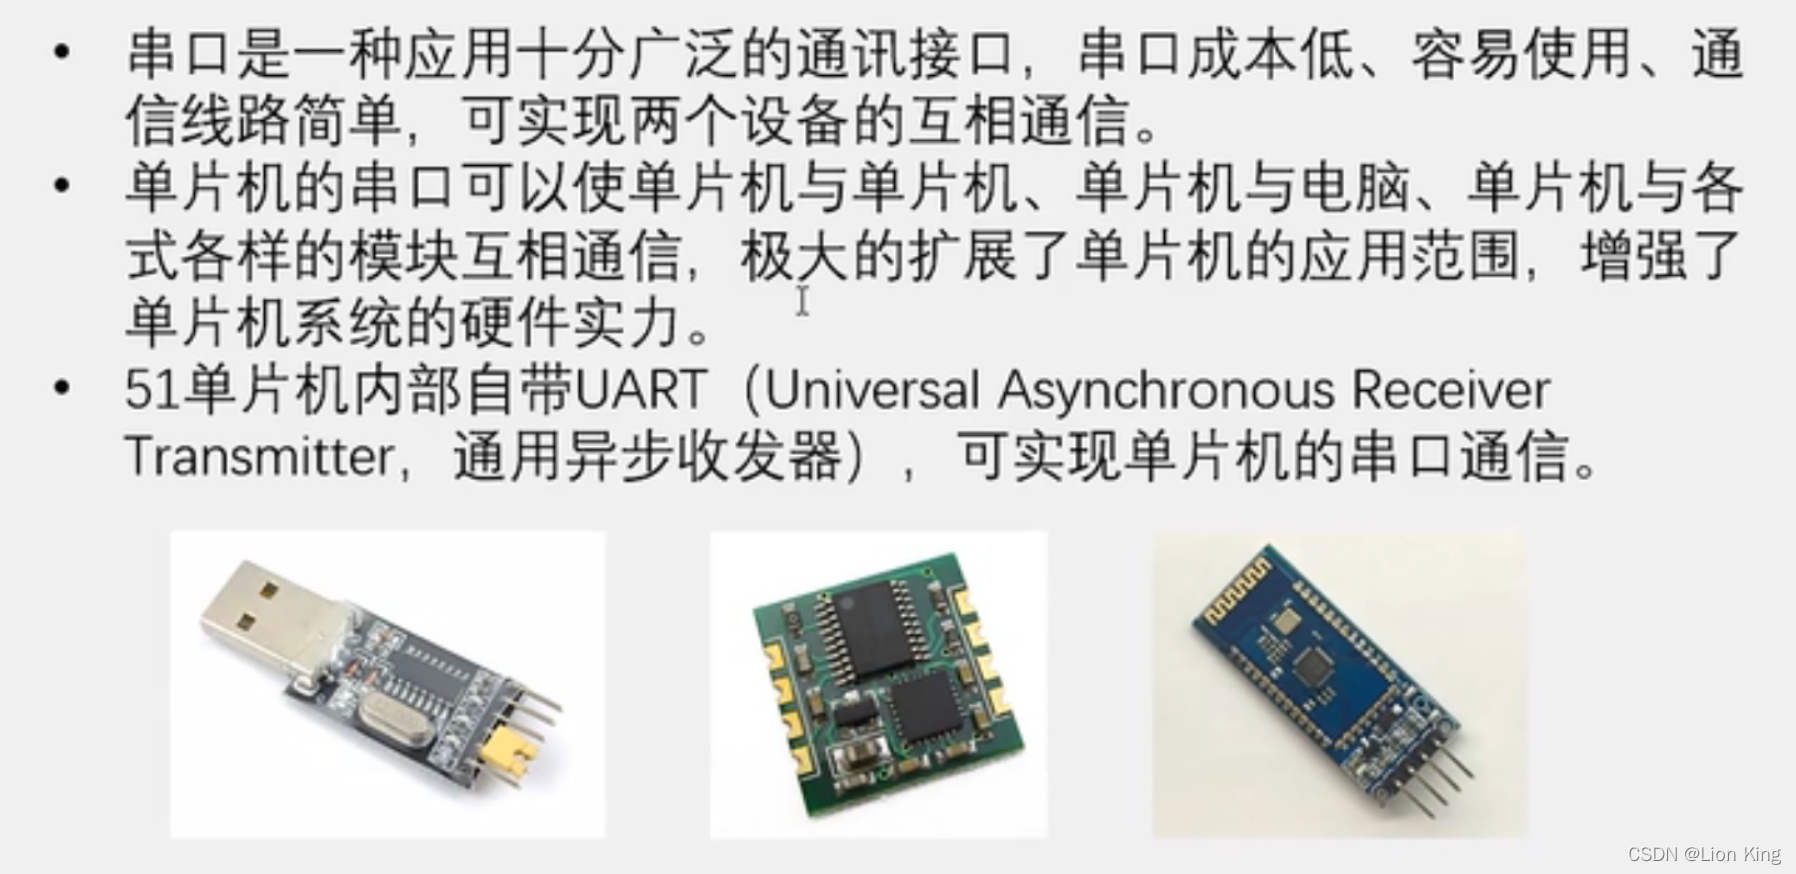
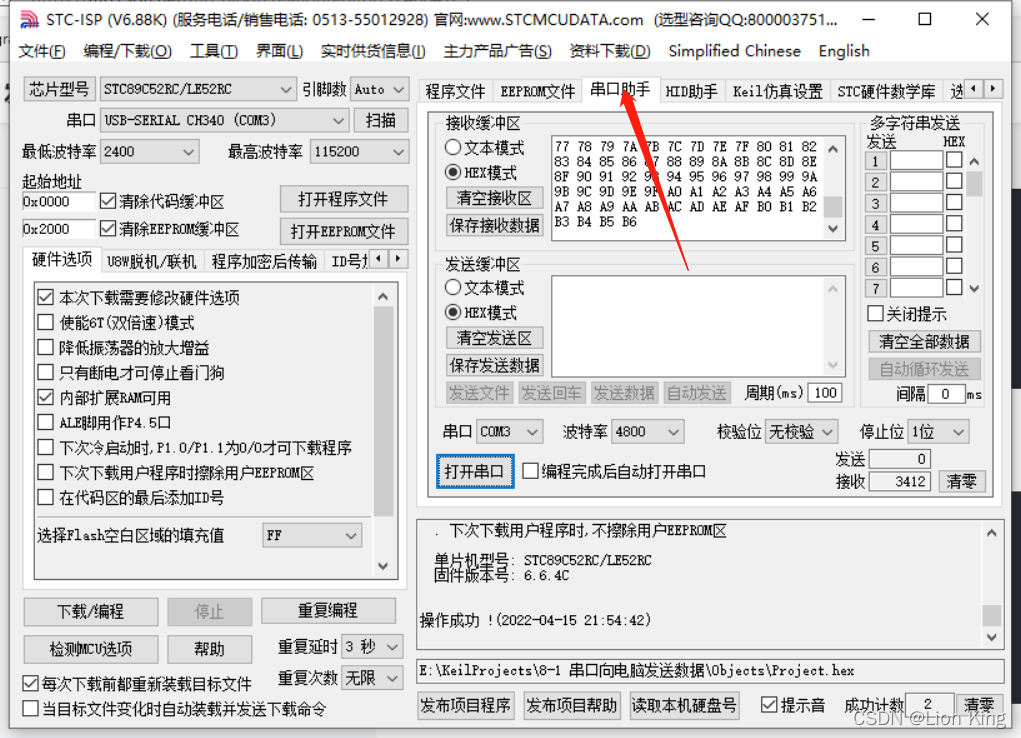
十九、单片机实操十七:串口通信与串口向电脑发送数据
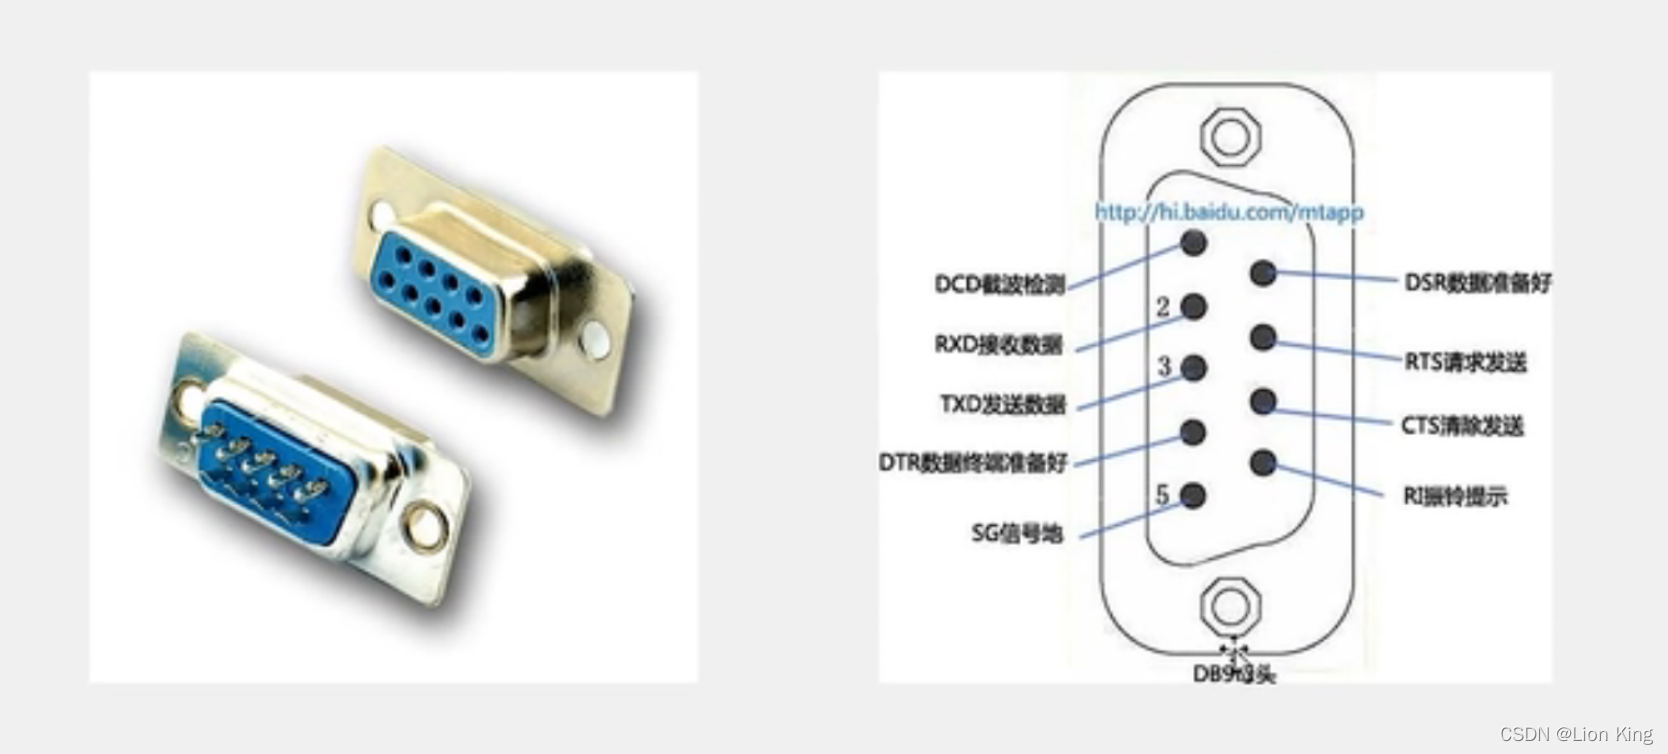
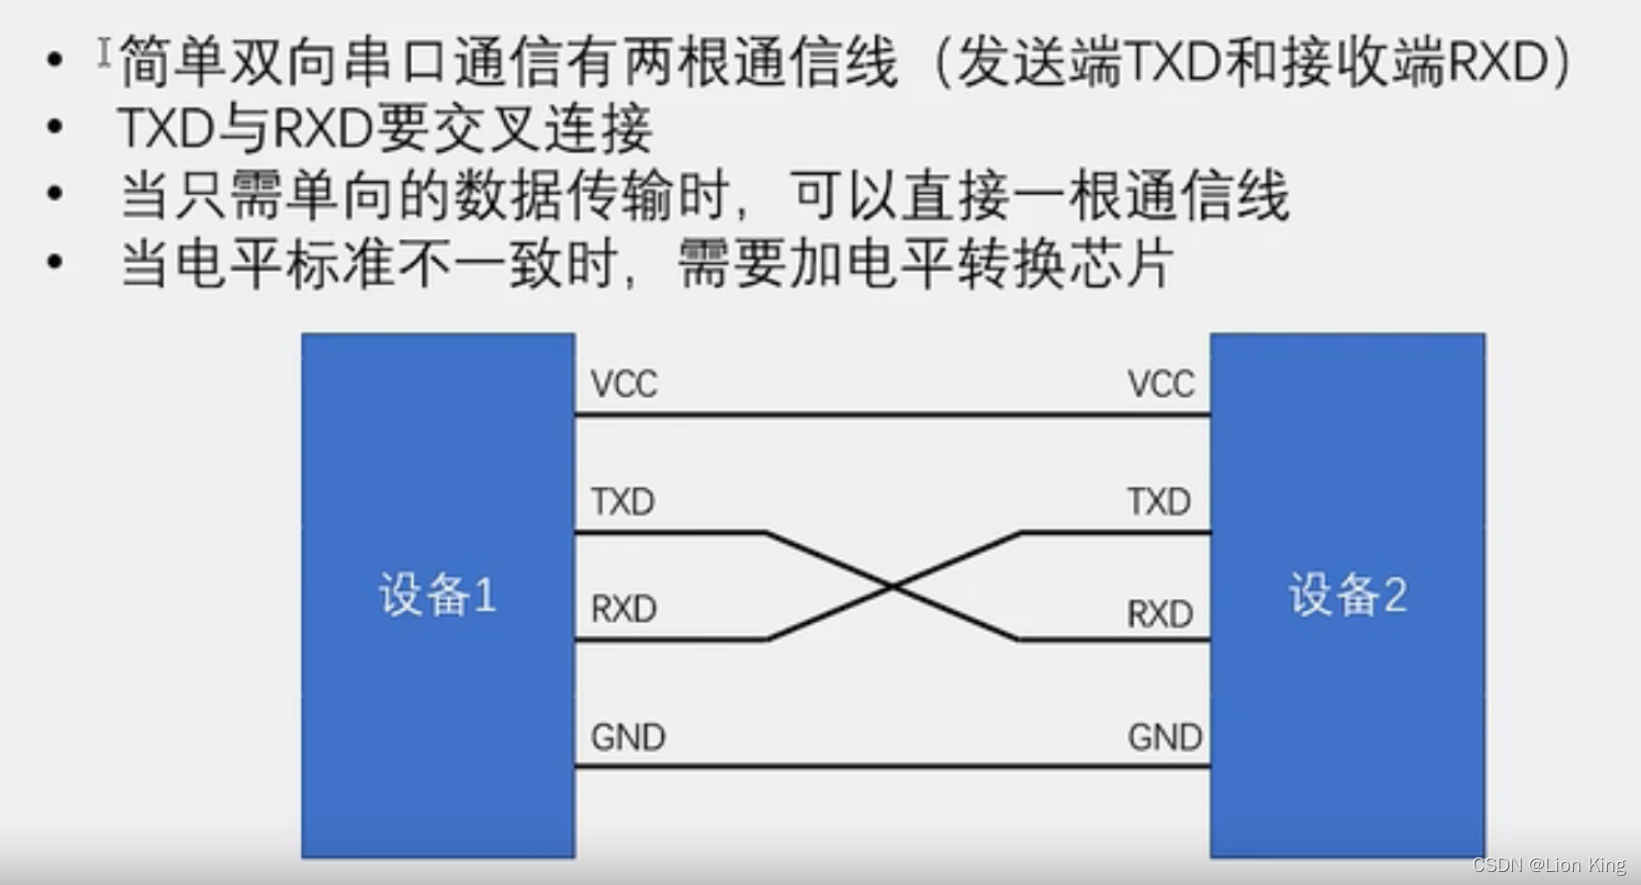
1、串口介绍
2、接口及引脚定义
3、硬件电路
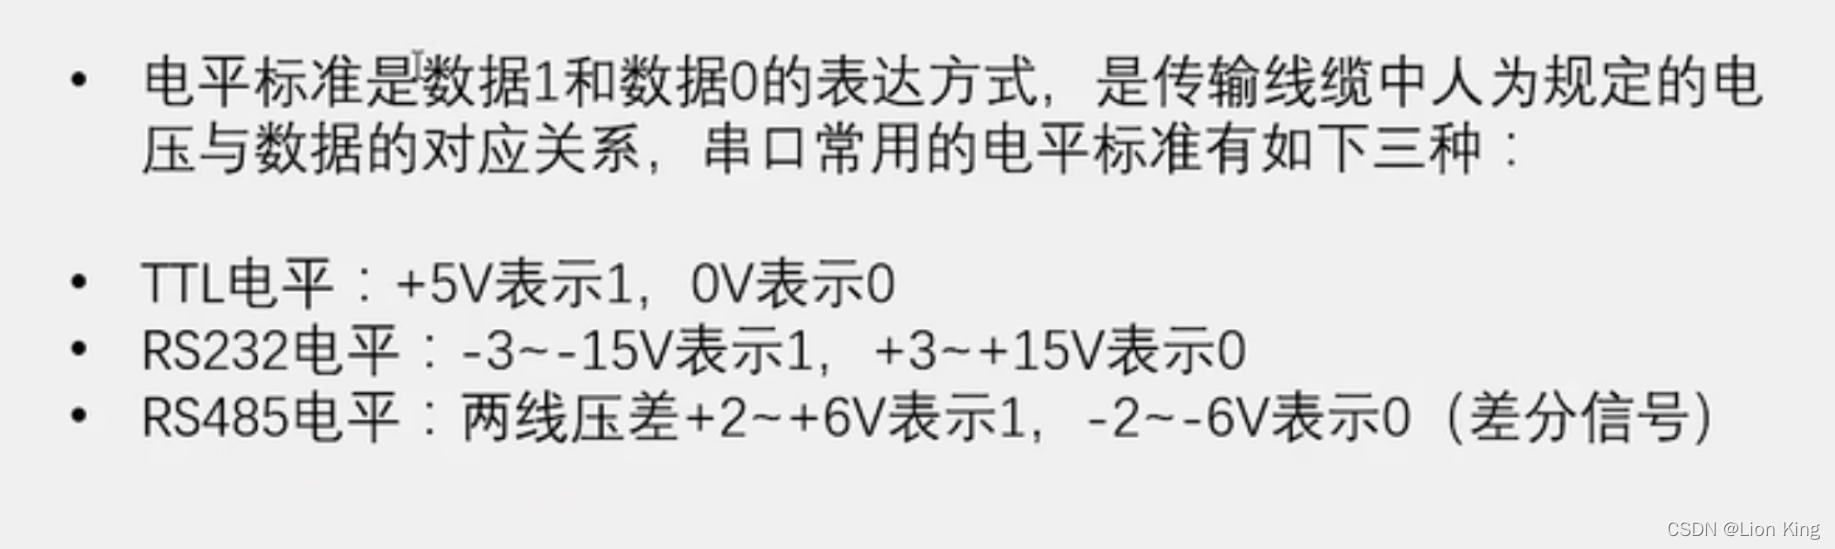
4、电平标准
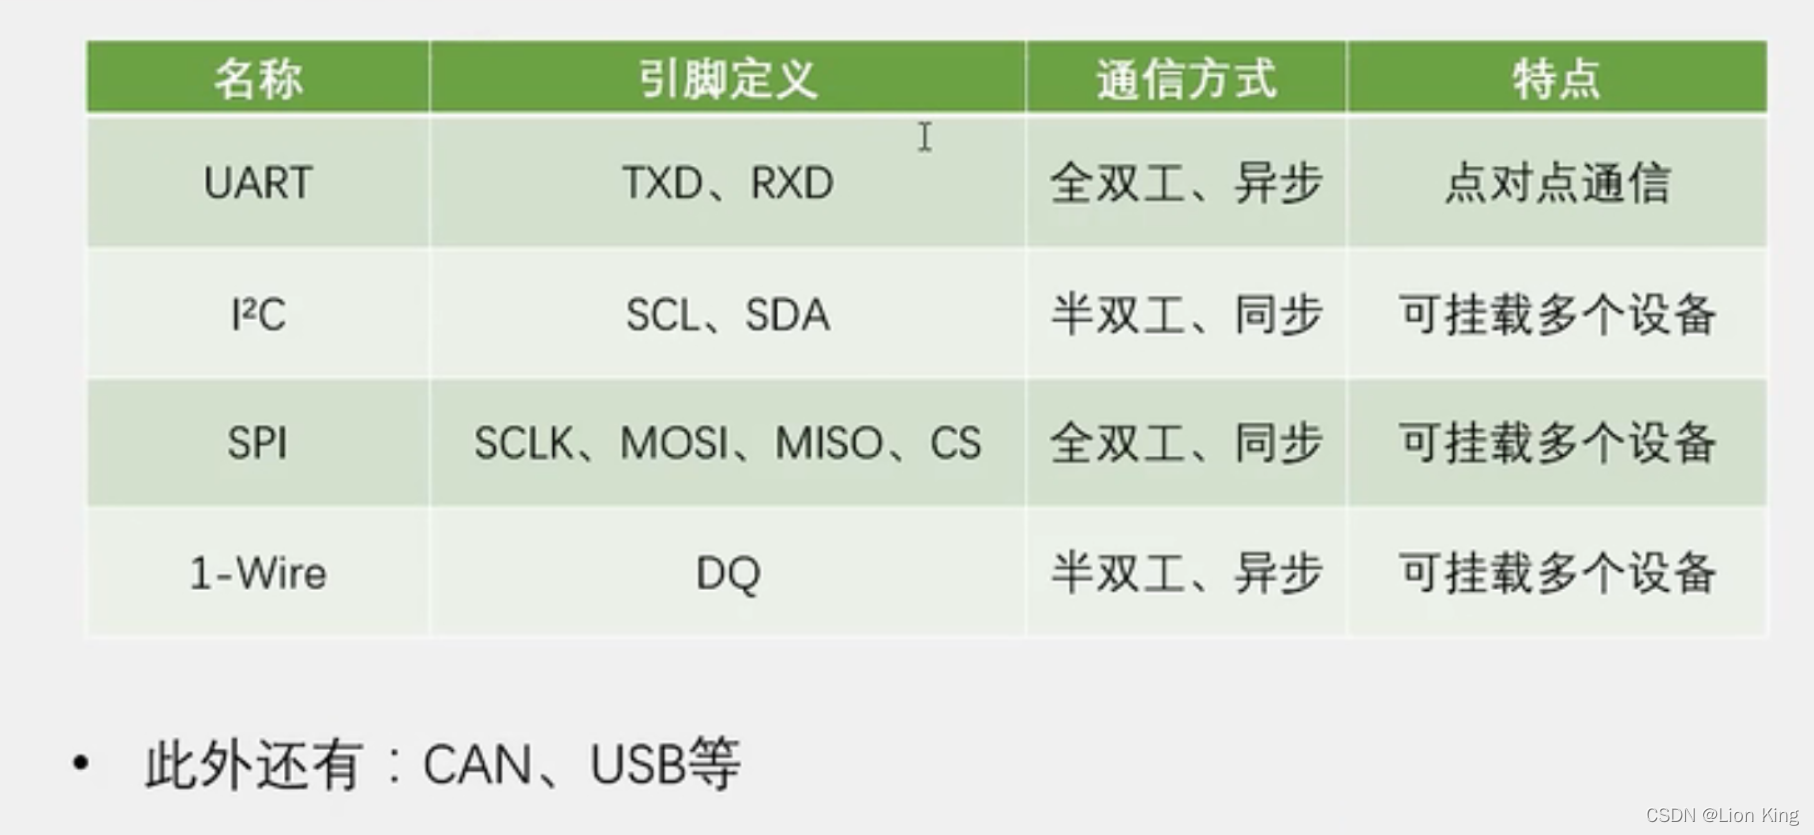
5、常见通信接口比较
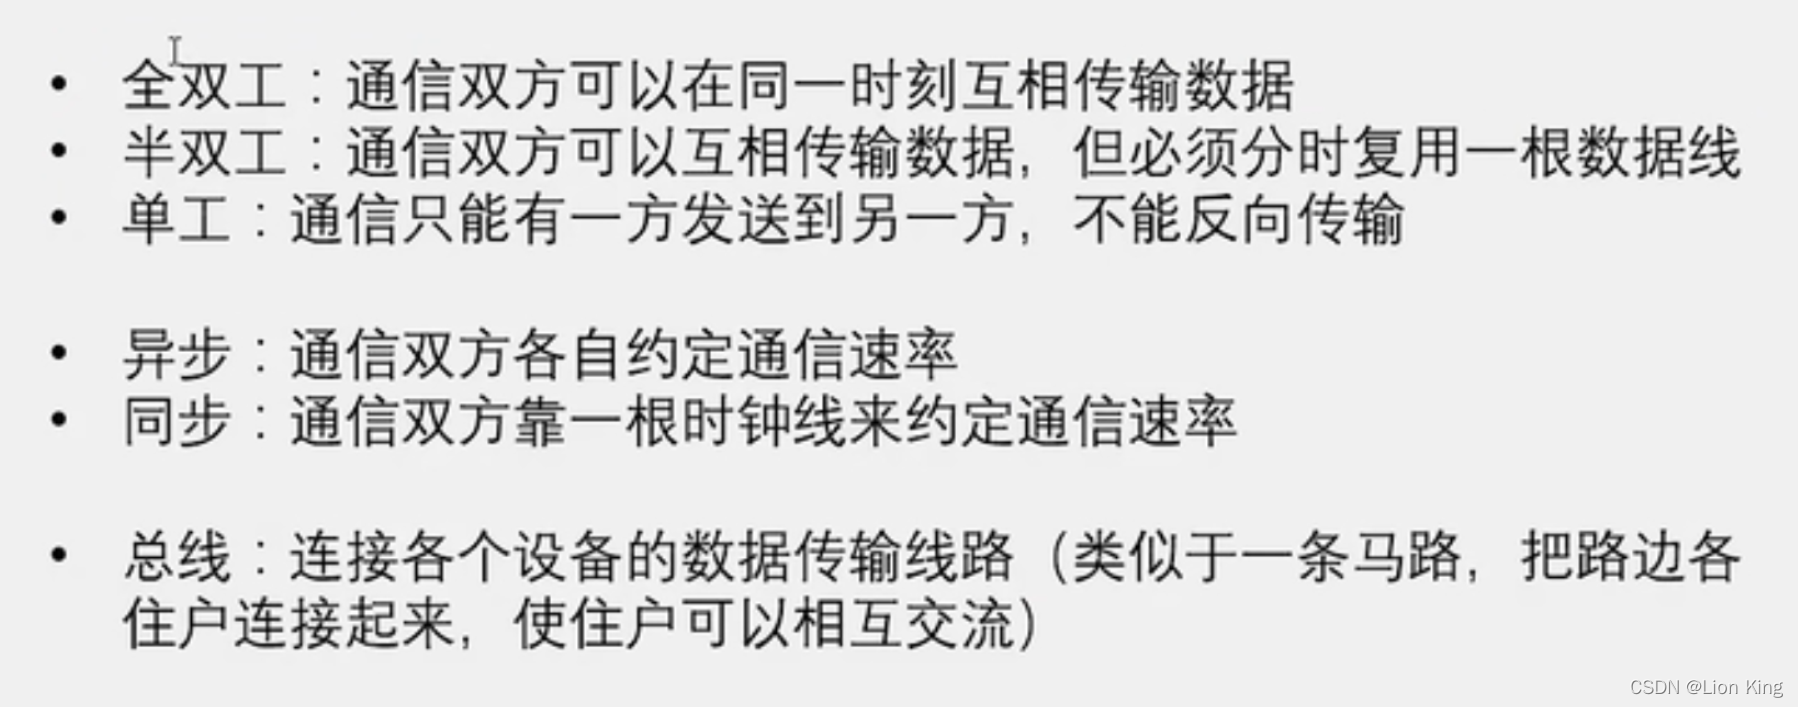
6、相关术语
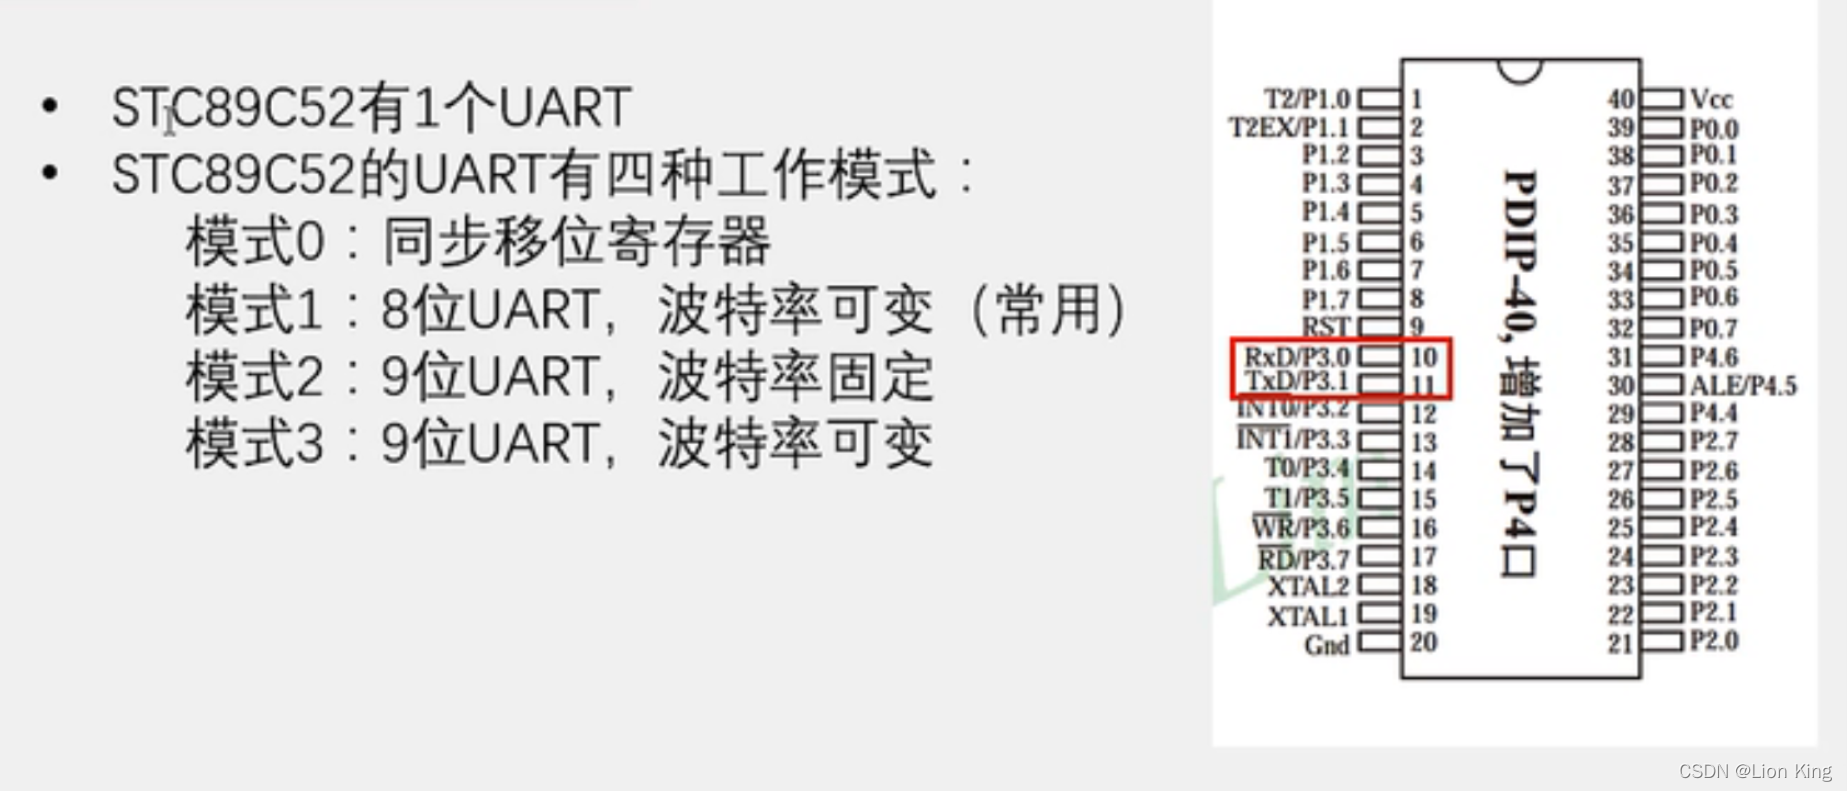
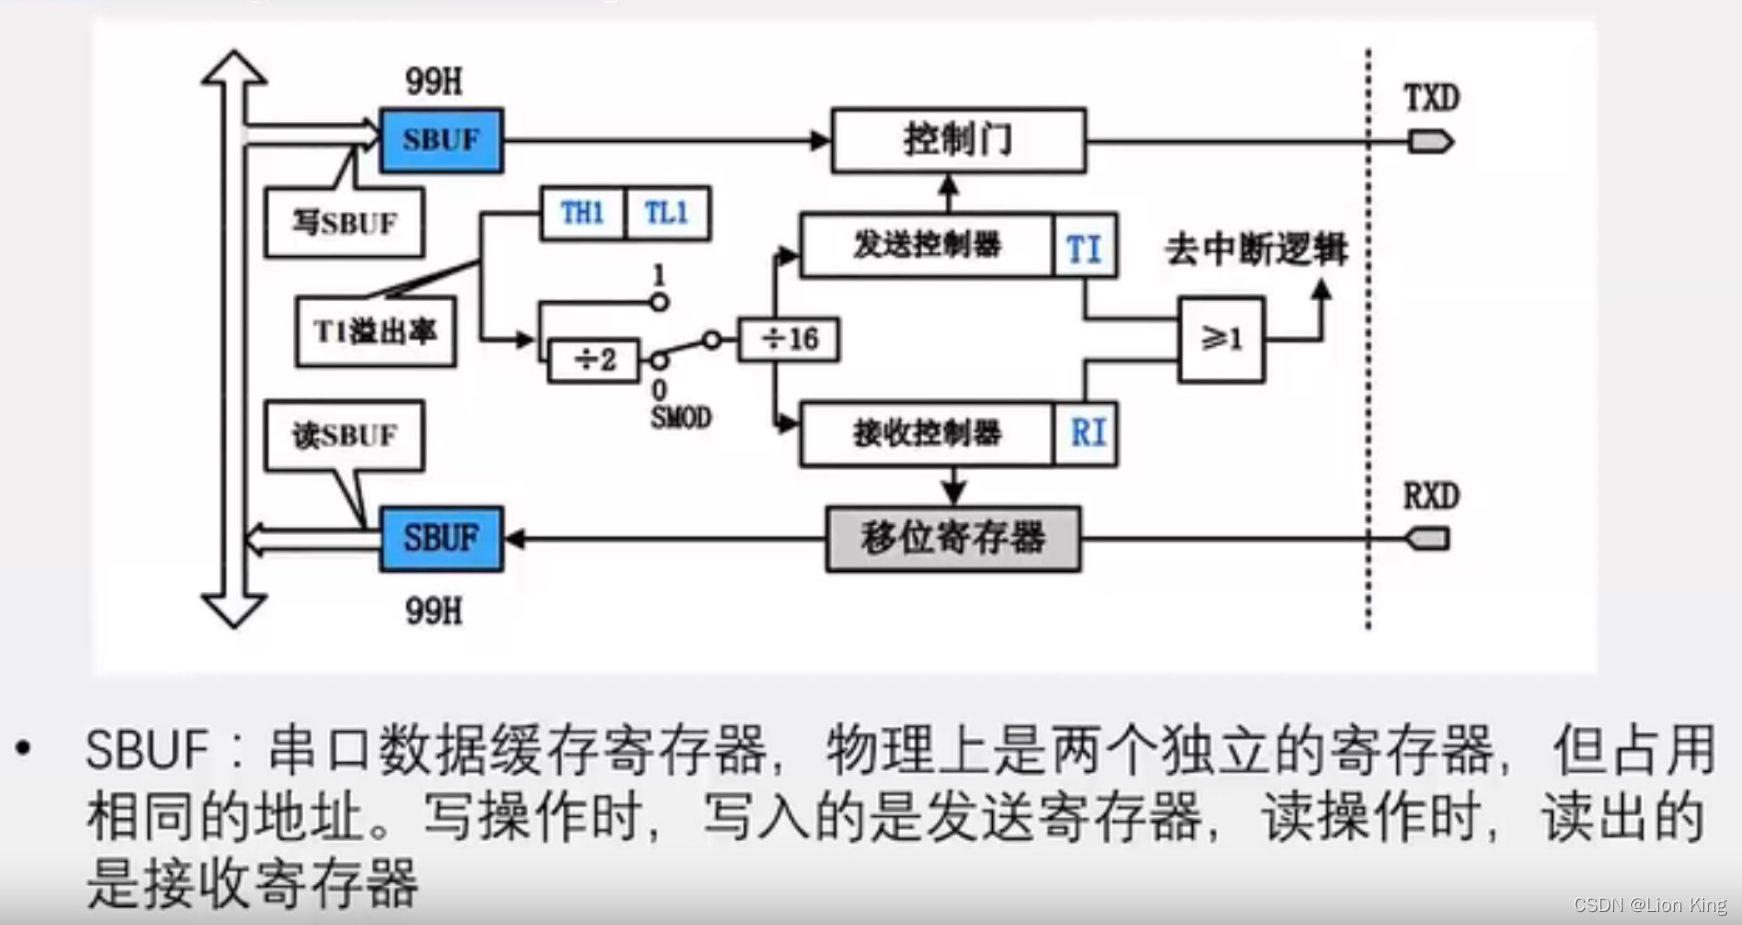
7、51单片机的UART
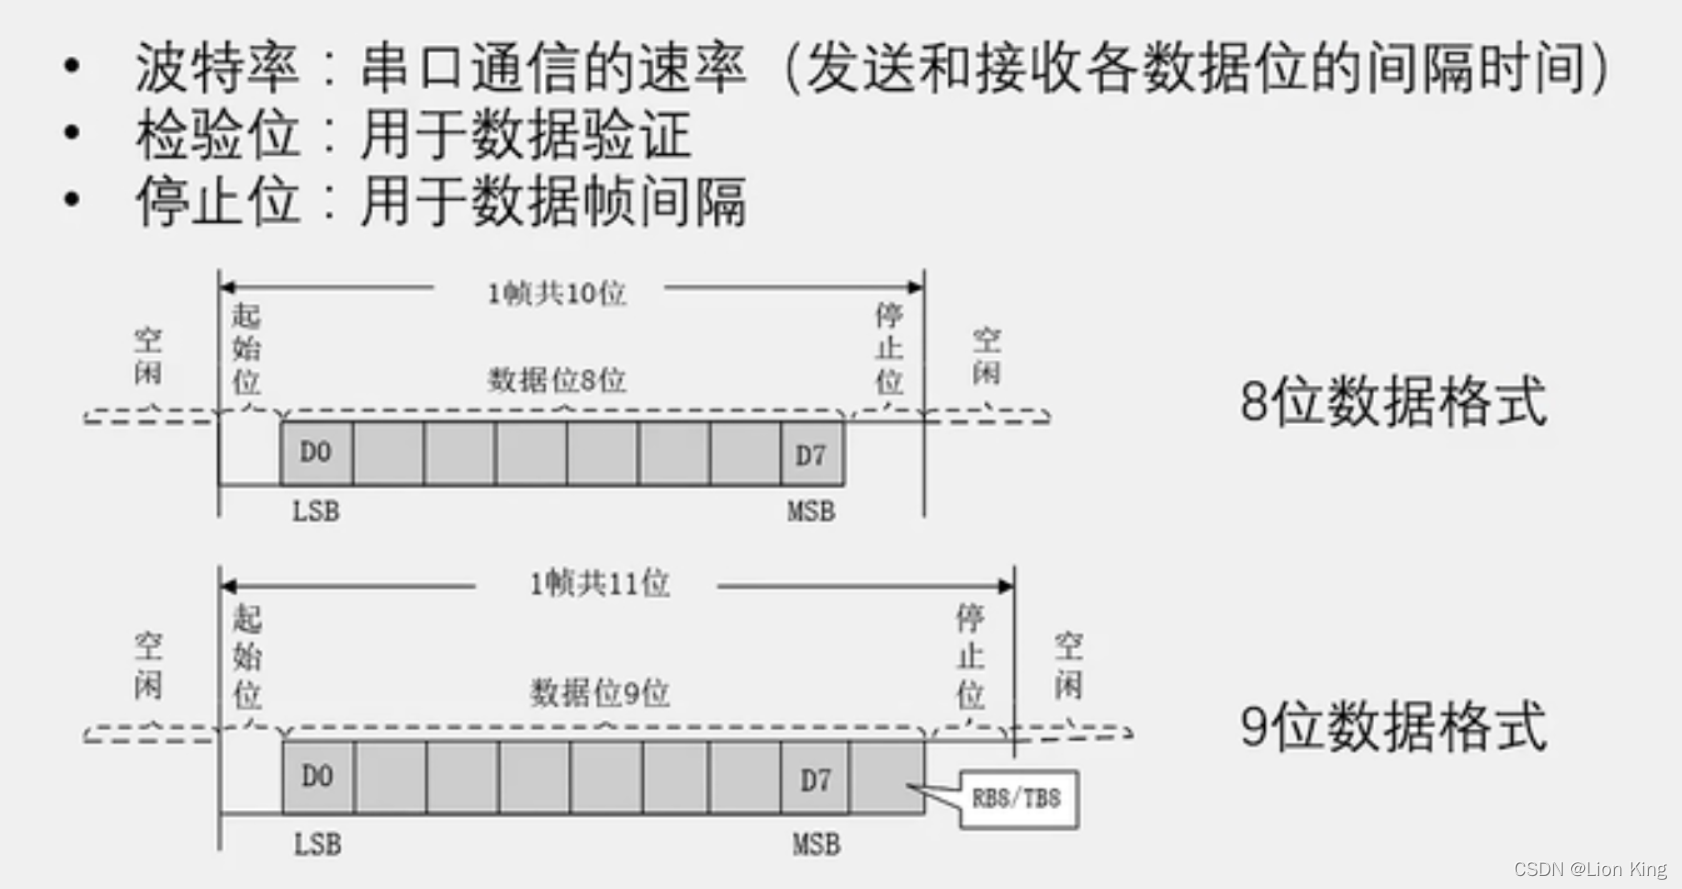
8、串口参数与时序图
9、串口模式图
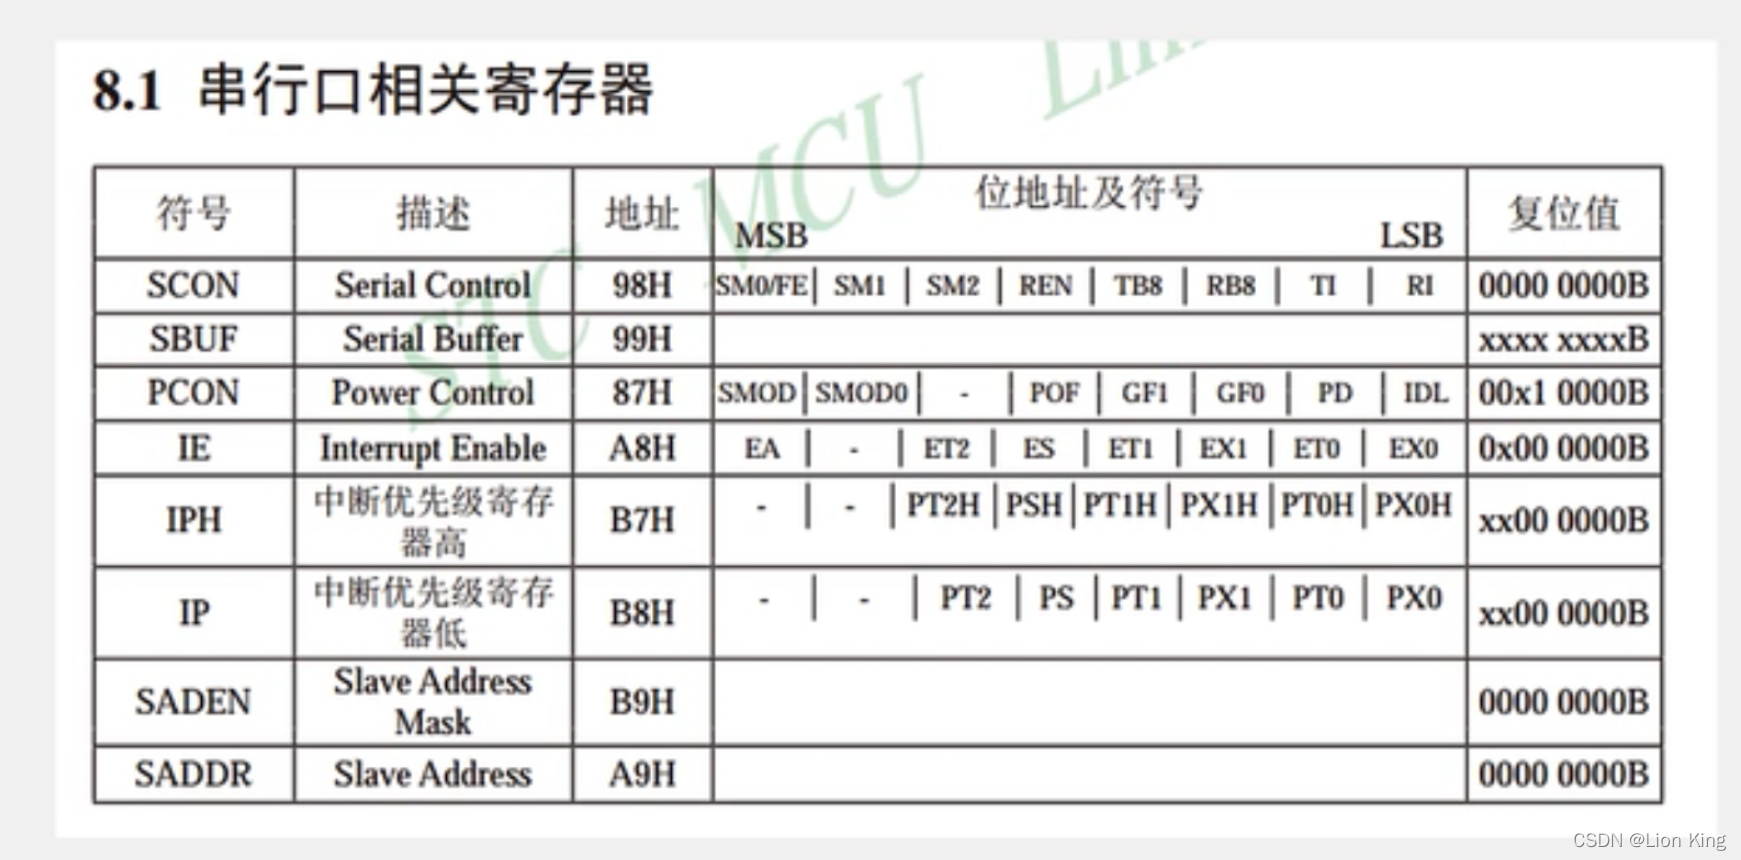
10、串口相关寄存器
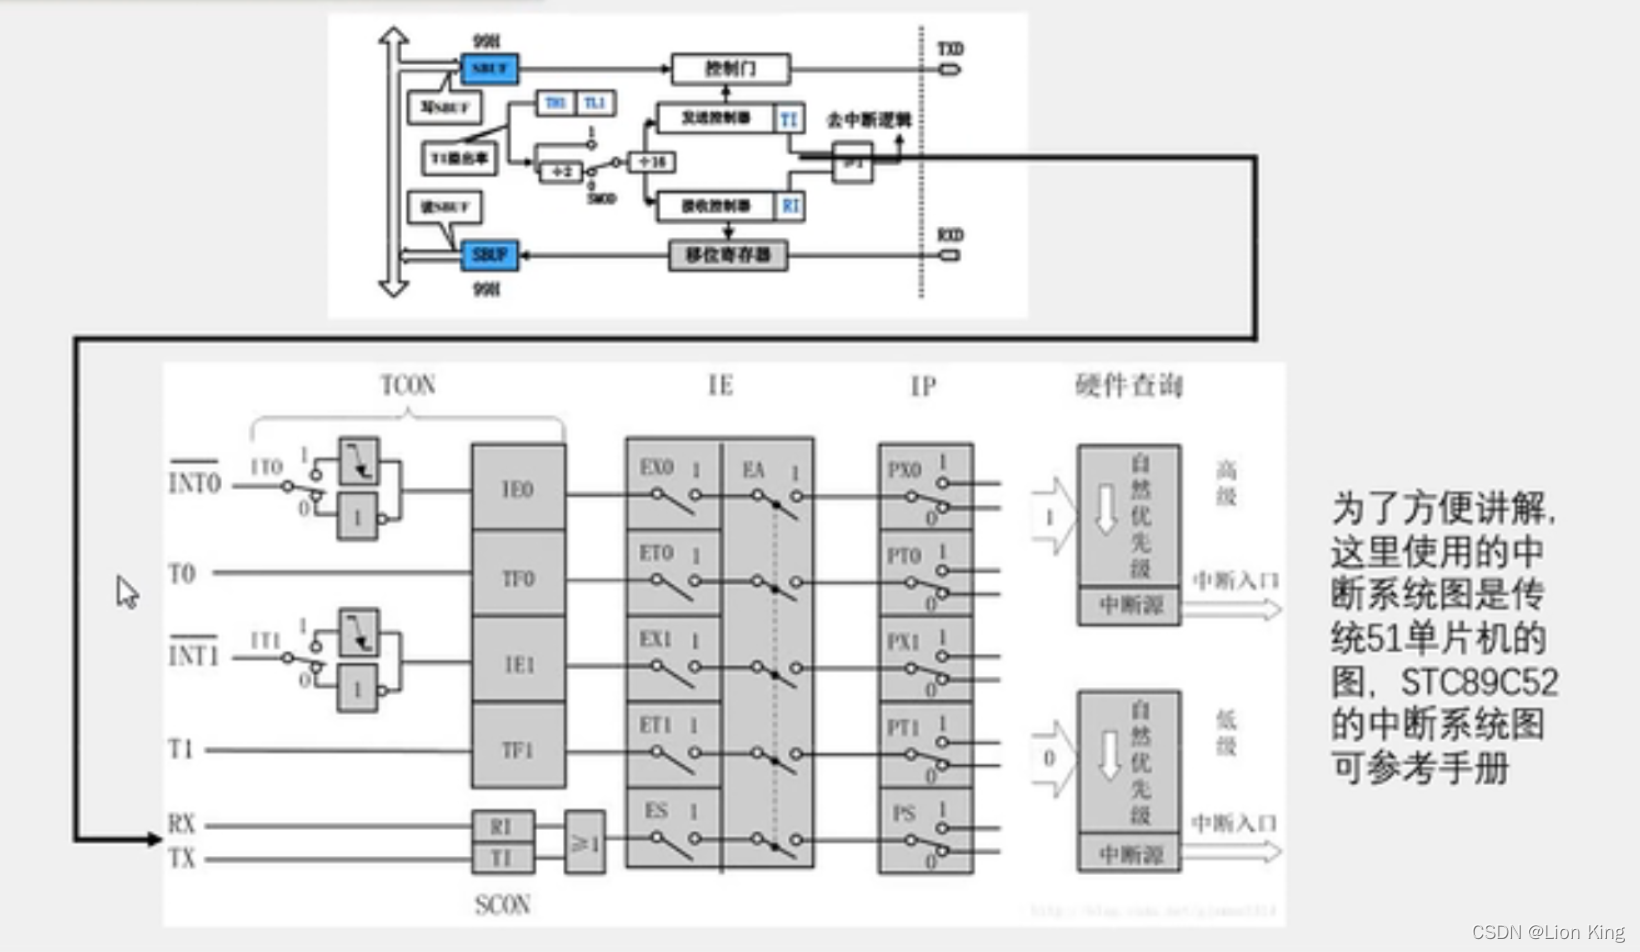
11、串口和中断系统
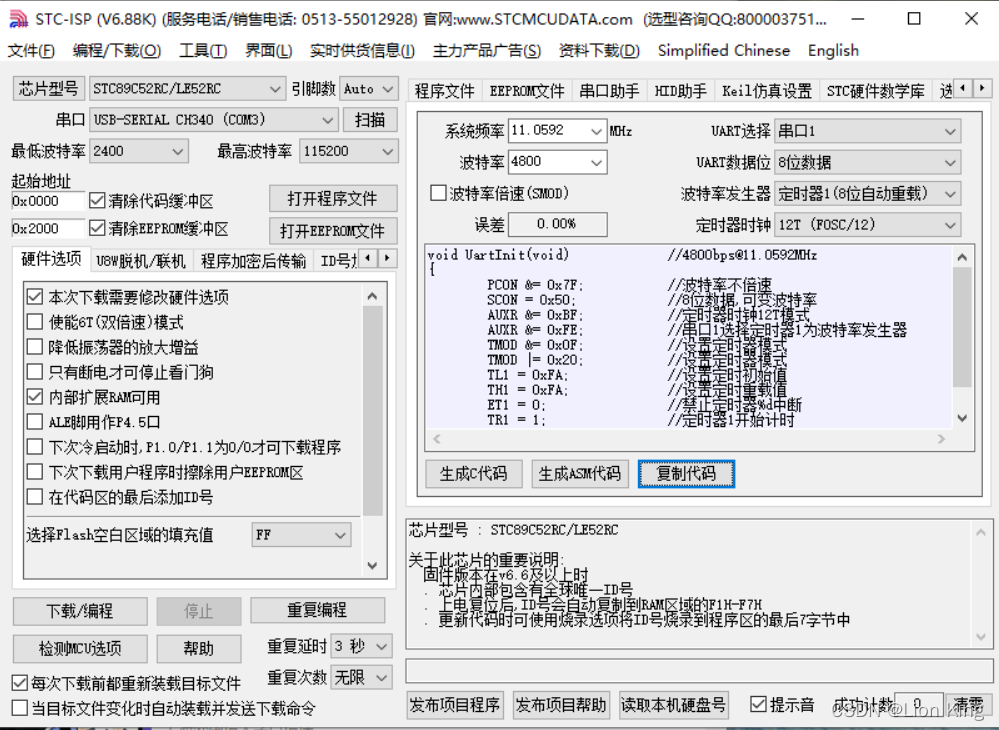
11、使用工具生成串口配置
12、编写程序
main.c
#include <STC89C5xRC.H>
#include "Delay.h"
#include "UART.h"unsigned char Sec;void main()
{UartInit();while(1){UART_SendByte(Sec);Sec++;Delay(1);  // 必要的延时,避免误差导致乱码,没误差的时候可以不需要}
}
UART.c
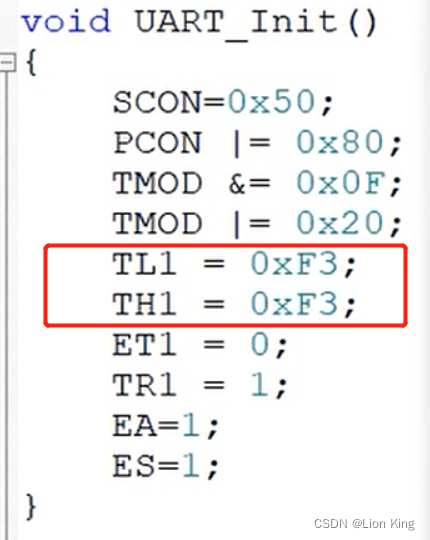
#include <STC89C5xRC.H>void UartInit(void)		//4800bps@11.0592MHz
{PCON &= 0x80;		//波特率不倍速SCON = 0x40;		//8位数据,可变波特率TMOD &= 0x0F;		//设置定时器模式TMOD |= 0x20;		//设置定时器模式TL1 = 0xFA;		//设置定时初始值TH1 = 0xFA;		//设置定时重载值ET1 = 0;		//禁止定时器%d中断TR1 = 1;		//定时器1开始计时
}void UART_SendByte(unsigned char Byte)
{SBUF=Byte;  // 根据硬件原理,操作寄存器while(TI==0);  // 操作寄存器,检测是否完成TI=0;  // 按要求重新赋值为0
}
UART.h
#ifndef __UART_H__
#define __UART_H__void UartInit(void);
void UART_SendByte(unsigned char Byte);#endif
其他文件:复制之前写的模块即可。
13、调试程序
二十、单片机实操十八:电脑通过串口控制LED
1、编写程序
#include <STC89C5xRC.H>
#include "Delay.h"
#include "UART.h"unsigned char Sec;void main()
{UartInit();while(1){}
}void UART_Routine() interrupt 4
{if(RI==1){P2=~SBUF;  // 读寄存器的数据UART_SendByte(SBUF);RI=0;  // 说明书要求手动复位}
}
其他文件:复制之前写的模块即可。
2、波特率计算
(1)内部逻辑图
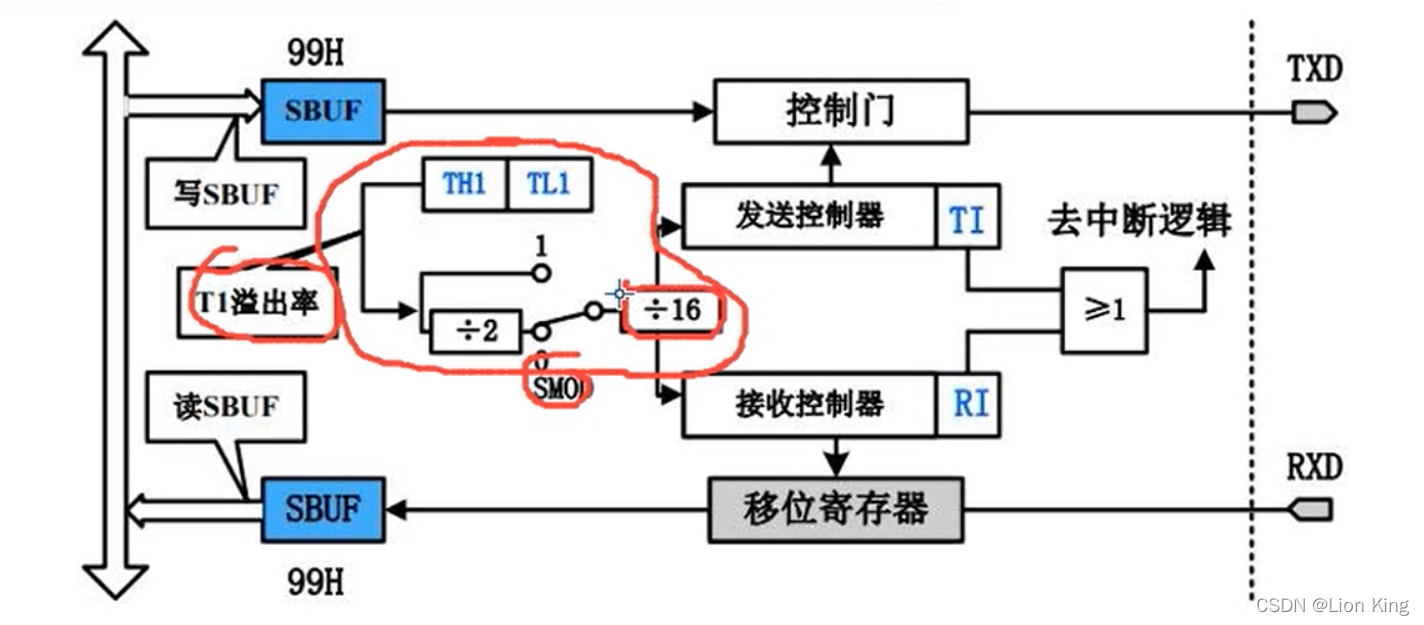
(2)配置的定时初值
(3)计算方式
F3=243;
256-243=13us;
每记13次数,溢出1次;
1/13=0.0769230769230769MHz;
0.0769230769230769/16=0.0048076923076923MHz=4,807.692307692308HZ
3、ASCII码编码表
文本模式与Hex模式对应情况。

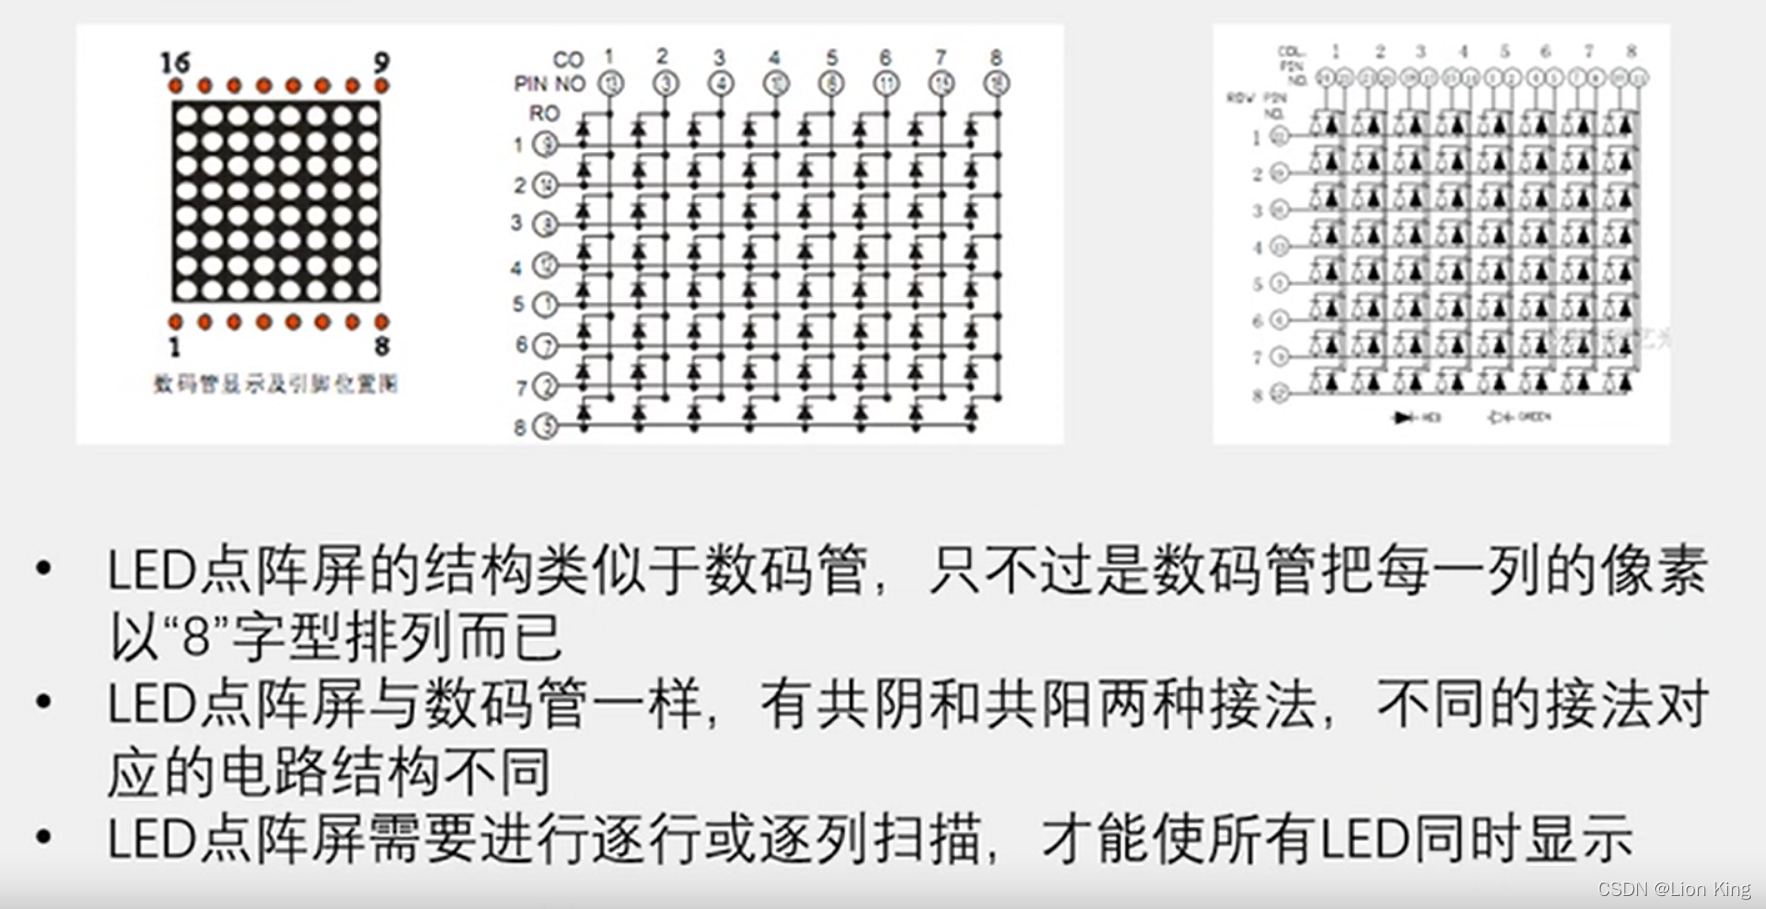
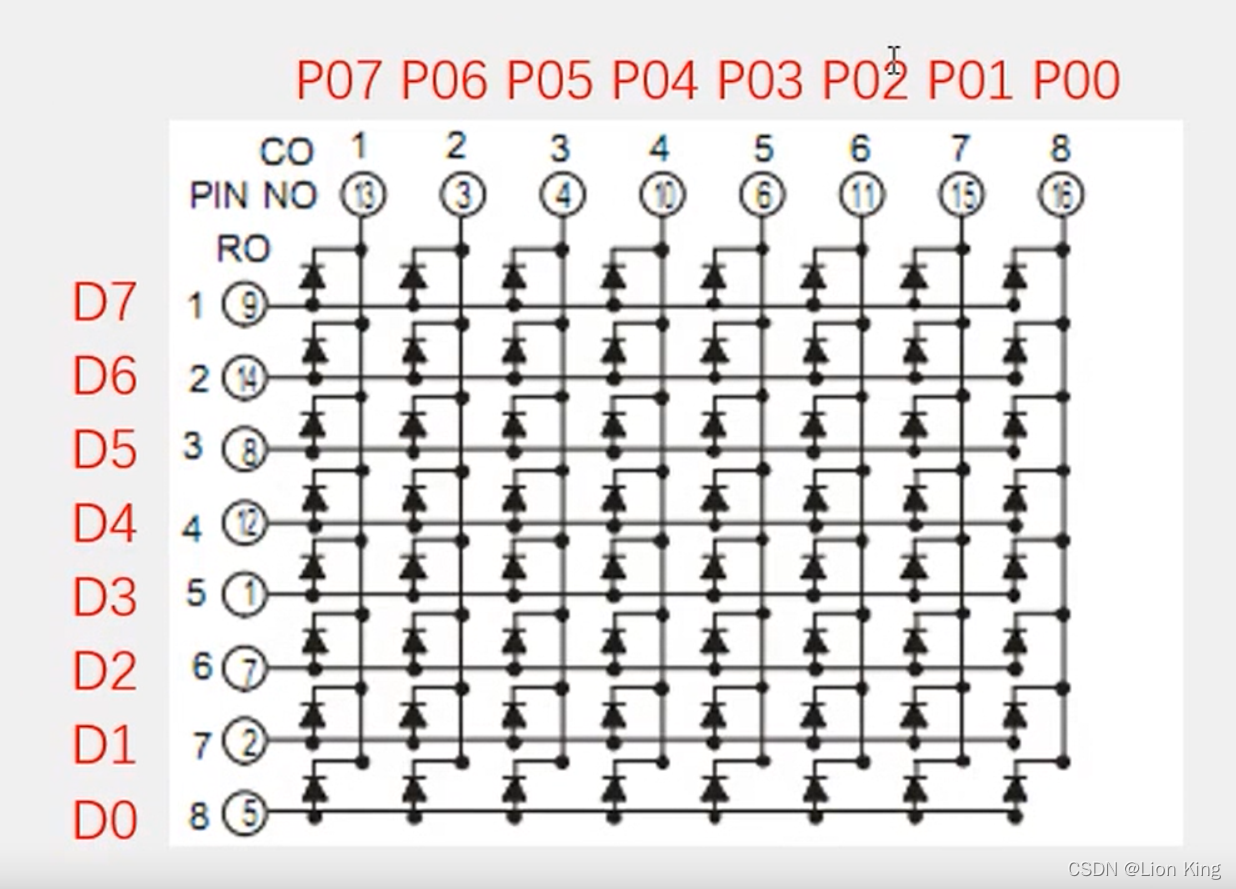
二十一、单片机实操十九:LED点阵屏与显示图形
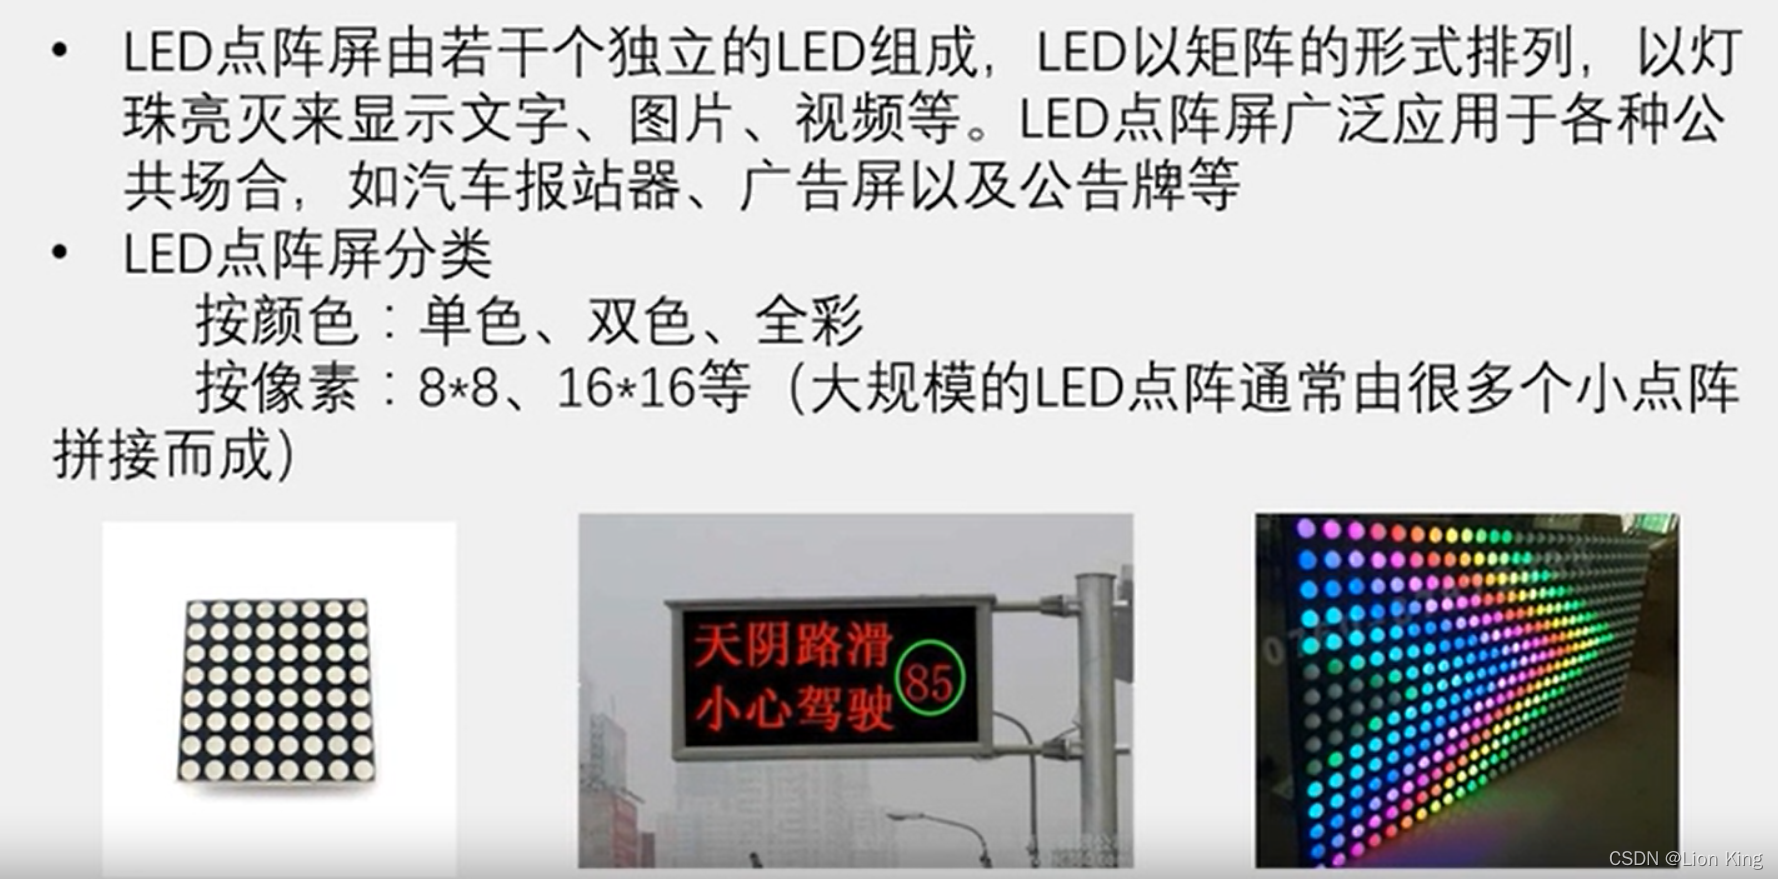
1、LED点阵屏介绍
2、显示原理
3、74HC595模块原理图
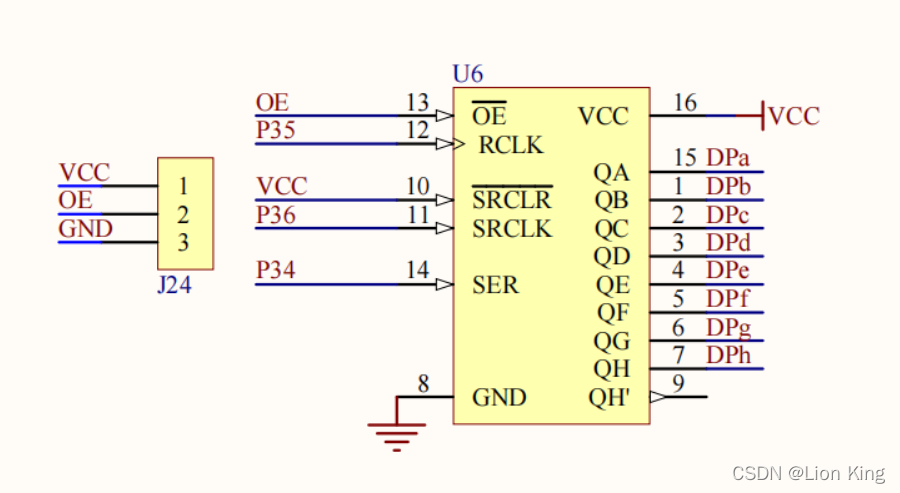
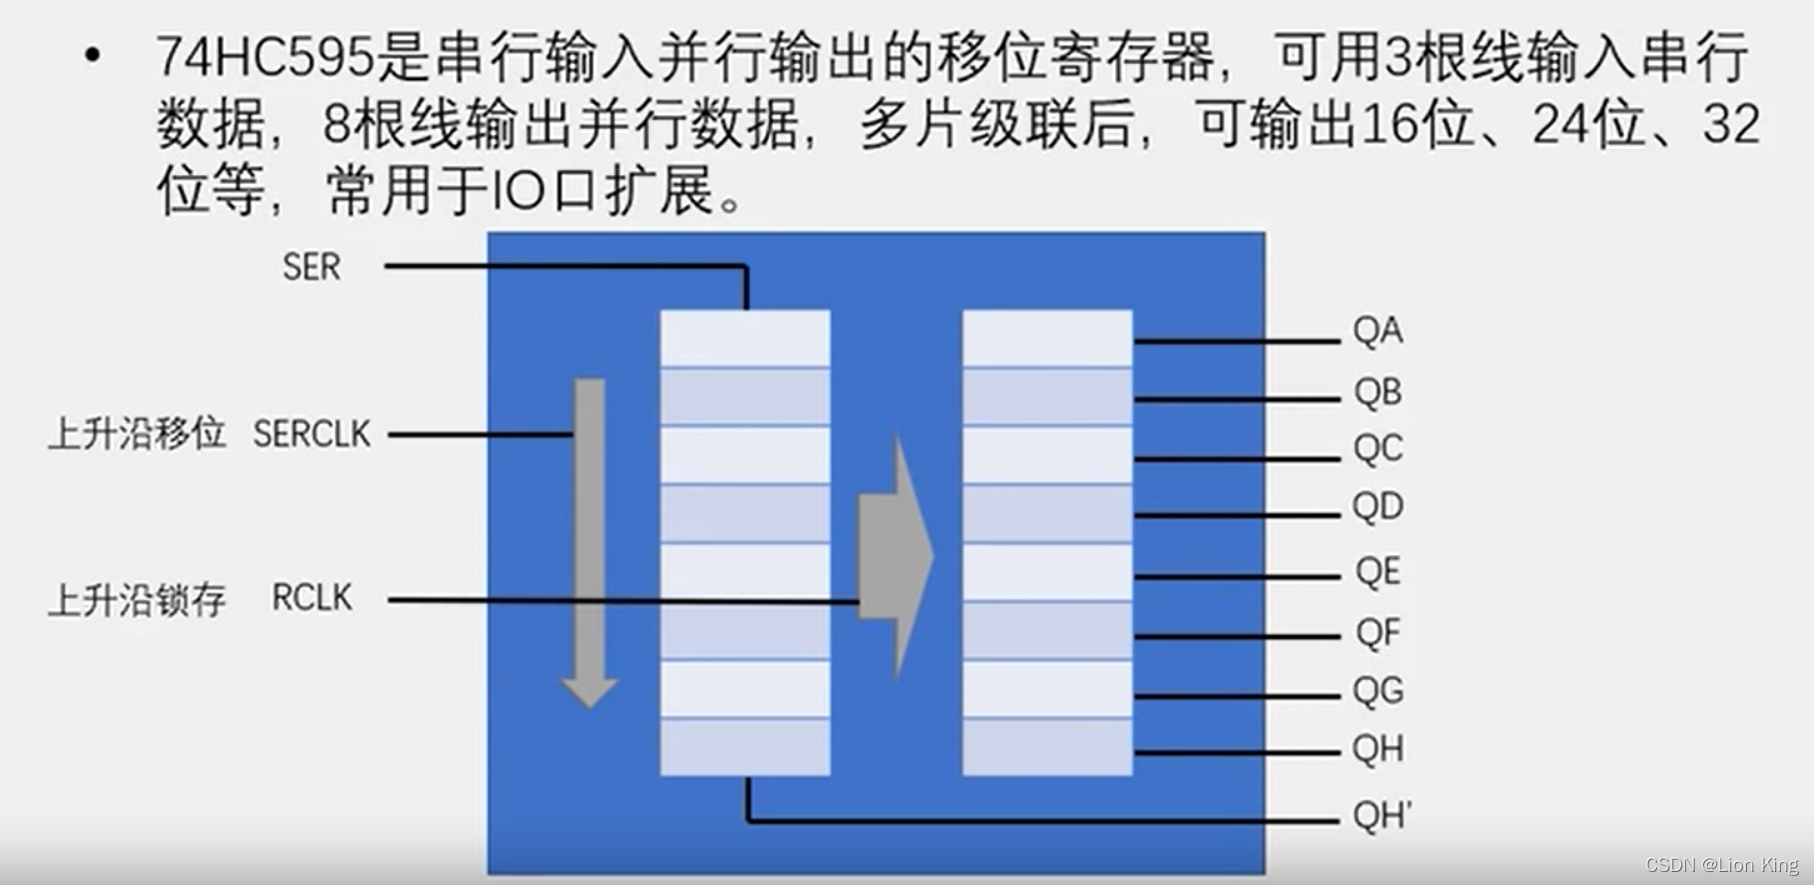
4、74HC595介绍
5、接线
OE要通过跳线帽与GND相连,而开发板默认OE与VCC相连,因此需要操作。
6、开发板引脚对应关系
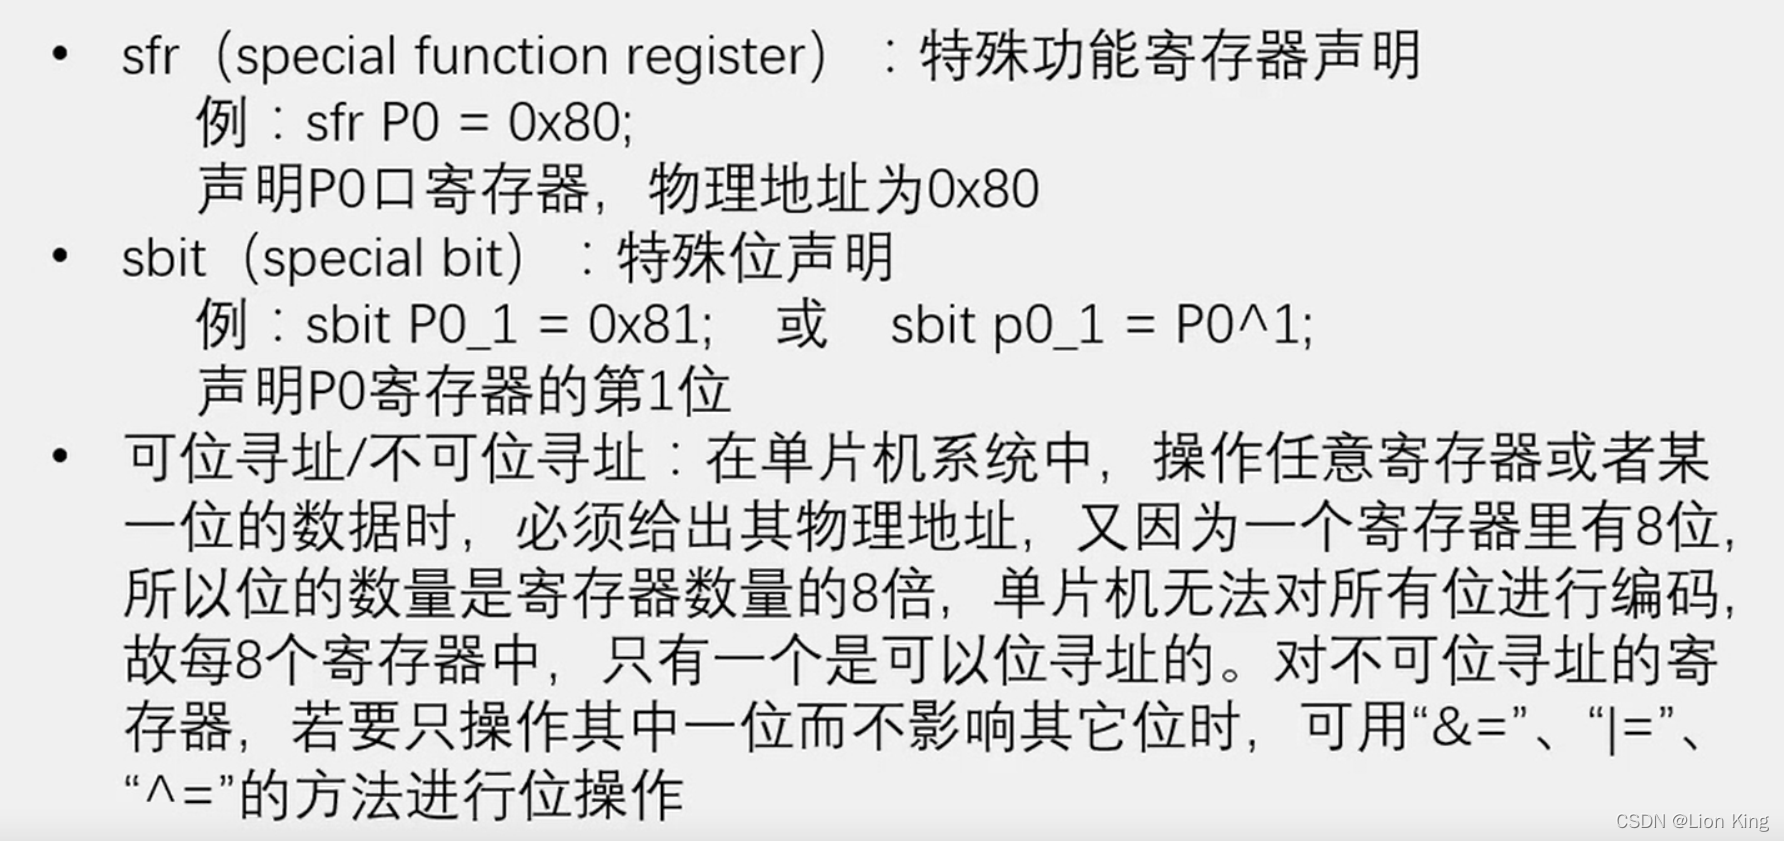
7、C51的sfr、sbit
8、编写程序
main.c
#include <STC89C5xRC.H>
#include "Delay.H"sbit RCK=P3^5;  //RCLK
sbit SCK=P3^6;  //SRCLK
sbit SER=P3^4;	//SER#define MATRIX_LED_PORT  P0void _74HC595_WriteByte(unsigned char Byte)
{
//	SER=Byte&0x80;  //一般是0、1赋值,不过,如果非0,都会当作1
//	SCK=1;
//	SCK=0;
//	SER=Byte&0x60;
//	SCK=1;
//	SCK=0;unsigned char i;for(i=0;i<8;i++){SER=Byte&(0x80>>i);SCK=1;SCK=0;}RCK=1;RCK=0;
}void MatrixLED_ShowColumn(unsigned char Column, Data)
{_74HC595_WriteByte(Data);
//	if(Column==0){P0=~0x80;}
//	if(Column==1){P0=~0x40;}MATRIX_LED_PORT=~(0x80>>Column);Delay(1);MATRIX_LED_PORT=0xFF;}void main()
{SCK=0;RCK=0;while(1){
//		_74HC595_WriteByte(0xAA);MatrixLED_ShowColumn(0,0x80);MatrixLED_ShowColumn(1,0x40);MatrixLED_ShowColumn(2,0x20);MatrixLED_ShowColumn(3,0x10);}
}
二十二、单片机实操二十:LED点阵屏显示动画
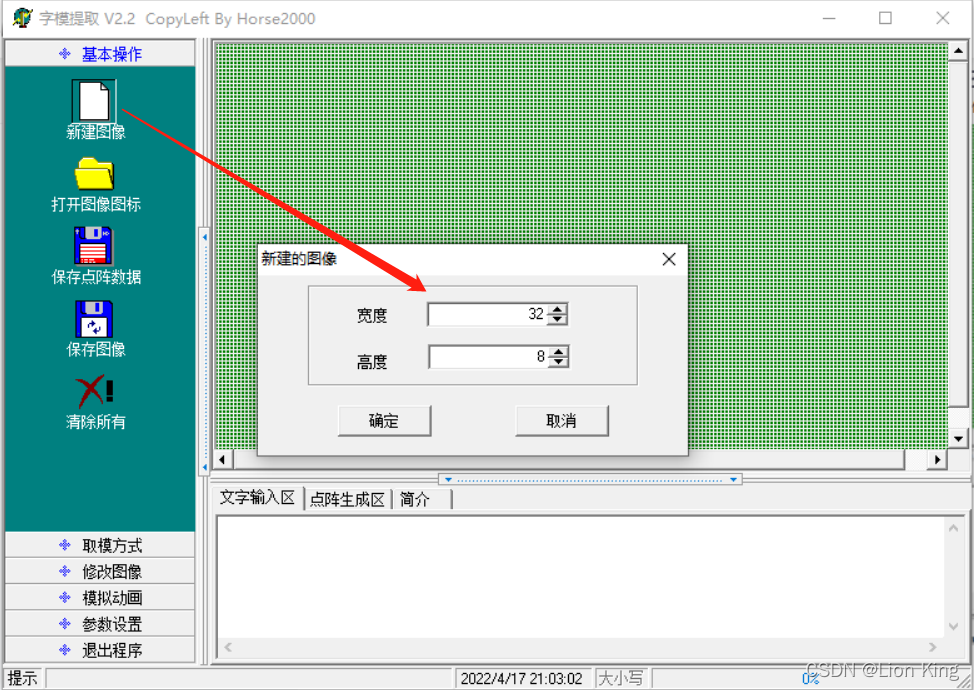
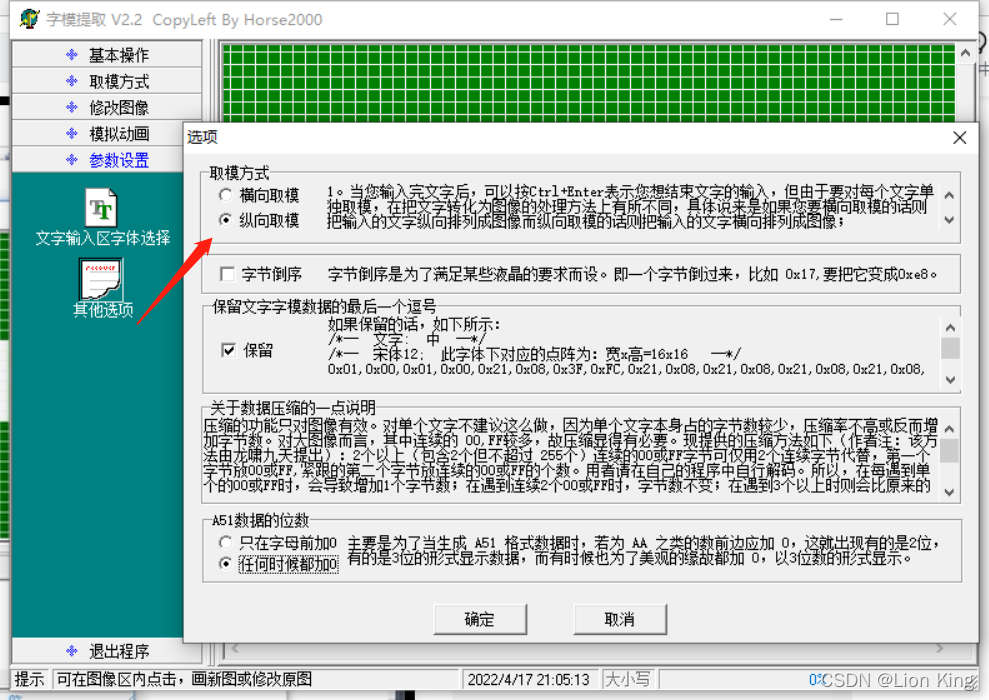
1、字模提取软件

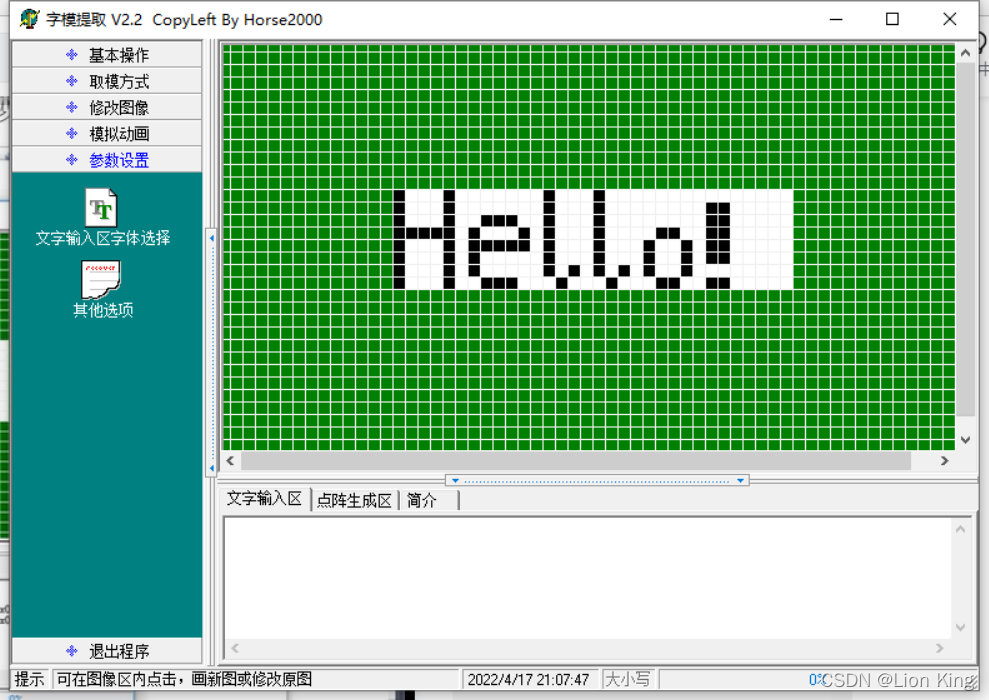
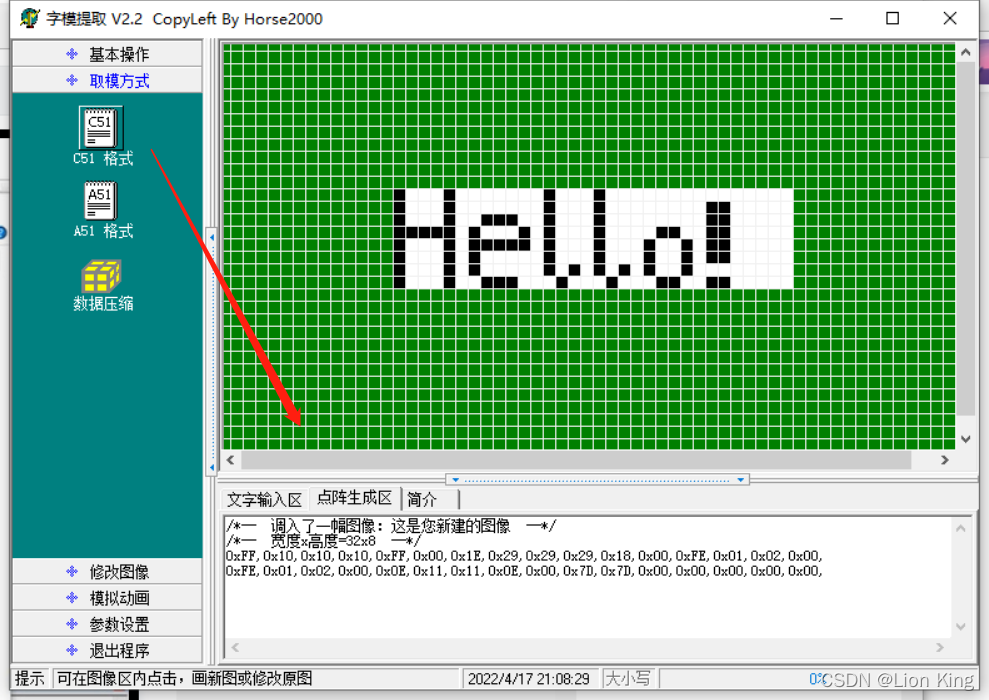
取出数据如下,将作为程序数组使用:
0xFF,0x10,0x10,0x10,0xFF,0x00,0x1E,0x29,0x29,0x29,0x18,0x00,0xFE,0x01,0x02,0x00,
0xFE,0x01,0x02,0x00,0x0E,0x11,0x11,0x0E,0x00,0x7D,0x7D,0x00,0x00,0x00,0x00,0x00,
2、编写程序
main.c
#include <STC89C5xRC.H>
#include "Delay.H"
#include "MatrixLED.H"unsigned char Animation[]={0x00,0x00,0x00,0x00,0x00,0x00,0x00,0x00,  // 为了显示更好看,避免第一列直接显示字符本身
0xFF,0x10,0x10,0x10,0xFF,0x00,0x1E,0x29,0x29,0x29,0x18,0x00,0xFE,0x01,0x02,0x00,
0xFE,0x01,0x02,0x00,0x0E,0x11,0x11,0x0E,0x00,0x7D,0x7D,0x00,0x00,0x00,0x00,0x00,
0x00,0x00,0x00,0x00,0x00,0x00,0x00,0x00,  // 为了显示更好看
};void main()
{unsigned char i, Offset=1, Count=0;while(1){for(i=0;i<8;i++){MatrixLED_ShowColumn(i,Animation[i+Offset]);}Count++;if(Count>10){Count=0;Offset++;if(Offset>40){Offset=0; //防止数组溢出}}}
}
MatrixLED.c
#include <STC89C5xRC.H>
#include "Delay.H"sbit RCK=P3^5;  //RCLK
sbit SCK=P3^6;  //SRCLK
sbit SER=P3^4;	//SER#define MATRIX_LED_PORT  P0void _74HC595_WriteByte(unsigned char Byte)
{
//	SER=Byte&0x80;  //一般是0、1赋值,不过,如果非0,都会当作1
//	SCK=1;
//	SCK=0;
//	SER=Byte&0x60;
//	SCK=1;
//	SCK=0;unsigned char i;for(i=0;i<8;i++){SER=Byte&(0x80>>i);SCK=1;SCK=0;}RCK=1;RCK=0;
}void MatrixLED_Init()
{SCK=0;RCK=0;
}void MatrixLED_ShowColumn(unsigned char Column, Data)
{_74HC595_WriteByte(Data);
//	if(Column==0){P0=~0x80;}
//	if(Column==1){P0=~0x40;}MATRIX_LED_PORT=~(0x80>>Column);Delay(1);MATRIX_LED_PORT=0xFF;}
MatrixLED.h
#ifndef __MATRIXLED_H__
#define __MATRIXLED_H__void MatrixLED_ShowColumn(unsigned char Column, Data);
void MatrixLED_Init();#endif
3、注意事项
将数据放在flash里面,用来避免内存被消耗过多,但这种数据是不能更改的,方法如下:
将
unsigned char Animation[]
改为
unsigned char code Animation[]
二十三、单片机实操二十一:DS1302实时时钟
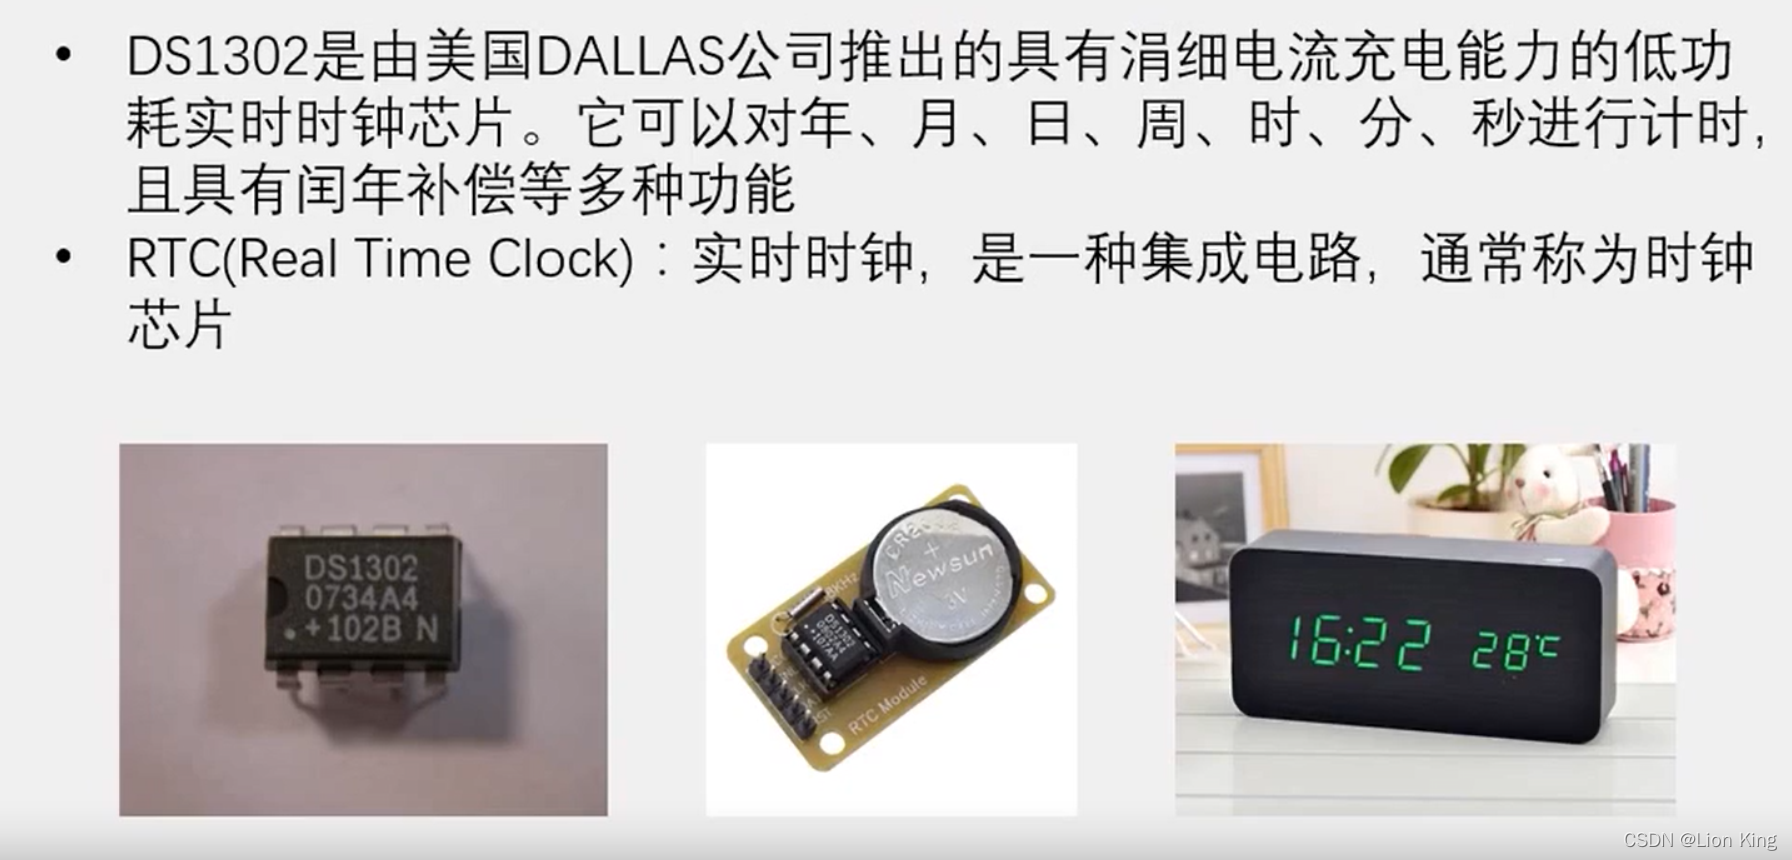
1、DS1302介绍
2、引脚定义和应用电路

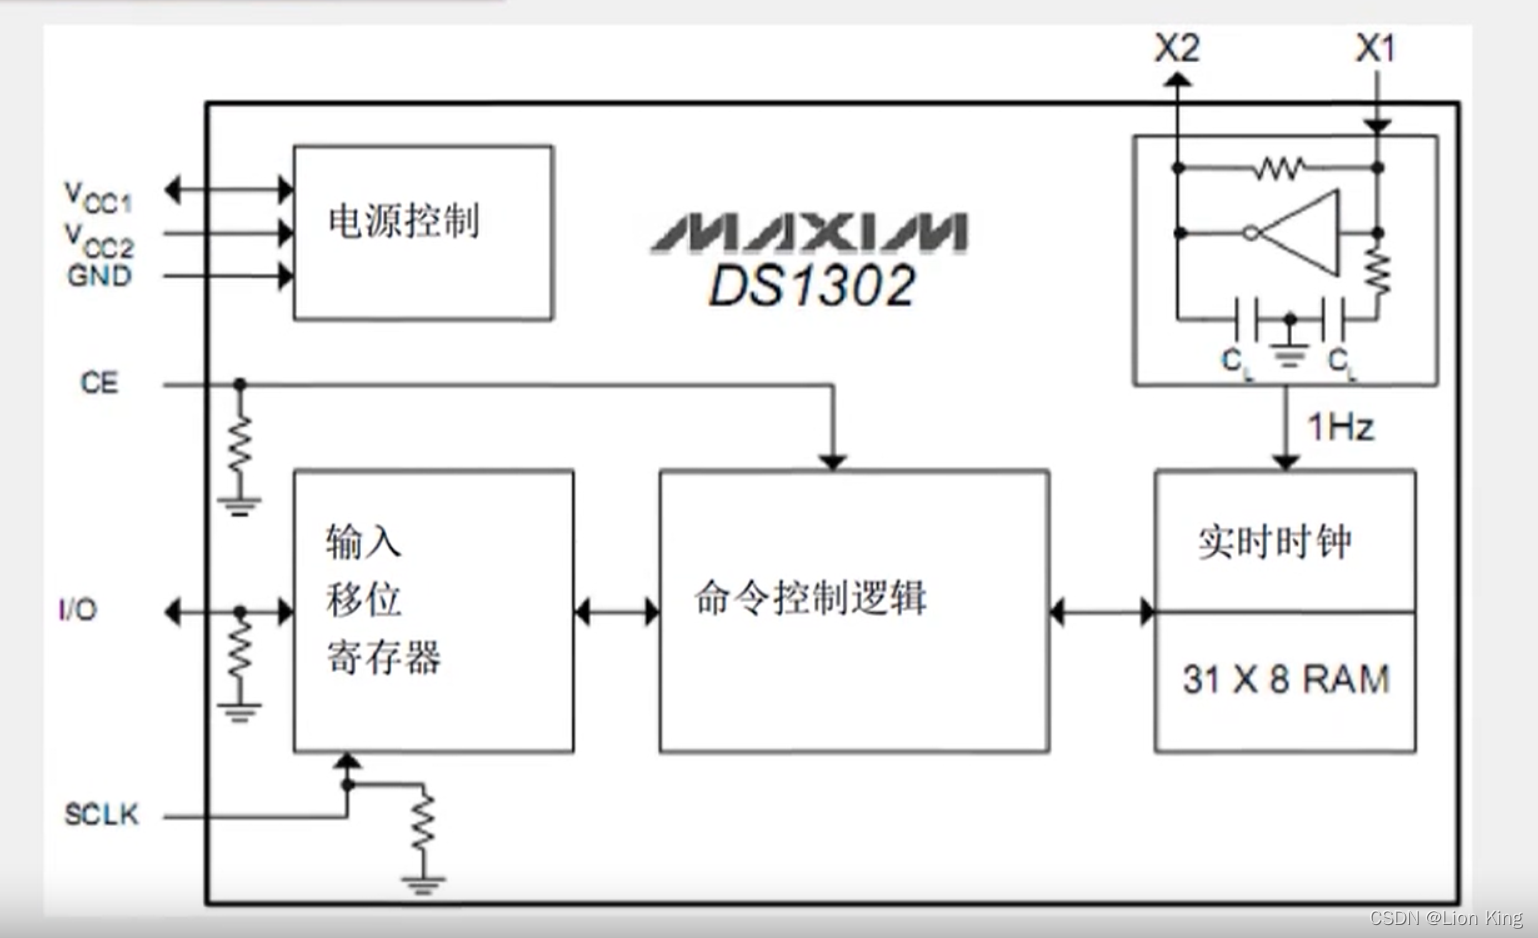
3、内部结构图
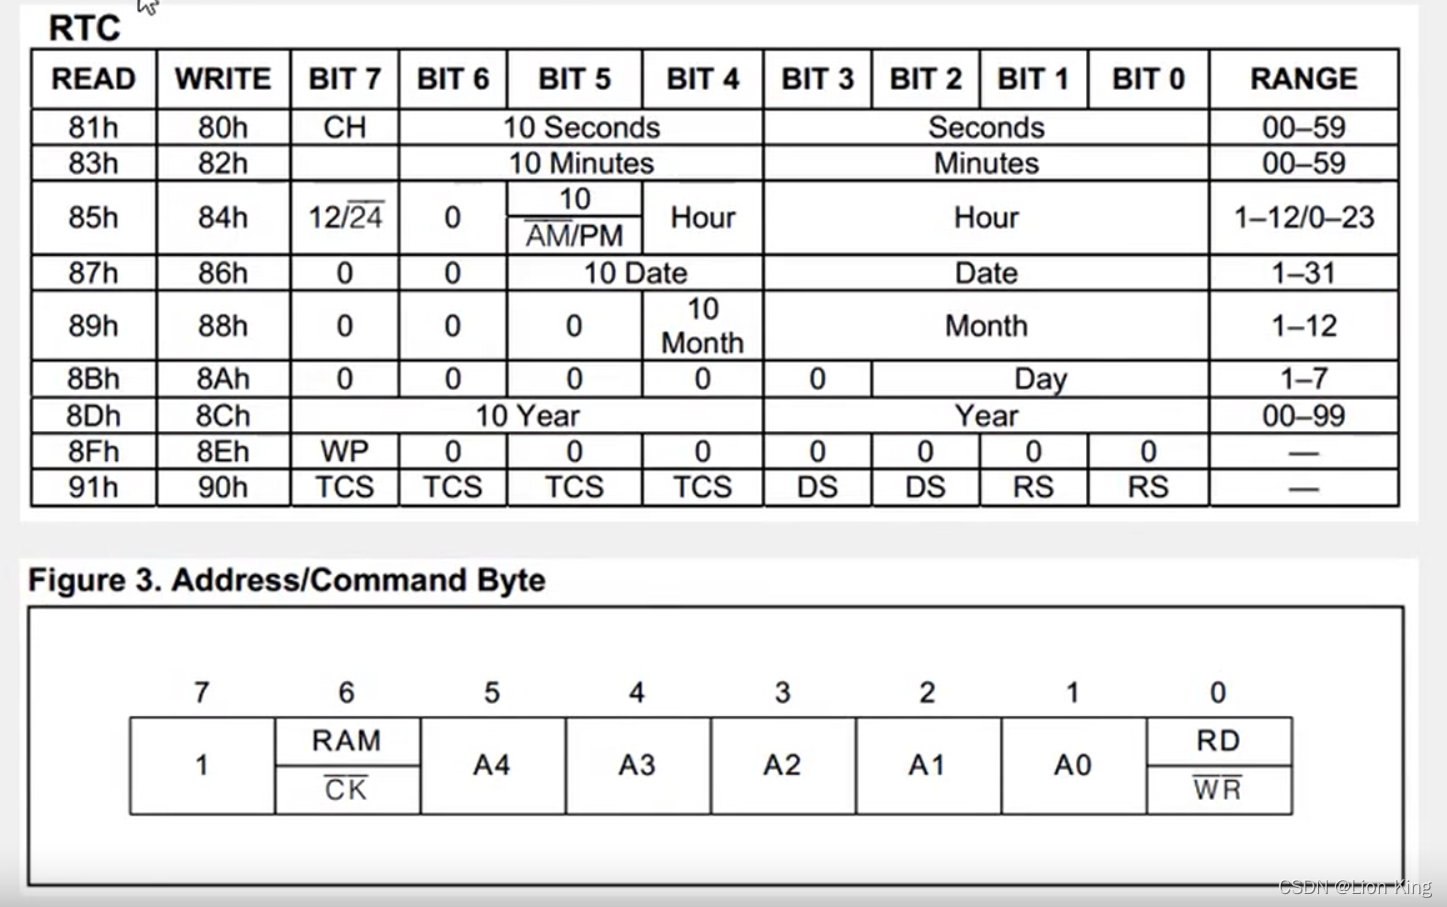
4、寄存器定义
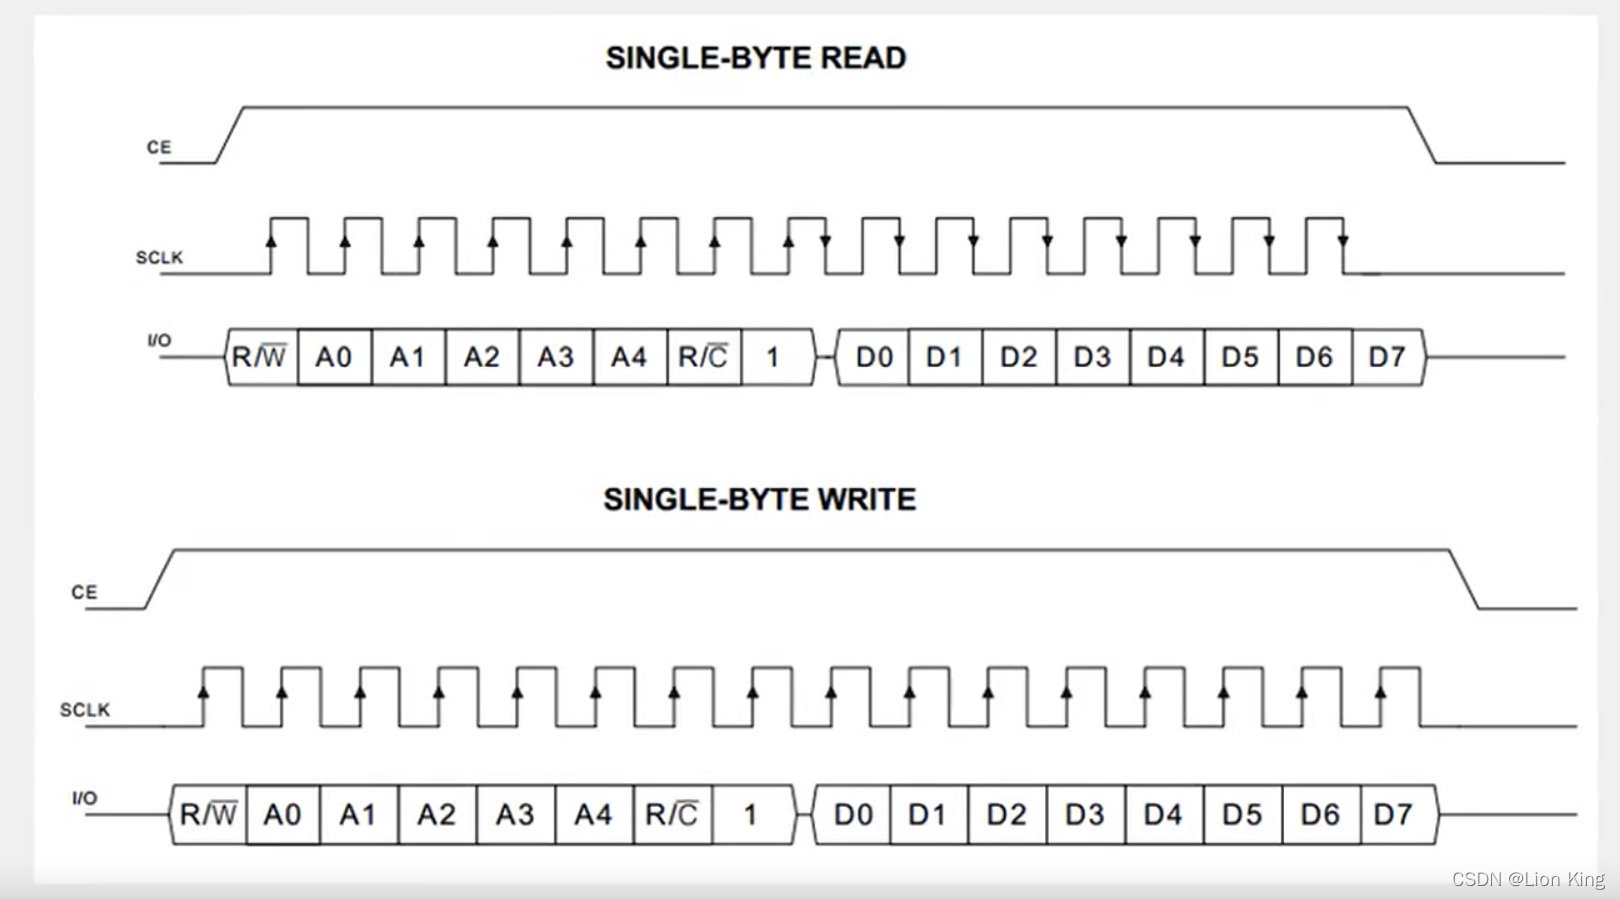
5、时序定义
6、BCD码

7、编写代码
main.c
#include <STC89C5xRC.H>
#include "LCD1602.h"
#include "DS1302.h"//  unsigned char Second, Minute;void main()
{LCD_Init();DS1302_Init();//	DS1302_WriteByte(0x8E, 0x00);  // 解除芯片写保护,避免数值不动
//	DS1302_WriteByte(0x80, 0x54);DS1302_SetTime();while(1){DS1302_ReadTime();LCD_ShowNum(1,1,DS1302_TIME[0],2);LCD_ShowNum(1,4,DS1302_TIME[1],2);LCD_ShowNum(1,7,DS1302_TIME[2],2);LCD_ShowNum(2,1,DS1302_TIME[3],2);LCD_ShowNum(2,4,DS1302_TIME[4],2);LCD_ShowNum(2,7,DS1302_TIME[5],2);//		Second=DS1302_ReadByte(0x81);
//		Minute=DS1302_ReadByte(0x83);
//		LCD_ShowNum(2,1,Second/16*10+Second%16,2);
//		LCD_ShowNum(2,3,Minute/16*10+Minute%16,2);}
}
DS1302.c
#include <STC89C5xRC.H>sbit DS1302_SCLK=P3^6;
sbit DS1302_IO=P3^4;
sbit DS1302_CE=P3^5;#define DS1302_SECOND 0x80
#define DS1302_MINUTE 0x82
#define DS1302_HOUR 0x84
#define DS1302_DATE 0x86
#define DS1302_MONTH 0x88
#define DS1302_DAY 0x8A
#define DS1302_YEAR 0x8C
#define DS1302_WP 0x8Eunsigned char DS1302_TIME[]={19,11,16,12,59,55,6};void DS1302_Init(void)
{DS1302_CE=0;DS1302_SCLK=0;
}void DS1302_WriteByte(unsigned char Command, Data)
{unsigned char i;DS1302_CE=1;//	DS1302_IO=Command&0x01;
//	DS1302_SCLK=1;  // 速度慢可以不加延时,有些速度快的芯片需要增加延时
//	DS1302_SCLK=0;
//
//	DS1302_IO=Command&0x02;
//	DS1302_SCLK=1;
//	DS1302_SCLK=0;for(i=0;i<8;i++){DS1302_IO=Command&(0x01<<i);DS1302_SCLK=1;DS1302_SCLK=0;}for(i=0;i<8;i++){DS1302_IO=Data&(0x01<<i);DS1302_SCLK=1;DS1302_SCLK=0;}DS1302_CE=0; //完成一次操作,释放IO
}unsigned char DS1302_ReadByte(unsigned char Command)
{unsigned char i,Data=0x00;Command|=0x01;  //DS1302_CE=1;for(i=0;i<8;i++){DS1302_IO=Command&(0x01<<i);DS1302_SCLK=0;  //根据时序操作DS1302_SCLK=1;}
//	DS1302_SCLK=0;
//	DS1302_SCLK=1;
//	if(DS1302_IO)
//	{
//		Data=Data|0x01;
//	}
//	DS1302_SCLK=0;
//	DS1302_SCLK=1;
//	if(DS1302_IO)
//	{
//		Data=Data|0x02;
//	}for(i=0;i<8;i++){DS1302_SCLK=1;  //重复置1是去掉一个周期,为的是满足时序DS1302_SCLK=0;if(DS1302_IO){Data|=(0x01<<i);}}DS1302_CE=0;DS1302_IO=0;  // 如果不加这一行,将显示全0return Data;
}void DS1302_SetTime(void)
{DS1302_WriteByte(DS1302_WP,0x00);DS1302_WriteByte(DS1302_YEAR,DS1302_TIME[0]/10*16+DS1302_TIME[0]%10);DS1302_WriteByte(DS1302_MONTH,DS1302_TIME[1]/10*16+DS1302_TIME[1]%10);DS1302_WriteByte(DS1302_DATE,DS1302_TIME[2]/10*16+DS1302_TIME[2]%10);DS1302_WriteByte(DS1302_HOUR,DS1302_TIME[3]/10*16+DS1302_TIME[3]%10);DS1302_WriteByte(DS1302_MINUTE,DS1302_TIME[4]/10*16+DS1302_TIME[4]%10);DS1302_WriteByte(DS1302_SECOND,DS1302_TIME[5]/10*16+DS1302_TIME[5]%10);DS1302_WriteByte(DS1302_DAY,DS1302_TIME[6]/10*16+DS1302_TIME[6]%10);DS1302_WriteByte(DS1302_WP,0x00);
}void DS1302_ReadTime(void)
{unsigned char Temp;Temp=DS1302_ReadByte(DS1302_YEAR);DS1302_TIME[0]=Temp/16*10+Temp%16;Temp=DS1302_ReadByte(DS1302_MONTH);DS1302_TIME[1]=Temp/16*10+Temp%16;Temp=DS1302_ReadByte(DS1302_DATE);DS1302_TIME[2]=Temp/16*10+Temp%16;Temp=DS1302_ReadByte(DS1302_HOUR);DS1302_TIME[3]=Temp/16*10+Temp%16;Temp=DS1302_ReadByte(DS1302_MINUTE);DS1302_TIME[4]=Temp/16*10+Temp%16;Temp=DS1302_ReadByte(DS1302_SECOND);DS1302_TIME[5]=Temp/16*10+Temp%16;Temp=DS1302_ReadByte(DS1302_DAY);DS1302_TIME[6]=Temp/16*10+Temp%16;
}
DS1302.h
#ifndef __DS1302_H__
#define __DS1302_H__extern unsigned char DS1302_TIME[];  // 声明数组void DS1302_Init(void);
void DS1302_WriteByte(unsigned char Command, Data);
unsigned char DS1302_ReadByte(unsigned char Command);
void DS1302_SetTime(void);
void DS1302_ReadTime(void);#endif
二十四、单片机实操二十二:DS1302可调时钟
1、编写程序
main.c
#include <STC89C5xRC.H>
#include "LCD1602.h"
#include "DS1302.h"
#include "Key.h"
#include "Timer0.h"unsigned char KeyNum,MODE,TimeSetSelect,TimeSetFlashFlag;void TimeShow(void)//时间显示功能
{DS1302_ReadTime();//读取时间LCD_ShowNum(1,1,DS1302_Time[0],2);//显示年LCD_ShowNum(1,4,DS1302_Time[1],2);//显示月LCD_ShowNum(1,7,DS1302_Time[2],2);//显示日LCD_ShowNum(2,1,DS1302_Time[3],2);//显示时LCD_ShowNum(2,4,DS1302_Time[4],2);//显示分LCD_ShowNum(2,7,DS1302_Time[5],2);//显示秒
}void TimeSet(void)//时间设置功能
{if(KeyNum==2)//按键2按下{TimeSetSelect++;//设置选择位加1TimeSetSelect%=6;//越界清零}if(KeyNum==3)//按键3按下{DS1302_Time[TimeSetSelect]++;//时间设置位数值加1if(DS1302_Time[0]>99){DS1302_Time[0]=0;}//年越界判断if(DS1302_Time[1]>12){DS1302_Time[1]=1;}//月越界判断if( DS1302_Time[1]==1 || DS1302_Time[1]==3 || DS1302_Time[1]==5 || DS1302_Time[1]==7 || DS1302_Time[1]==8 || DS1302_Time[1]==10 || DS1302_Time[1]==12)//日越界判断{if(DS1302_Time[2]>31){DS1302_Time[2]=1;}//大月}else if(DS1302_Time[1]==4 || DS1302_Time[1]==6 || DS1302_Time[1]==9 || DS1302_Time[1]==11){if(DS1302_Time[2]>30){DS1302_Time[2]=1;}//小月}else if(DS1302_Time[1]==2){if(DS1302_Time[0]%4==0){if(DS1302_Time[2]>29){DS1302_Time[2]=1;}//闰年2月}else{if(DS1302_Time[2]>28){DS1302_Time[2]=1;}//平年2月}}if(DS1302_Time[3]>23){DS1302_Time[3]=0;}//时越界判断if(DS1302_Time[4]>59){DS1302_Time[4]=0;}//分越界判断if(DS1302_Time[5]>59){DS1302_Time[5]=0;}//秒越界判断}if(KeyNum==4)//按键3按下{DS1302_Time[TimeSetSelect]--;//时间设置位数值减1if(DS1302_Time[0]<0){DS1302_Time[0]=99;}//年越界判断if(DS1302_Time[1]<1){DS1302_Time[1]=12;}//月越界判断if( DS1302_Time[1]==1 || DS1302_Time[1]==3 || DS1302_Time[1]==5 || DS1302_Time[1]==7 || DS1302_Time[1]==8 || DS1302_Time[1]==10 || DS1302_Time[1]==12)//日越界判断{if(DS1302_Time[2]<1){DS1302_Time[2]=31;}//大月if(DS1302_Time[2]>31){DS1302_Time[2]=1;}}else if(DS1302_Time[1]==4 || DS1302_Time[1]==6 || DS1302_Time[1]==9 || DS1302_Time[1]==11){if(DS1302_Time[2]<1){DS1302_Time[2]=30;}//小月if(DS1302_Time[2]>30){DS1302_Time[2]=1;}}else if(DS1302_Time[1]==2){if(DS1302_Time[0]%4==0){if(DS1302_Time[2]<1){DS1302_Time[2]=29;}//闰年2月if(DS1302_Time[2]>29){DS1302_Time[2]=1;}}else{if(DS1302_Time[2]<1){DS1302_Time[2]=28;}//平年2月if(DS1302_Time[2]>28){DS1302_Time[2]=1;}}}if(DS1302_Time[3]<0){DS1302_Time[3]=23;}//时越界判断if(DS1302_Time[4]<0){DS1302_Time[4]=59;}//分越界判断if(DS1302_Time[5]<0){DS1302_Time[5]=59;}//秒越界判断}//更新显示,根据TimeSetSelect和TimeSetFlashFlag判断可完成闪烁功能if(TimeSetSelect==0 && TimeSetFlashFlag==1){LCD_ShowString(1,1,"  ");}else {LCD_ShowNum(1,1,DS1302_Time[0],2);}if(TimeSetSelect==1 && TimeSetFlashFlag==1){LCD_ShowString(1,4,"  ");}else {LCD_ShowNum(1,4,DS1302_Time[1],2);}if(TimeSetSelect==2 && TimeSetFlashFlag==1){LCD_ShowString(1,7,"  ");}else {LCD_ShowNum(1,7,DS1302_Time[2],2);}if(TimeSetSelect==3 && TimeSetFlashFlag==1){LCD_ShowString(2,1,"  ");}else {LCD_ShowNum(2,1,DS1302_Time[3],2);}if(TimeSetSelect==4 && TimeSetFlashFlag==1){LCD_ShowString(2,4,"  ");}else {LCD_ShowNum(2,4,DS1302_Time[4],2);}if(TimeSetSelect==5 && TimeSetFlashFlag==1){LCD_ShowString(2,7,"  ");}else {LCD_ShowNum(2,7,DS1302_Time[5],2);}
}void main()
{LCD_Init();DS1302_Init();Timer0Init();LCD_ShowString(1,1,"  -  -  ");//静态字符初始化显示LCD_ShowString(2,1,"  :  :  ");DS1302_SetTime();//设置时间while(1){KeyNum=Key();//读取键码if(KeyNum==1)//按键1按下{if(MODE==0){MODE=1;TimeSetSelect=0;}//功能切换else if(MODE==1){MODE=0;DS1302_SetTime();}}switch(MODE)//根据不同的功能执行不同的函数{case 0:TimeShow();break;case 1:TimeSet();break;}}
}void Timer0_Routine() interrupt 1
{static unsigned int T0Count;TL0 = 0x18;		//设置定时初值TH0 = 0xFC;		//设置定时初值T0Count++;if(T0Count>=500)//每500ms进入一次{T0Count=0;TimeSetFlashFlag=!TimeSetFlashFlag;//闪烁标志位取反}
}
DS1302.c
#include <STC89C5xRC.H>//引脚定义
sbit DS1302_SCLK=P3^6;
sbit DS1302_IO=P3^4;
sbit DS1302_CE=P3^5;//寄存器写入地址/指令定义
#define DS1302_SECOND		0x80
#define DS1302_MINUTE		0x82
#define DS1302_HOUR			0x84
#define DS1302_DATE			0x86
#define DS1302_MONTH		0x88
#define DS1302_DAY			0x8A
#define DS1302_YEAR			0x8C
#define DS1302_WP			0x8E//时间数组,索引0~6分别为年、月、日、时、分、秒、星期,设置为有符号的便于<0的判断
char DS1302_Time[]={19,11,16,12,59,55,6};/*** @brief  DS1302初始化* @param  无* @retval 无*/
void DS1302_Init(void)
{DS1302_CE=0;DS1302_SCLK=0;
}/*** @brief  DS1302写一个字节* @param  Command 命令字/地址* @param  Data 要写入的数据* @retval 无*/
void DS1302_WriteByte(unsigned char Command,Data)
{unsigned char i;DS1302_CE=1;for(i=0;i<8;i++){DS1302_IO=Command&(0x01<<i);DS1302_SCLK=1;DS1302_SCLK=0;}for(i=0;i<8;i++){DS1302_IO=Data&(0x01<<i);DS1302_SCLK=1;DS1302_SCLK=0;}DS1302_CE=0;
}/*** @brief  DS1302读一个字节* @param  Command 命令字/地址* @retval 读出的数据*/
unsigned char DS1302_ReadByte(unsigned char Command)
{unsigned char i,Data=0x00;Command|=0x01;	//将指令转换为读指令DS1302_CE=1;for(i=0;i<8;i++){DS1302_IO=Command&(0x01<<i);DS1302_SCLK=0;DS1302_SCLK=1;}for(i=0;i<8;i++){DS1302_SCLK=1;DS1302_SCLK=0;if(DS1302_IO){Data|=(0x01<<i);}}DS1302_CE=0;DS1302_IO=0;	//读取后将IO设置为0,否则读出的数据会出错return Data;
}/*** @brief  DS1302设置时间,调用之后,DS1302_Time数组的数字会被设置到DS1302中* @param  无* @retval 无*/
void DS1302_SetTime(void)
{DS1302_WriteByte(DS1302_WP,0x00);DS1302_WriteByte(DS1302_YEAR,DS1302_Time[0]/10*16+DS1302_Time[0]%10);//十进制转BCD码后写入DS1302_WriteByte(DS1302_MONTH,DS1302_Time[1]/10*16+DS1302_Time[1]%10);DS1302_WriteByte(DS1302_DATE,DS1302_Time[2]/10*16+DS1302_Time[2]%10);DS1302_WriteByte(DS1302_HOUR,DS1302_Time[3]/10*16+DS1302_Time[3]%10);DS1302_WriteByte(DS1302_MINUTE,DS1302_Time[4]/10*16+DS1302_Time[4]%10);DS1302_WriteByte(DS1302_SECOND,DS1302_Time[5]/10*16+DS1302_Time[5]%10);DS1302_WriteByte(DS1302_DAY,DS1302_Time[6]/10*16+DS1302_Time[6]%10);DS1302_WriteByte(DS1302_WP,0x80);
}/*** @brief  DS1302读取时间,调用之后,DS1302中的数据会被读取到DS1302_Time数组中* @param  无* @retval 无*/
void DS1302_ReadTime(void)
{unsigned char Temp;Temp=DS1302_ReadByte(DS1302_YEAR);DS1302_Time[0]=Temp/16*10+Temp%16;//BCD码转十进制后读取Temp=DS1302_ReadByte(DS1302_MONTH);DS1302_Time[1]=Temp/16*10+Temp%16;Temp=DS1302_ReadByte(DS1302_DATE);DS1302_Time[2]=Temp/16*10+Temp%16;Temp=DS1302_ReadByte(DS1302_HOUR);DS1302_Time[3]=Temp/16*10+Temp%16;Temp=DS1302_ReadByte(DS1302_MINUTE);DS1302_Time[4]=Temp/16*10+Temp%16;Temp=DS1302_ReadByte(DS1302_SECOND);DS1302_Time[5]=Temp/16*10+Temp%16;Temp=DS1302_ReadByte(DS1302_DAY);DS1302_Time[6]=Temp/16*10+Temp%16;
}
DS1302.h
#ifndef __DS1302_H__
#define __DS1302_H__//外部可调用时间数组,索引0~6分别为年、月、日、时、分、秒、星期,设置为有符号的便于<0的判断
extern char DS1302_Time[];void DS1302_Init(void);
void DS1302_WriteByte(unsigned char Command,Data);
unsigned char DS1302_ReadByte(unsigned char Command);
void DS1302_SetTime(void);
void DS1302_ReadTime(void);#endif
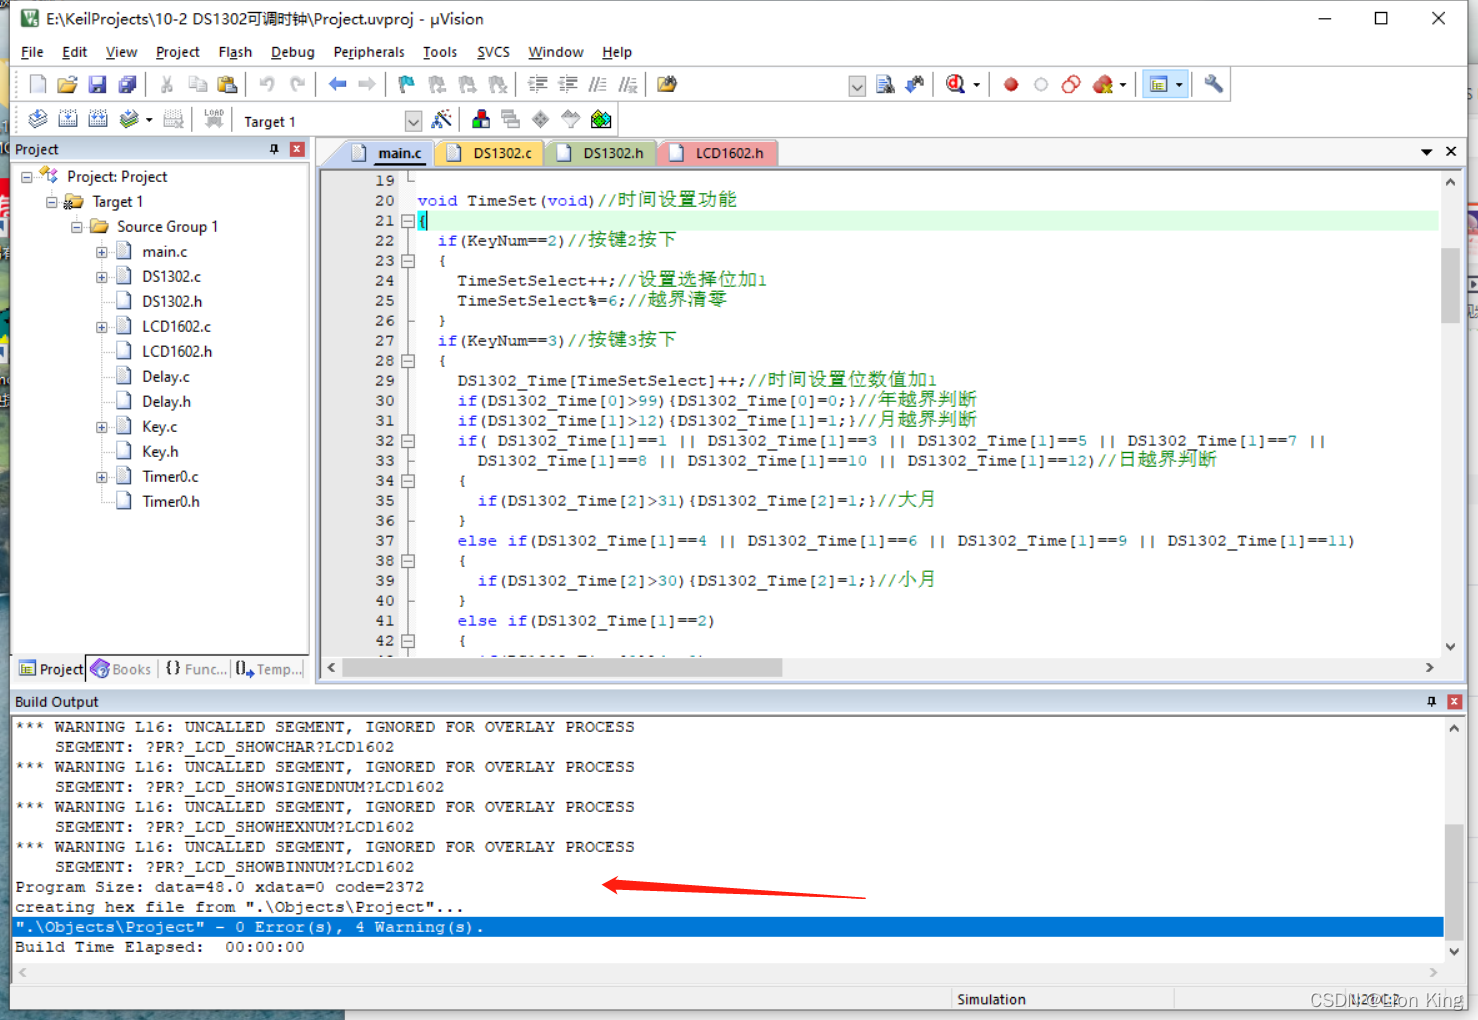
2、遇到问题
*** FATAL ERROR L250: CODE SIZE LIMIT IN RESTRICTED VERSION EXCEEDED
MODULE: D:\KEIL5\C51\LIB\C51S.LIB (-----)
LIMIT: 0800H BYTES
Target not created.
Build Time Elapsed: 00:00:01
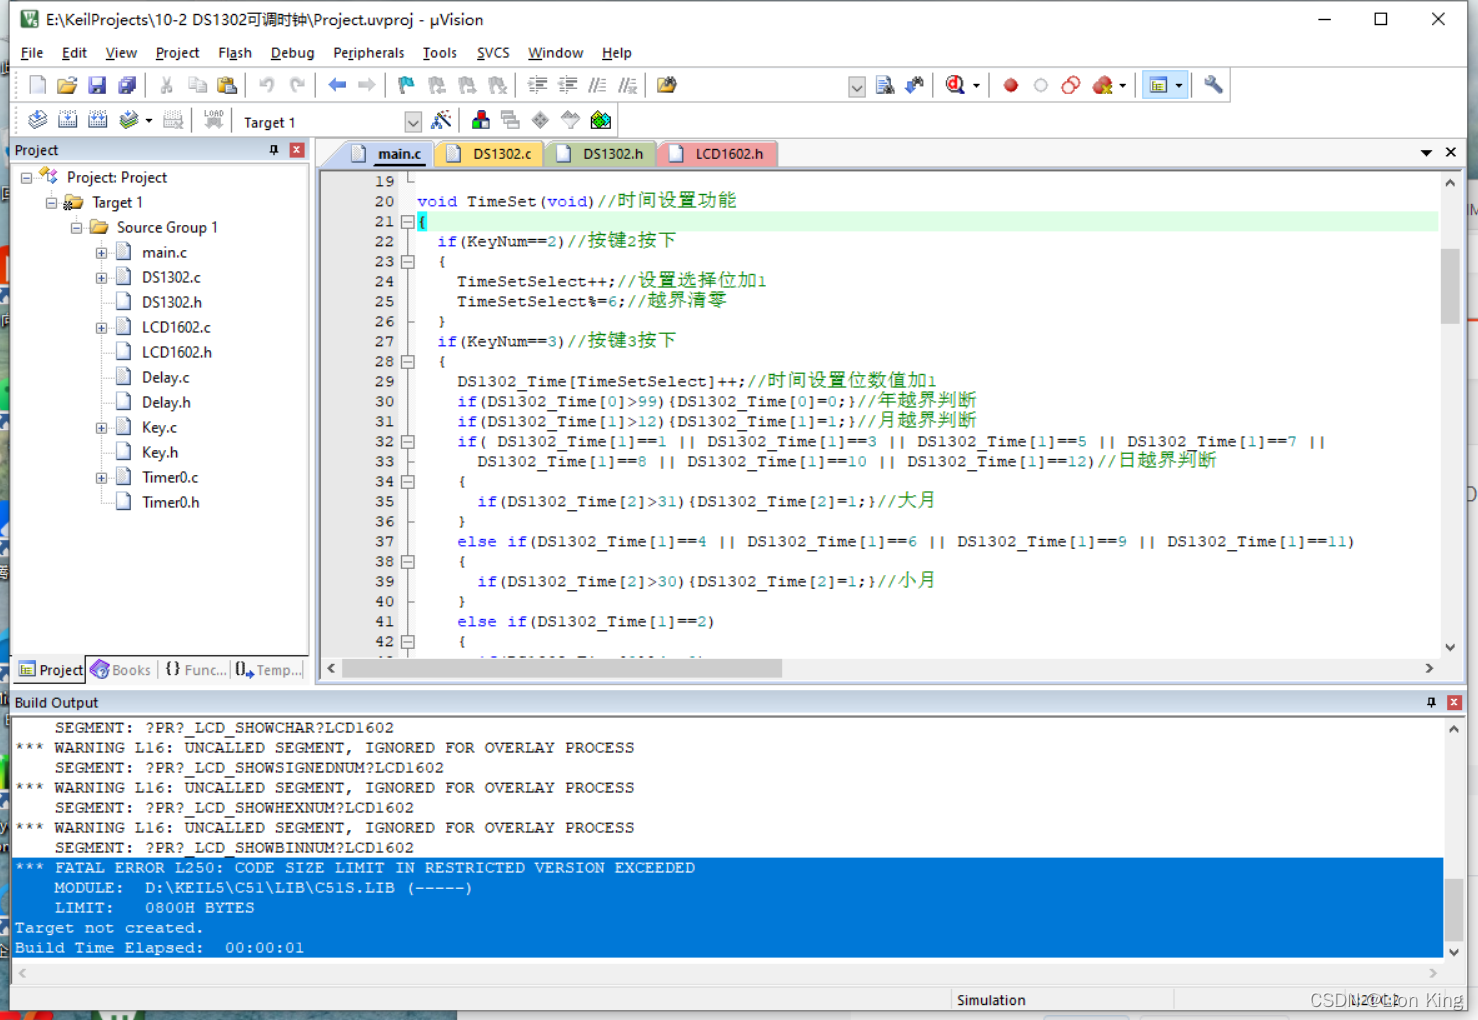
3、解决方式
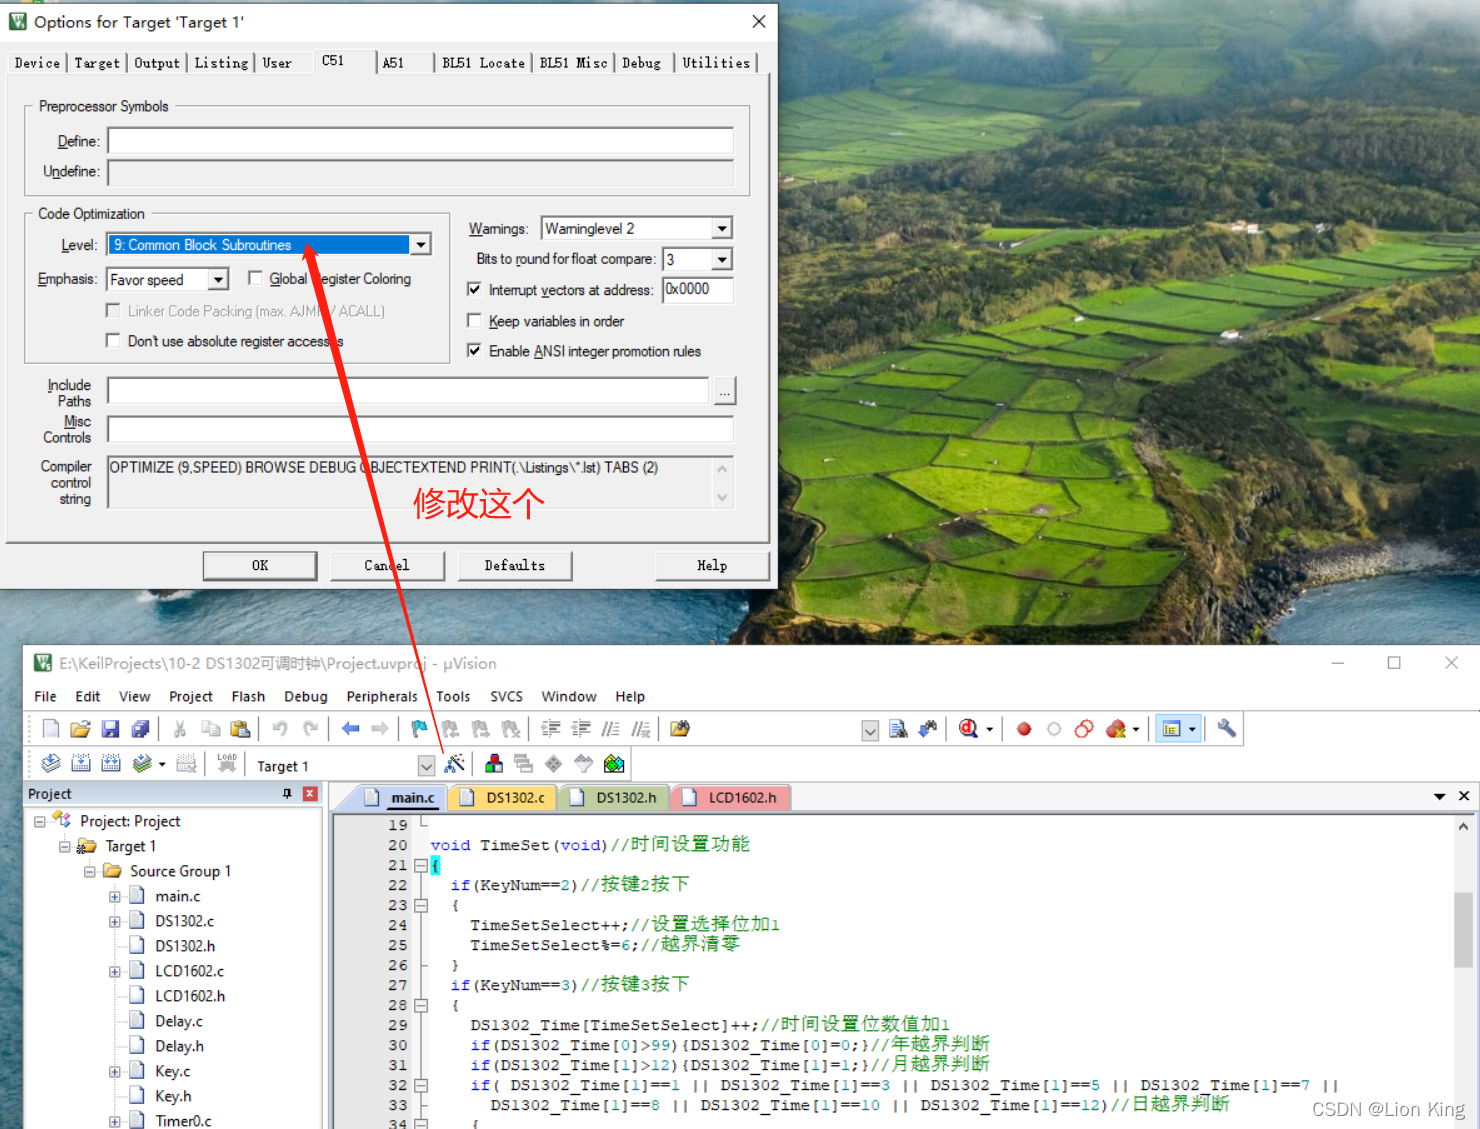
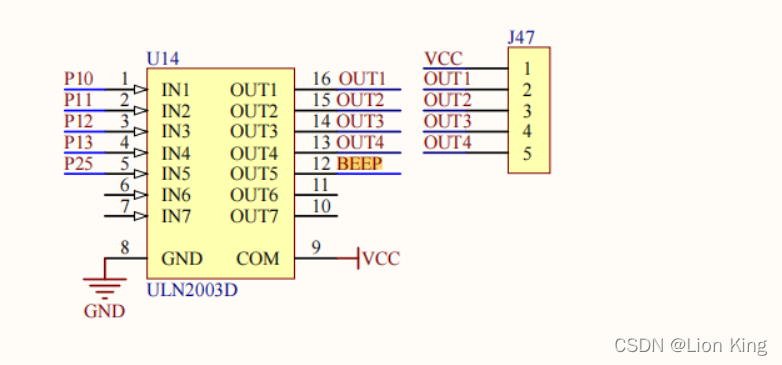
二十五、单片机实操二十三:蜂鸣器与播放提示音
1、蜂鸣器介绍
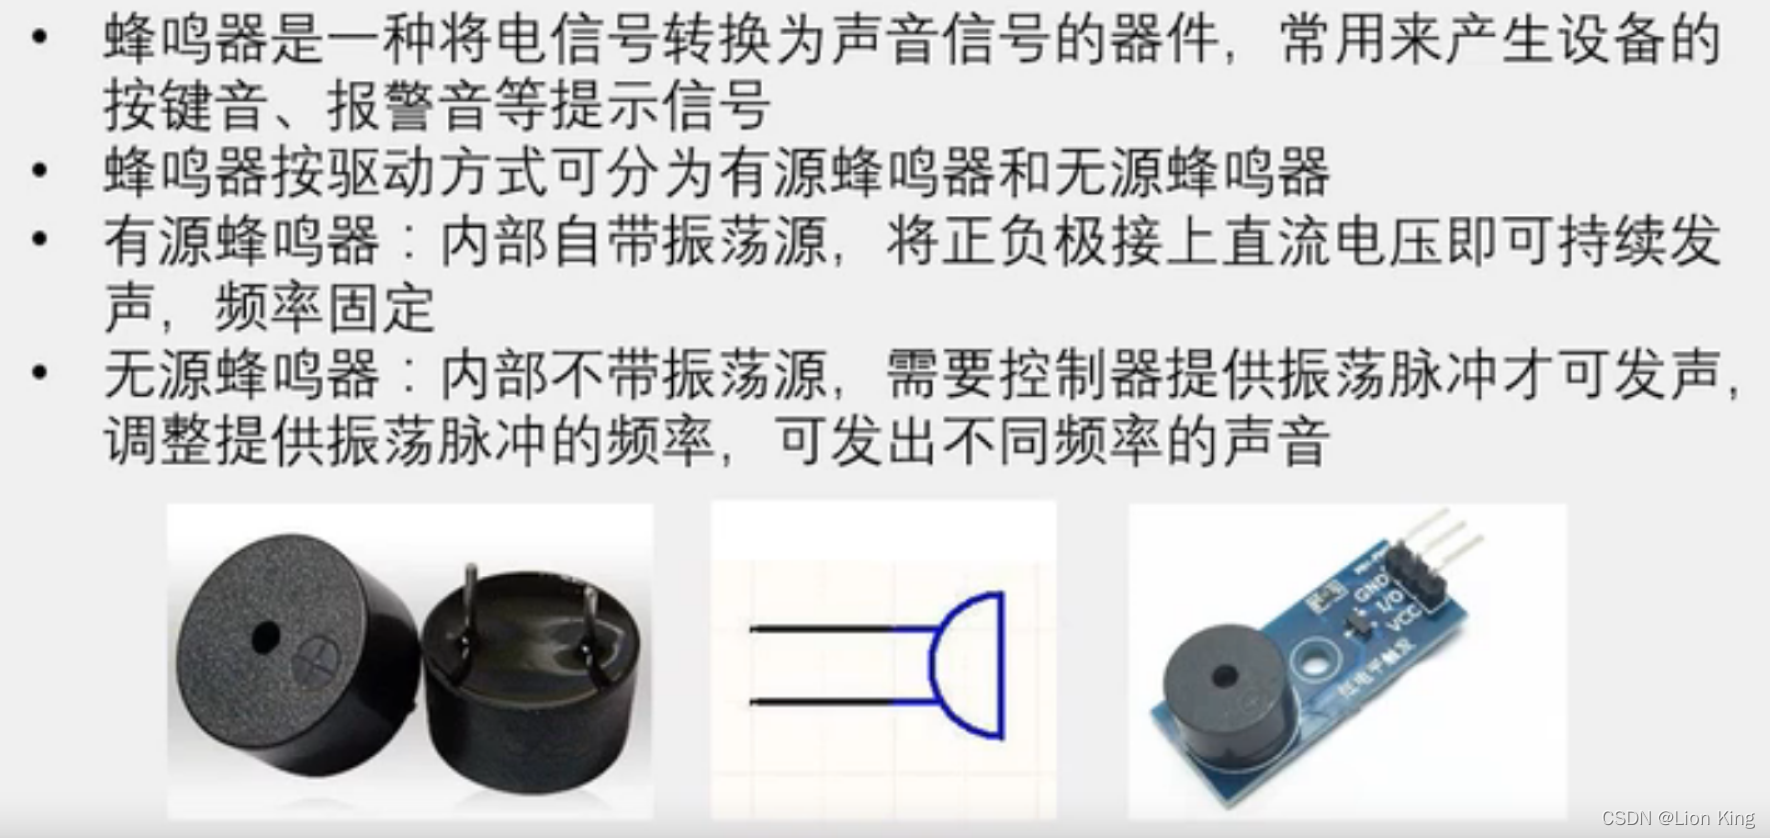
2、驱动电路
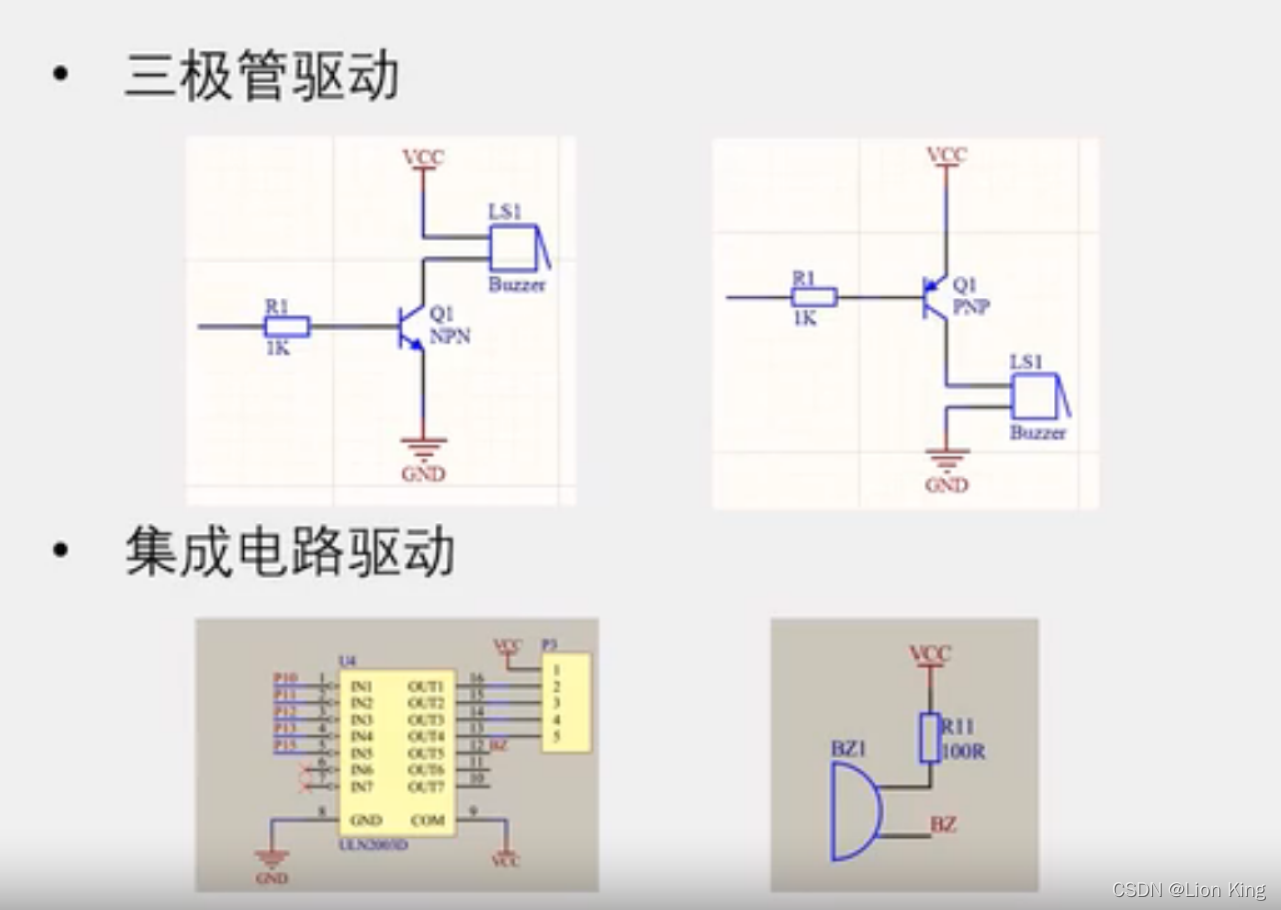
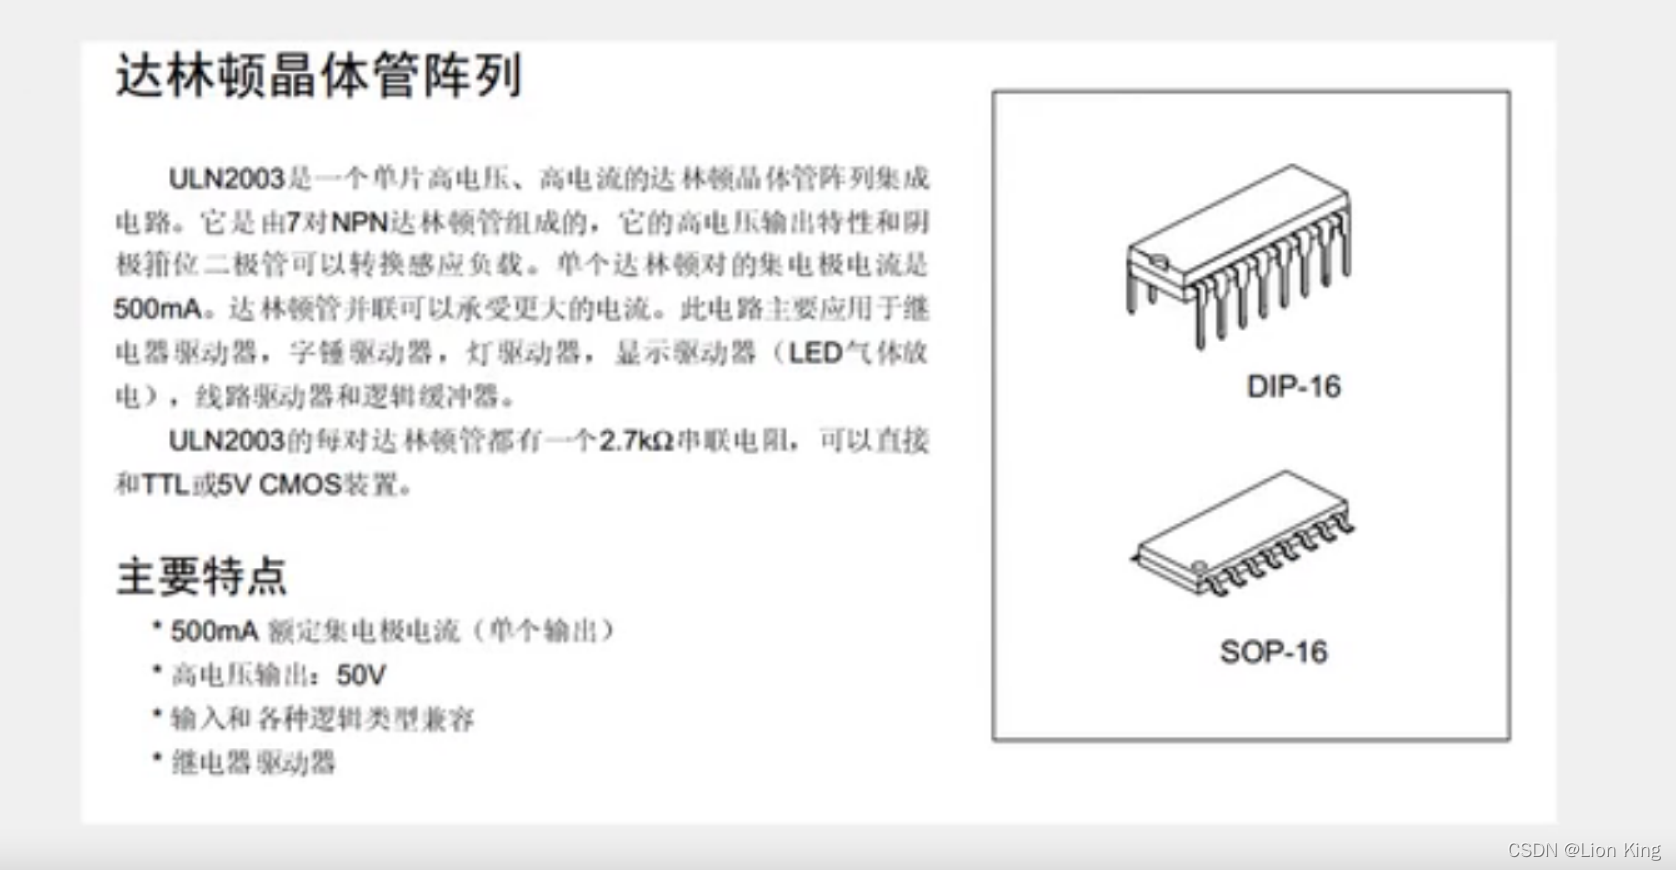
3、ULN2003
4、硬件原理图
无源蜂鸣器,使用的控制引脚是P25
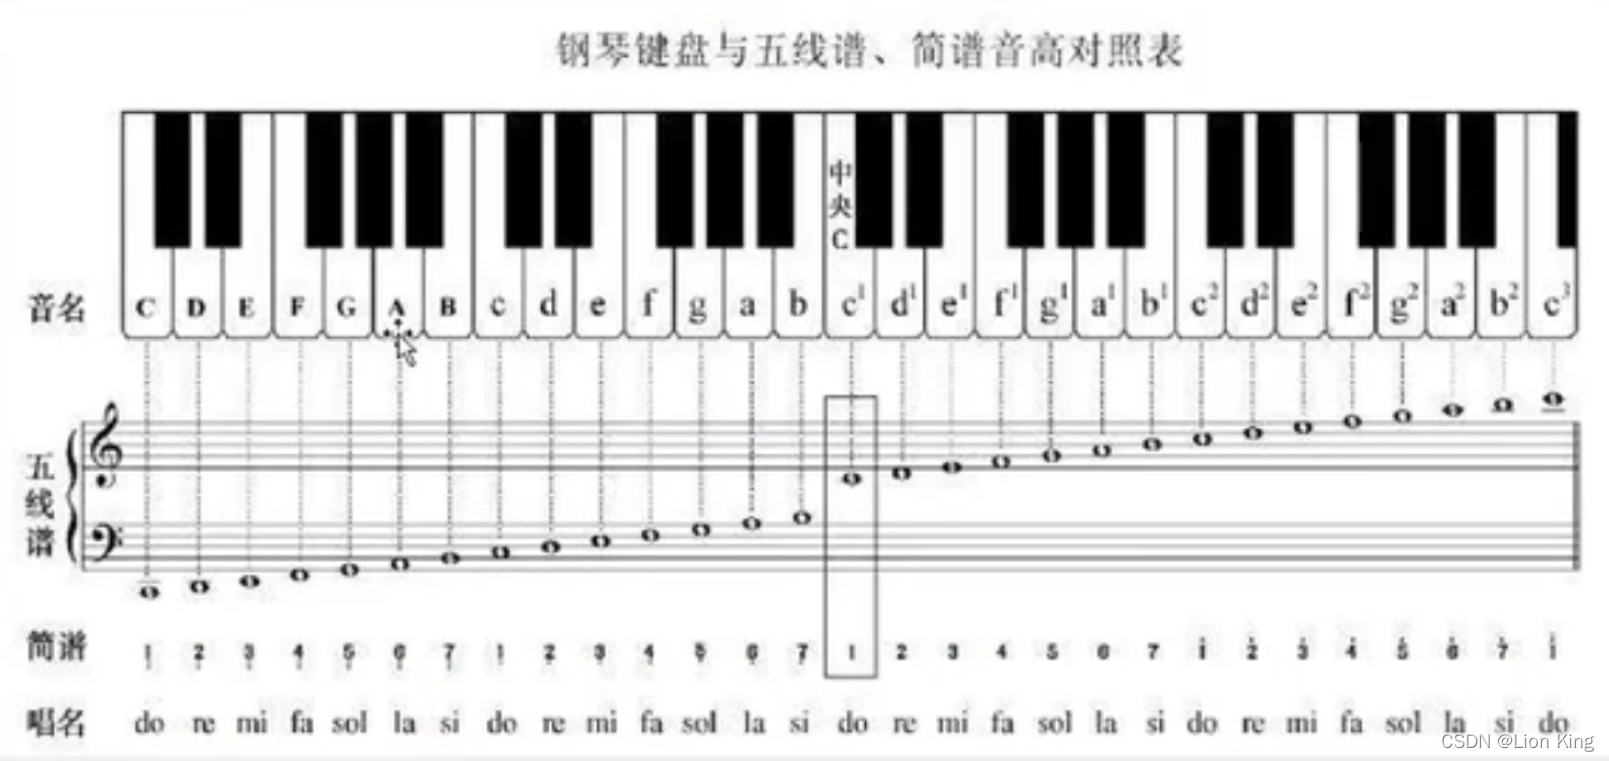
5、钢琴键盘与音符对照
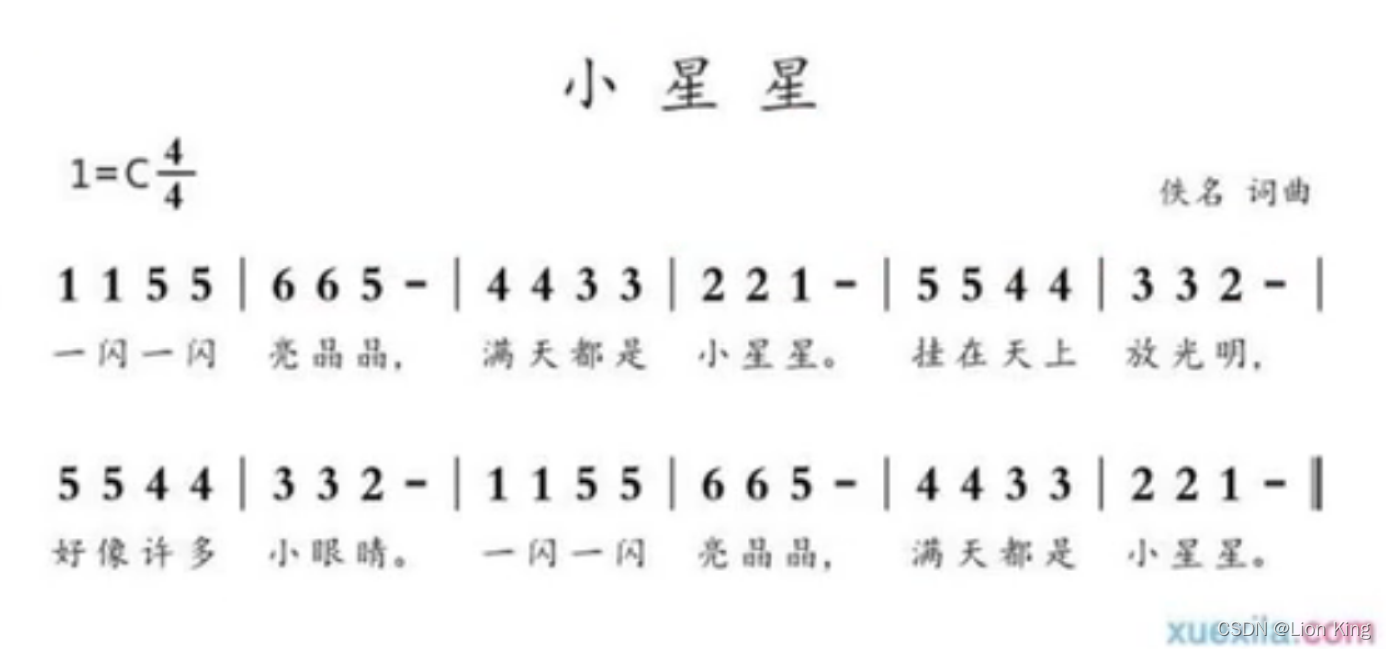
6、 简谱
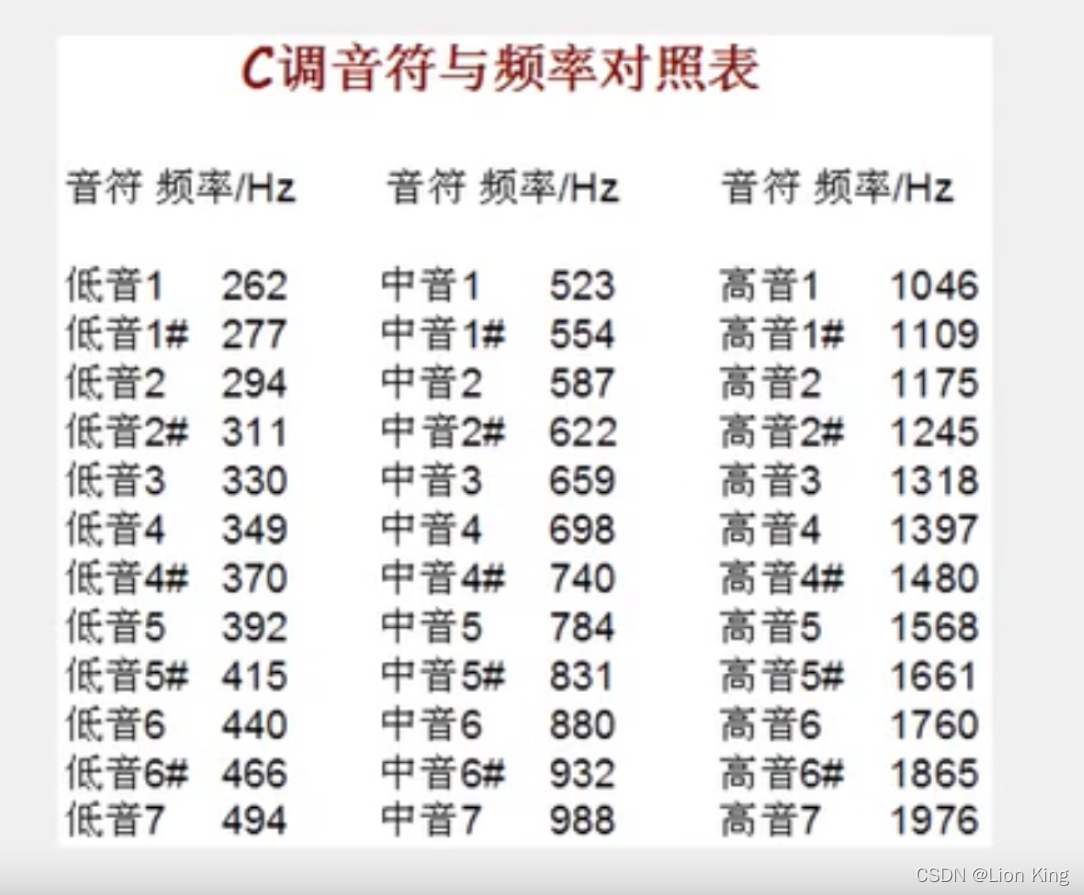
7、C调音符与频率对照表
8、编写程序
main.c
#include <STC89C5xRC.H>
#include "Delay.h"
#include "Key.h"
#include "Nixie.h"
#include "Buzzer.h"unsigned char KeyNum;void main()
{Nixie(1,0);while(1){KeyNum=Key();if(KeyNum){Buzzer_Time(1000);Nixie(1,KeyNum);}}
}
Buzzer.c
#include <STC89C5xRC.H>
#include <INTRINS.H>sbit Buzzer=P2^5;void Buzzer_Delay500us()		//@11.0592MHz
{unsigned char i;_nop_();i = 227;while (--i);
}void Buzzer_Time(unsigned int ms)
{unsigned int i;for(i=0;i<ms*2;i++){Buzzer=!Buzzer;Buzzer_Delay500us();}
}
Buzzer.h
#ifndef __BUZZER_H__
#define __BUZZER_H__void Buzzer_Time(unsigned int ms);#endif
二十六、单片机实操二十四:蜂鸣器与播放提示音
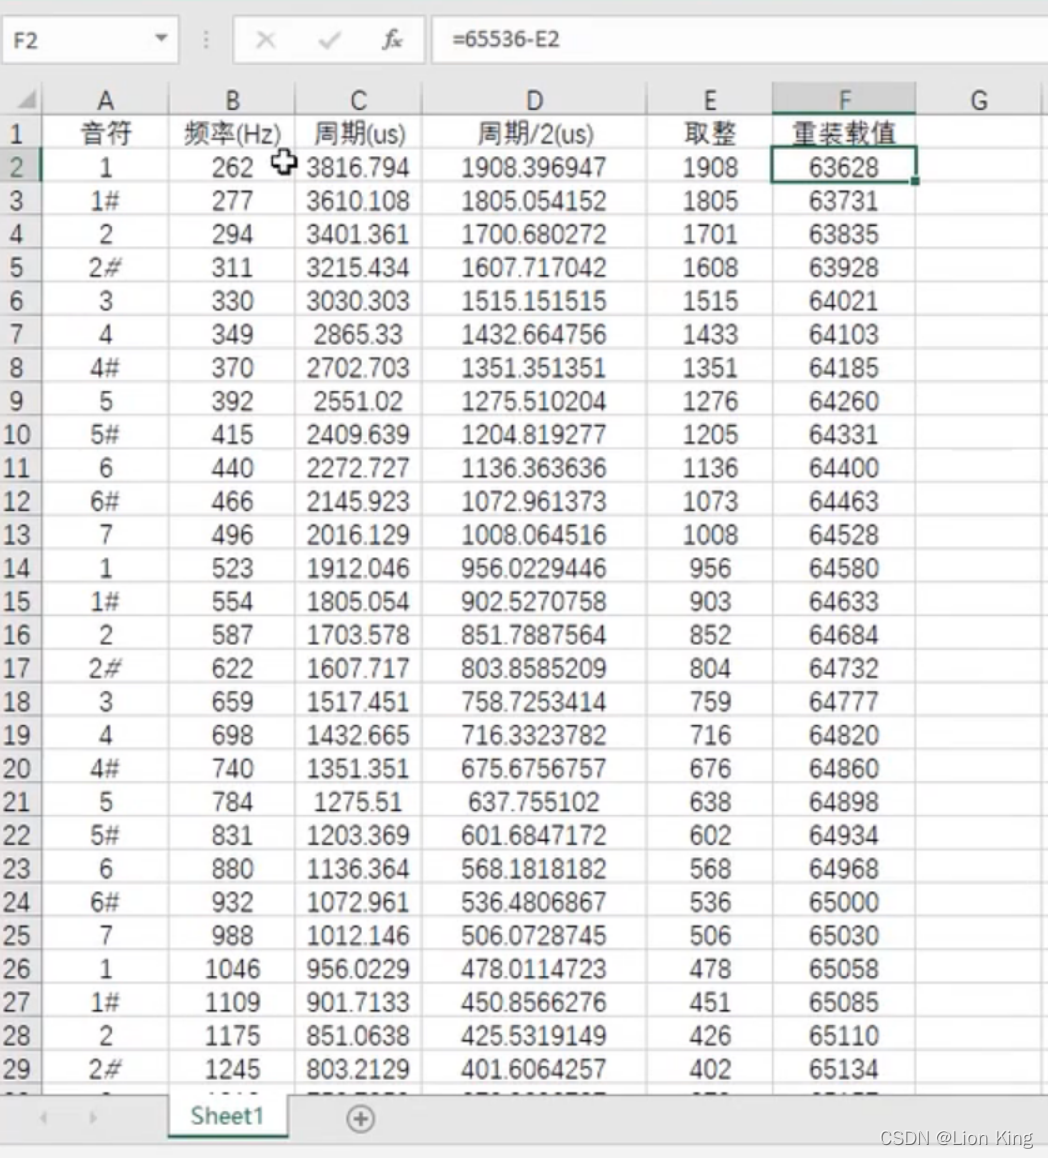
1、音符对应的重载值计算方式
2、编写天空之城音乐程序
main.c
#include <STC89C5xRC.H>
#include "Delay.h"
#include "Timer0.h"//蜂鸣器端口定义
sbit Buzzer=P2^5;//播放速度,值为四分音符的时长(ms)
#define SPEED	500//音符与索引对应表,P:休止符,L:低音,M:中音,H:高音,下划线:升半音符号#
#define P	0
#define L1	1
#define L1_	2
#define L2	3
#define L2_	4
#define L3	5
#define L4	6
#define L4_	7
#define L5	8
#define L5_	9
#define L6	10
#define L6_	11
#define L7	12
#define M1	13
#define M1_	14
#define M2	15
#define M2_	16
#define M3	17
#define M4	18
#define M4_	19
#define M5	20
#define M5_	21
#define M6	22
#define M6_	23
#define M7	24
#define H1	25
#define H1_	26
#define H2	27
#define H2_	28
#define H3	29
#define H4	30
#define H4_	31
#define H5	32
#define H5_	33
#define H6	34
#define H6_	35
#define H7	36//索引与频率对照表
unsigned int FreqTable[]={0,63628,63731,63835,63928,64021,64103,64185,64260,64331,64400,64463,64528,64580,64633,64684,64732,64777,64820,64860,64898,64934,64968,65000,65030,65058,65085,65110,65134,65157,65178,65198,65217,65235,65252,65268,65283,
};//乐谱
unsigned char code Music[]={//音符,时值,//1P,	4,P,	4,P,	4,M6,	2,M7,	2,H1,	4+2,M7,	2,H1,	4,H3,	4,M7,	4+4+4,M3,	2,M3,	2,//2M6,	4+2,M5,	2,M6, 4,H1,	4,M5,	4+4+4,M3,	4,M4,	4+2,M3,	2,M4,	4,H1,	4,//3M3,	4+4,P,	2,H1,	2,H1,	2,H1,	2,M7,	4+2,M4_,2,M4_,4,M7,	4,M7,	8,P,	4,M6,	2,M7,	2,//4H1,	4+2,M7,	2,H1,	4,H3,	4,M7,	4+4+4,M3,	2,M3,	2,M6,	4+2,M5,	2,M6, 4,H1,	4,//5M5,	4+4+4,M2,	2,M3,	2,M4,	4,H1,	2,M7,	2+2,H1,	2+4,H2,	2,H2,	2,H3,	2,H1,	2+4+4,//6H1,	2,M7,	2,M6,	2,M6,	2,M7,	4,M5_,4,M6,	4+4+4,H1,	2,H2,	2,H3,	4+2,H2,	2,H3,	4,H5,	4,//7H2,	4+4+4,M5,	2,M5,	2,H1,	4+2,M7,	2,H1,	4,H3,	4,H3,	4+4+4+4,//8M6,	2,M7,	2,H1,	4,M7,	4,H2,	2,H2,	2,H1,	4+2,M5,	2+4+4,H4,	4,H3,	4,H3,	4,H1,	4,//9H3,	4+4+4,H3,	4,H6,	4+4,H5,	4,H5,	4,H3,	2,H2,	2,H1,	4+4,P,	2,H1,	2,//10H2,	4,H1,	2,H2,	2,H2,	4,H5,	4,H3,	4+4+4,H3,	4,H6,	4+4,H5,	4+4,//11H3,	2,H2,	2,H1,	4+4,P,	2,H1,	2,H2,	4,H1,	2,H2,	2+4,M7,	4,M6,	4+4+4,P,	4,0xFF	//终止标志
};unsigned char FreqSelect,MusicSelect;void main()
{Timer0Init();while(1){if(Music[MusicSelect]!=0xFF)	//如果不是停止标志位{FreqSelect=Music[MusicSelect];	//选择音符对应的频率MusicSelect++;Delay(SPEED/4*Music[MusicSelect]);	//选择音符对应的时值MusicSelect++;TR0=0;Delay(5);	//音符间短暂停顿TR0=1;}else	//如果是停止标志位{TR0=0;while(1);}}
}void Timer0_Routine() interrupt 1
{if(FreqTable[FreqSelect])	//如果不是休止符{/*取对应频率值的重装载值到定时器*/TL0 = FreqTable[FreqSelect]%256;		//设置定时初值TH0 = FreqTable[FreqSelect]/256;		//设置定时初值Buzzer=!Buzzer;	//翻转蜂鸣器IO口}
}
二十七、单片机实操二十五:AT24C02(I2C总线)与数据存储
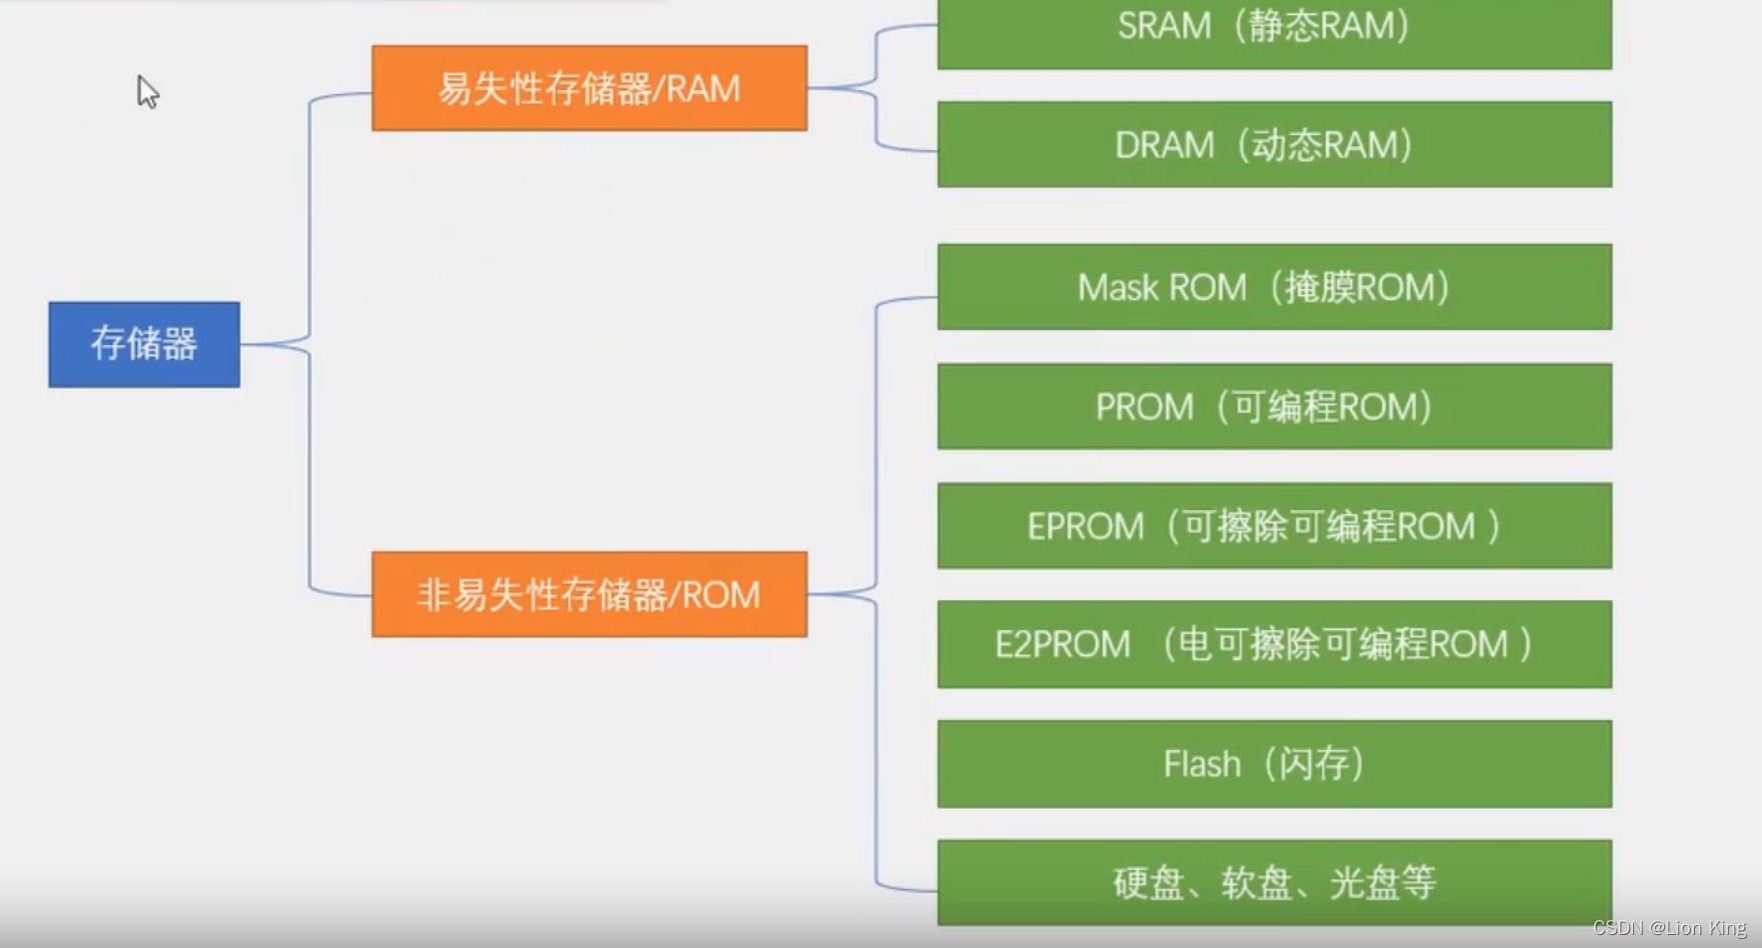
1、存储器介绍
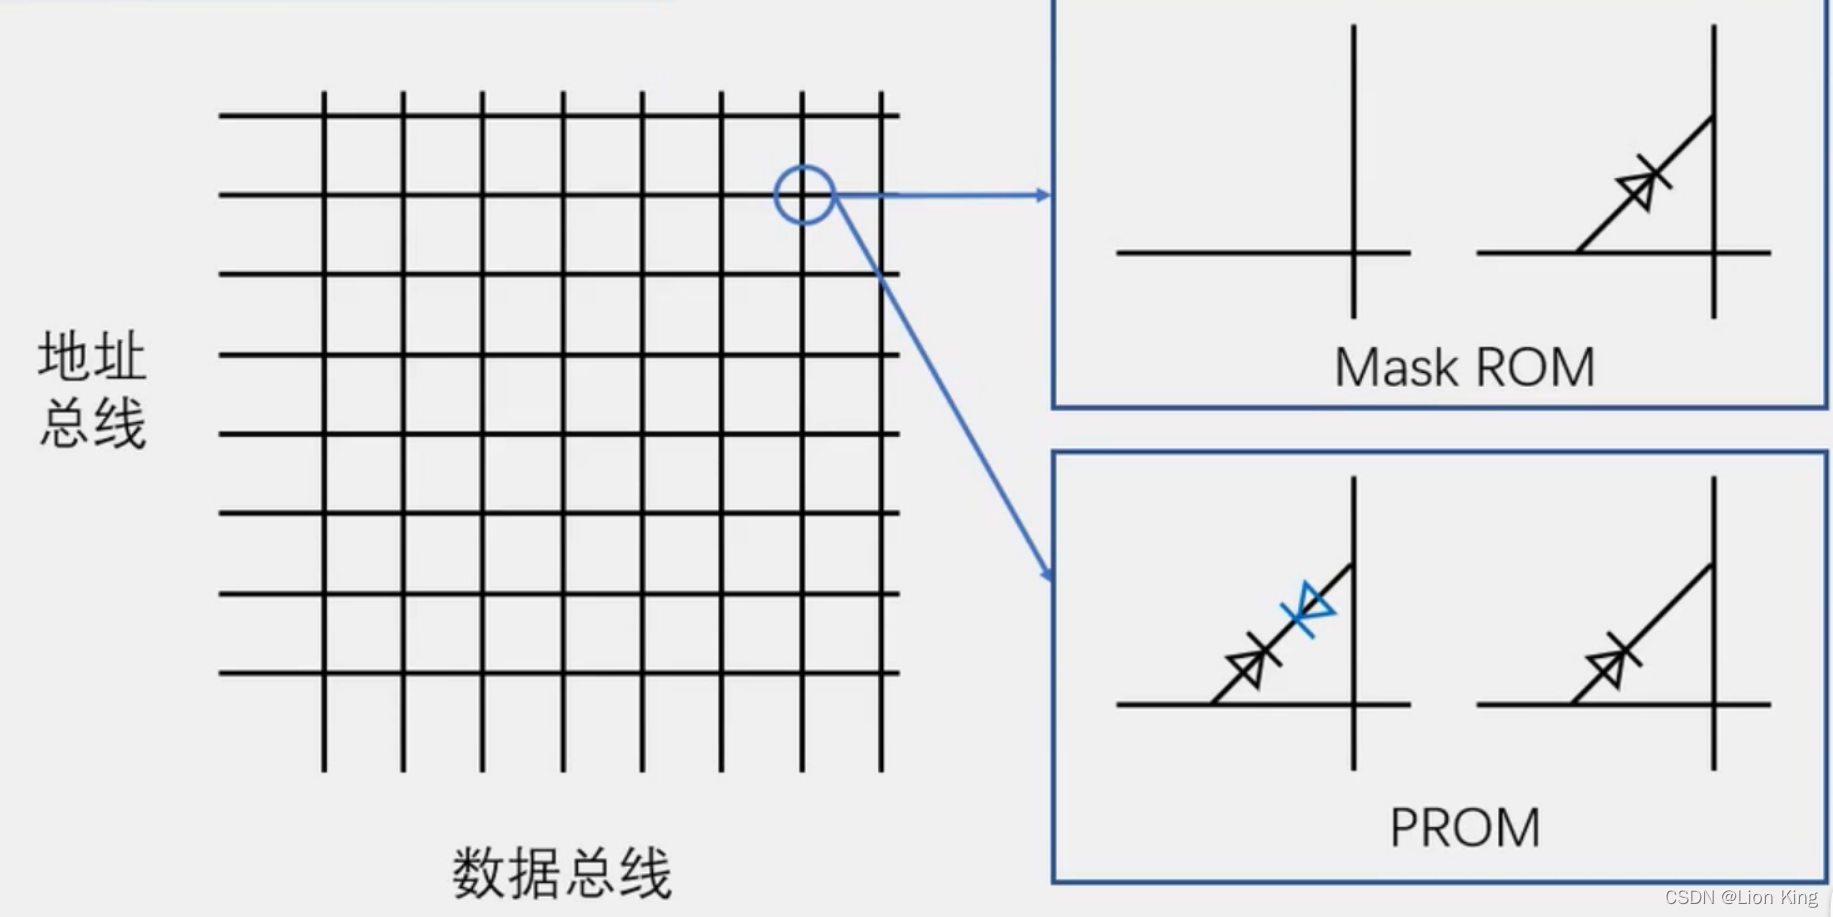
2、存储器简化模型
3、AT24C02介绍
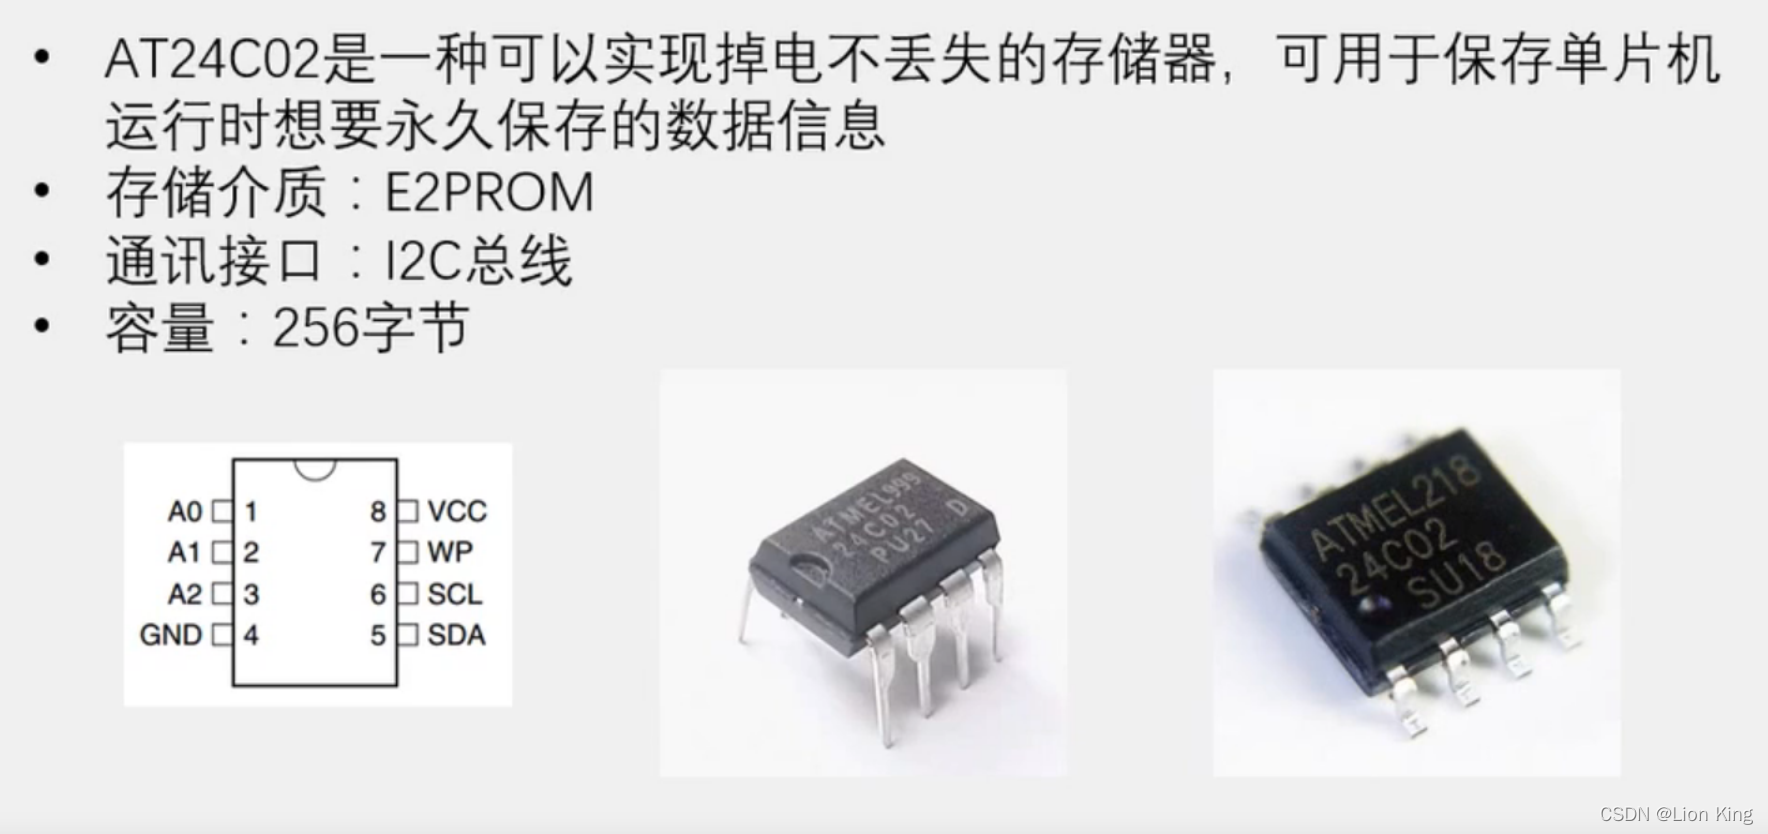
4、引脚与芯片电路
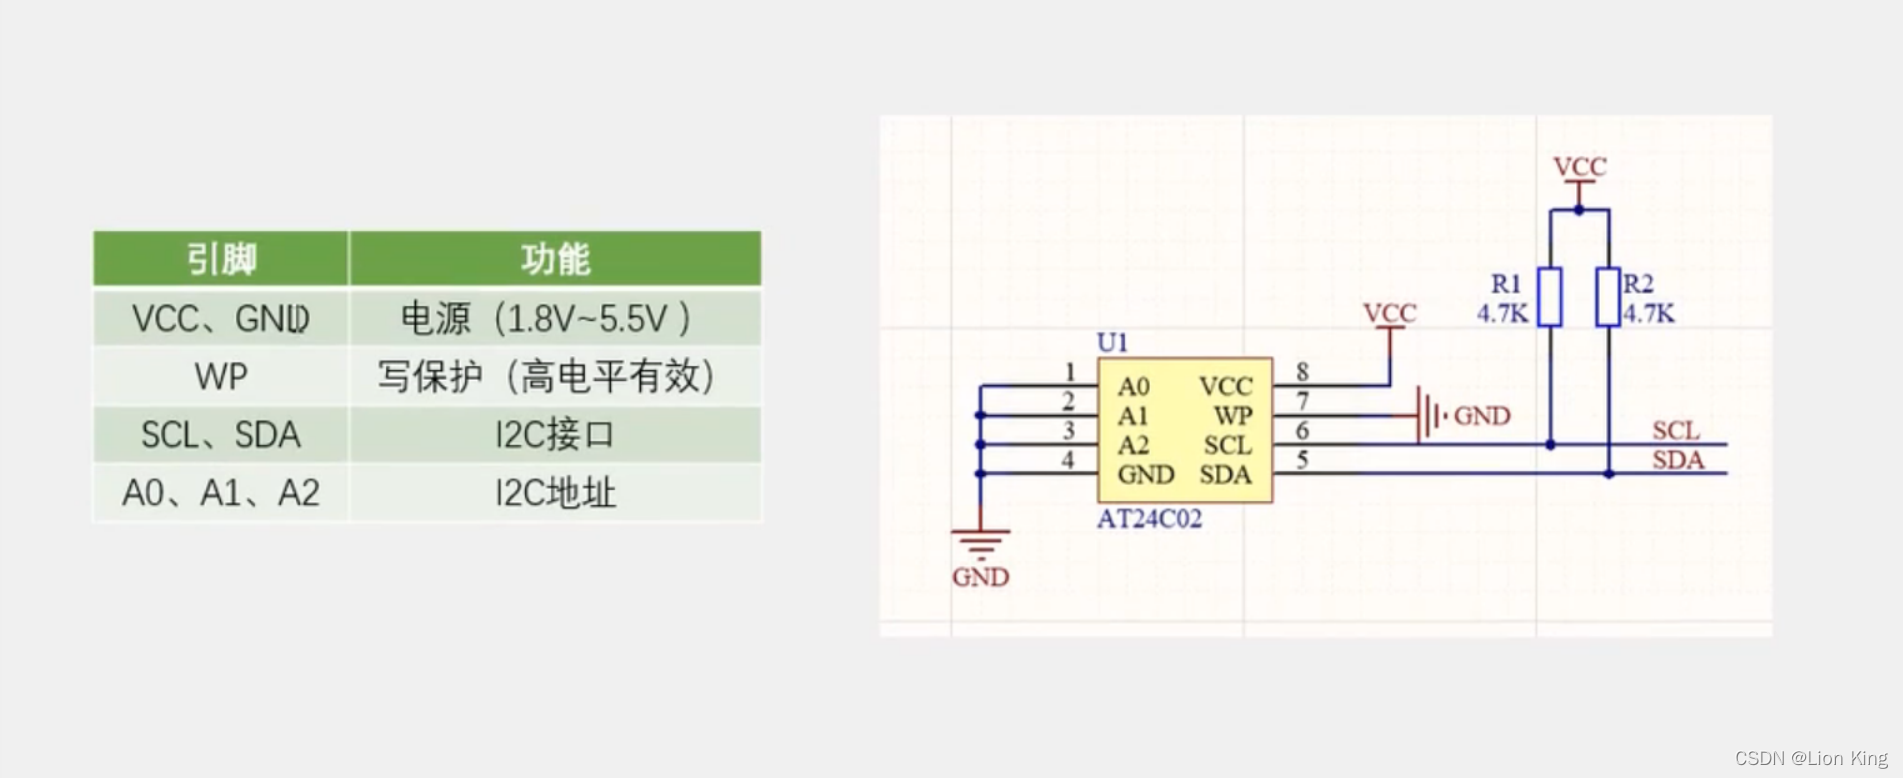
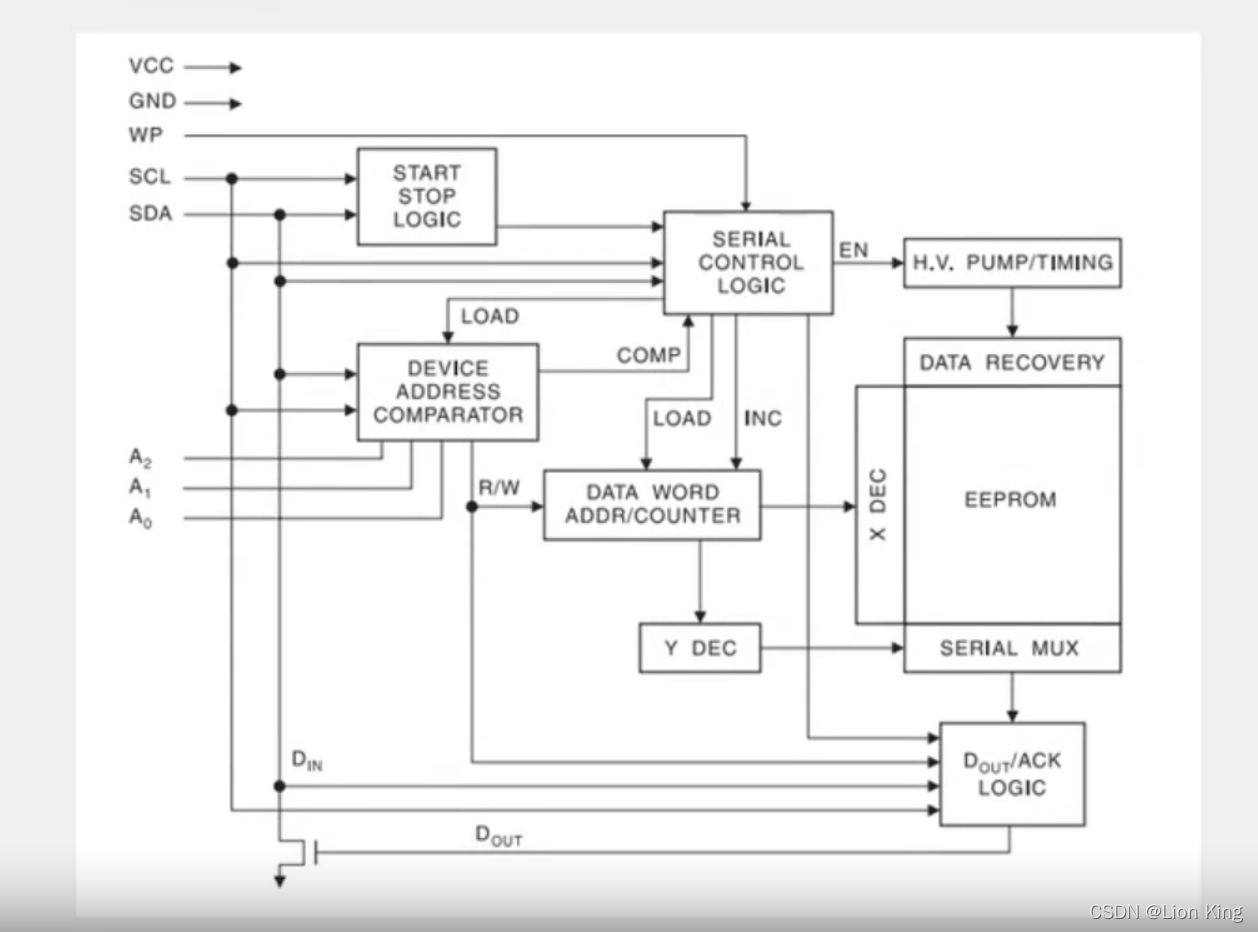
5、内部结构框图
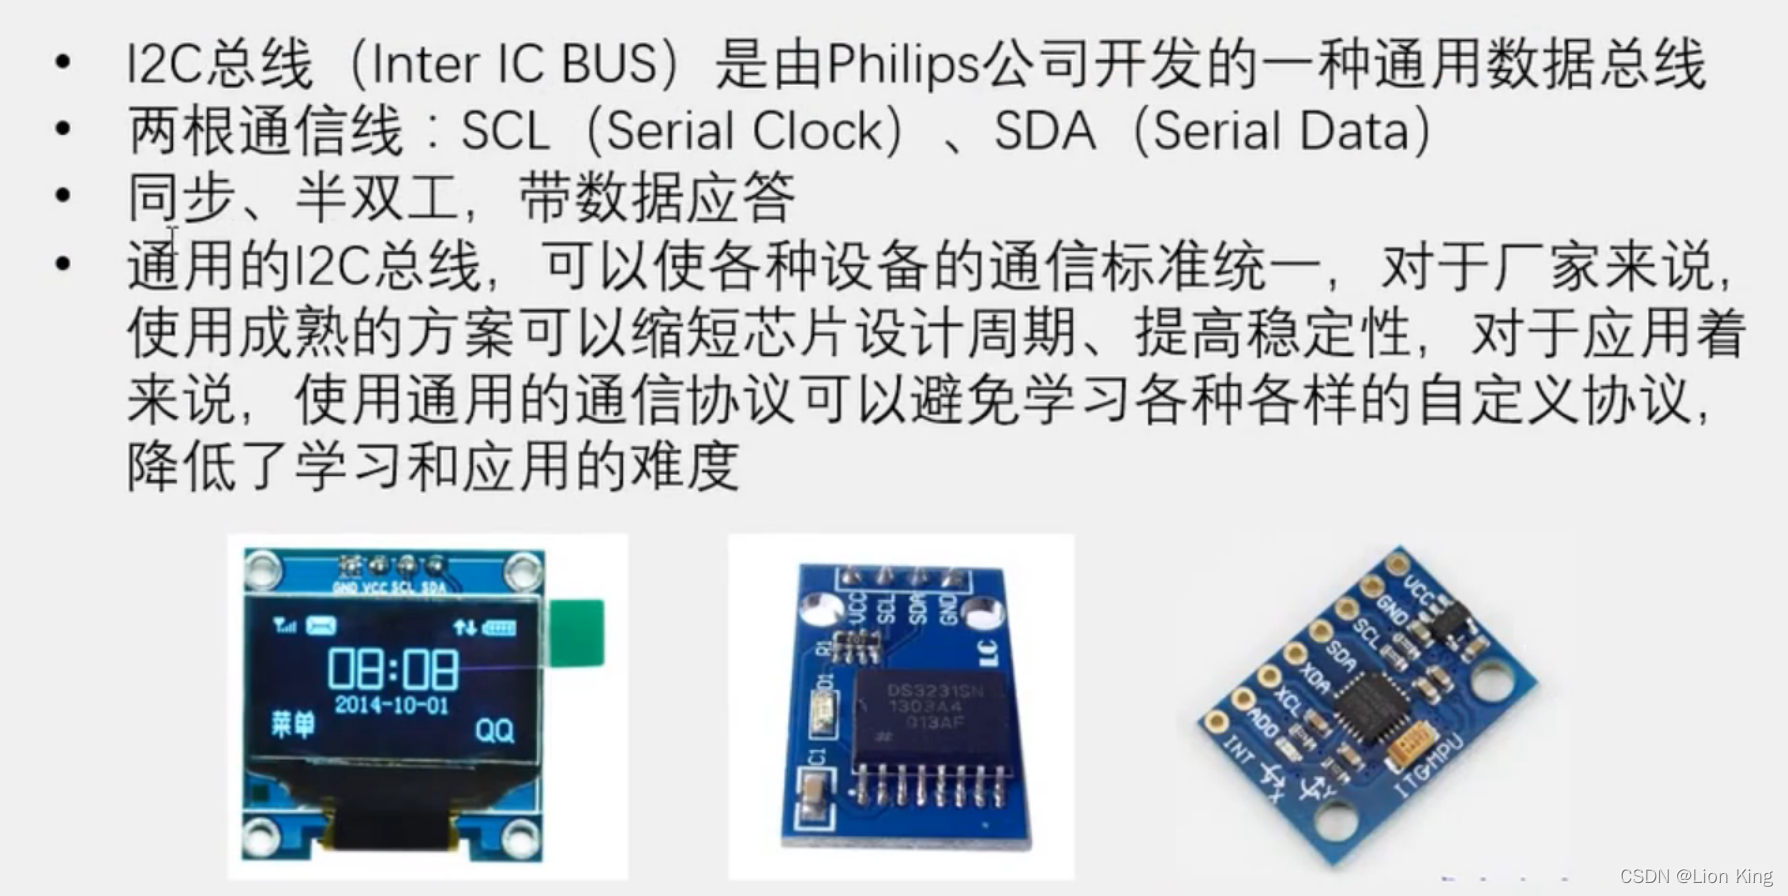
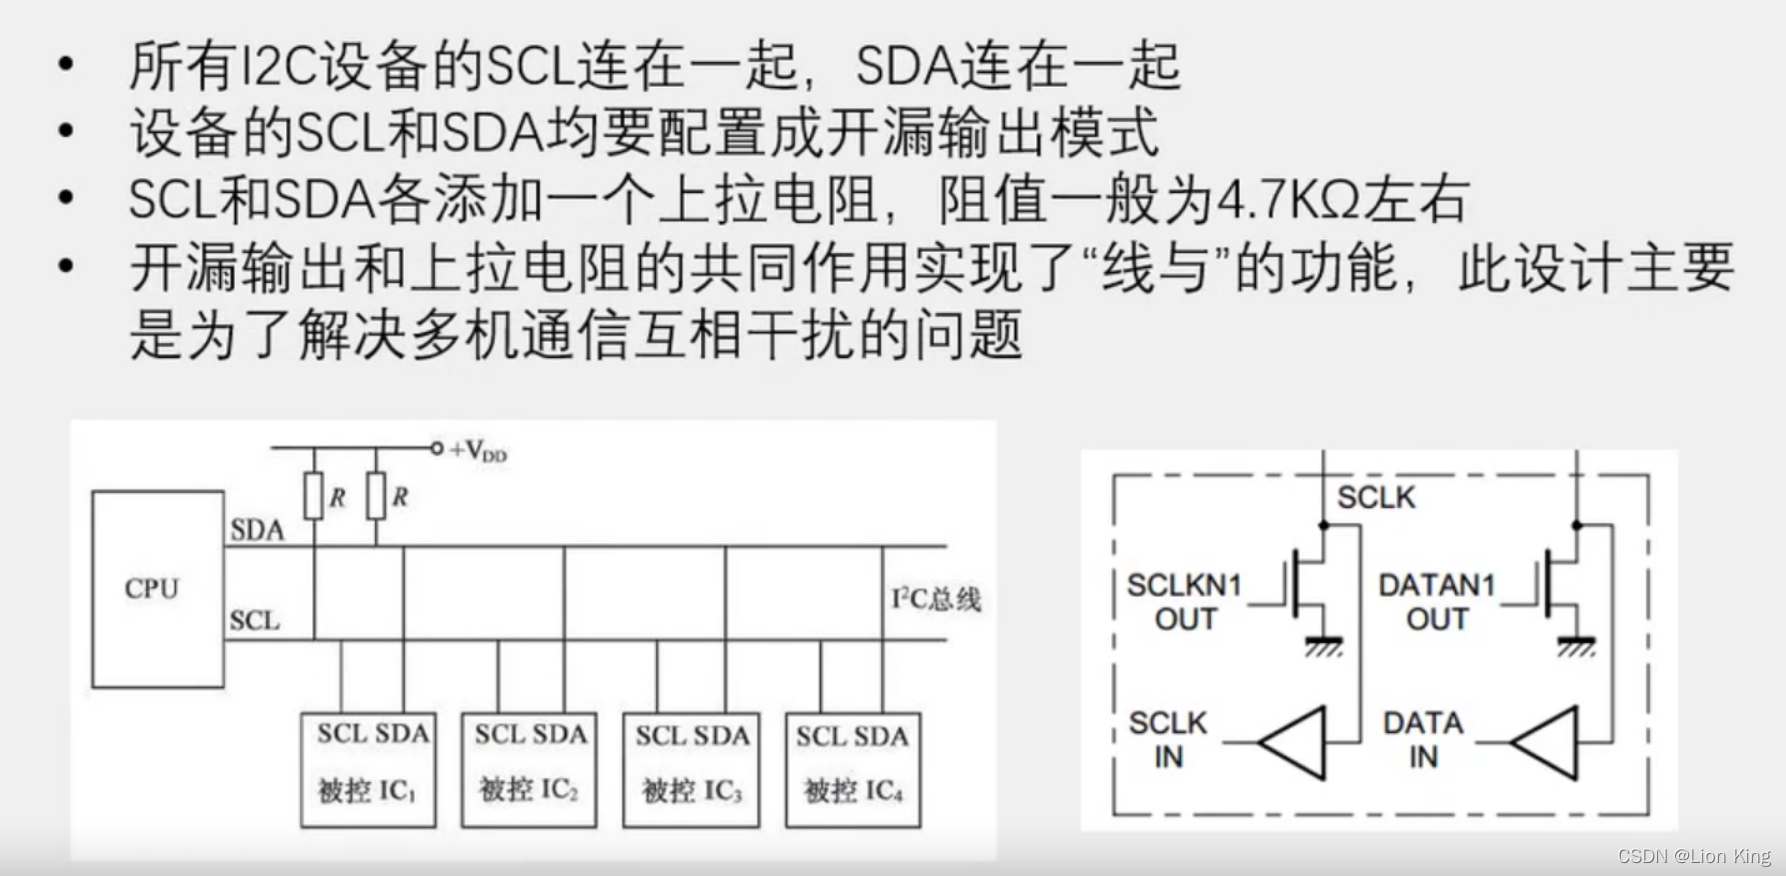
6、I2C总线介绍
7、I2C电路规范
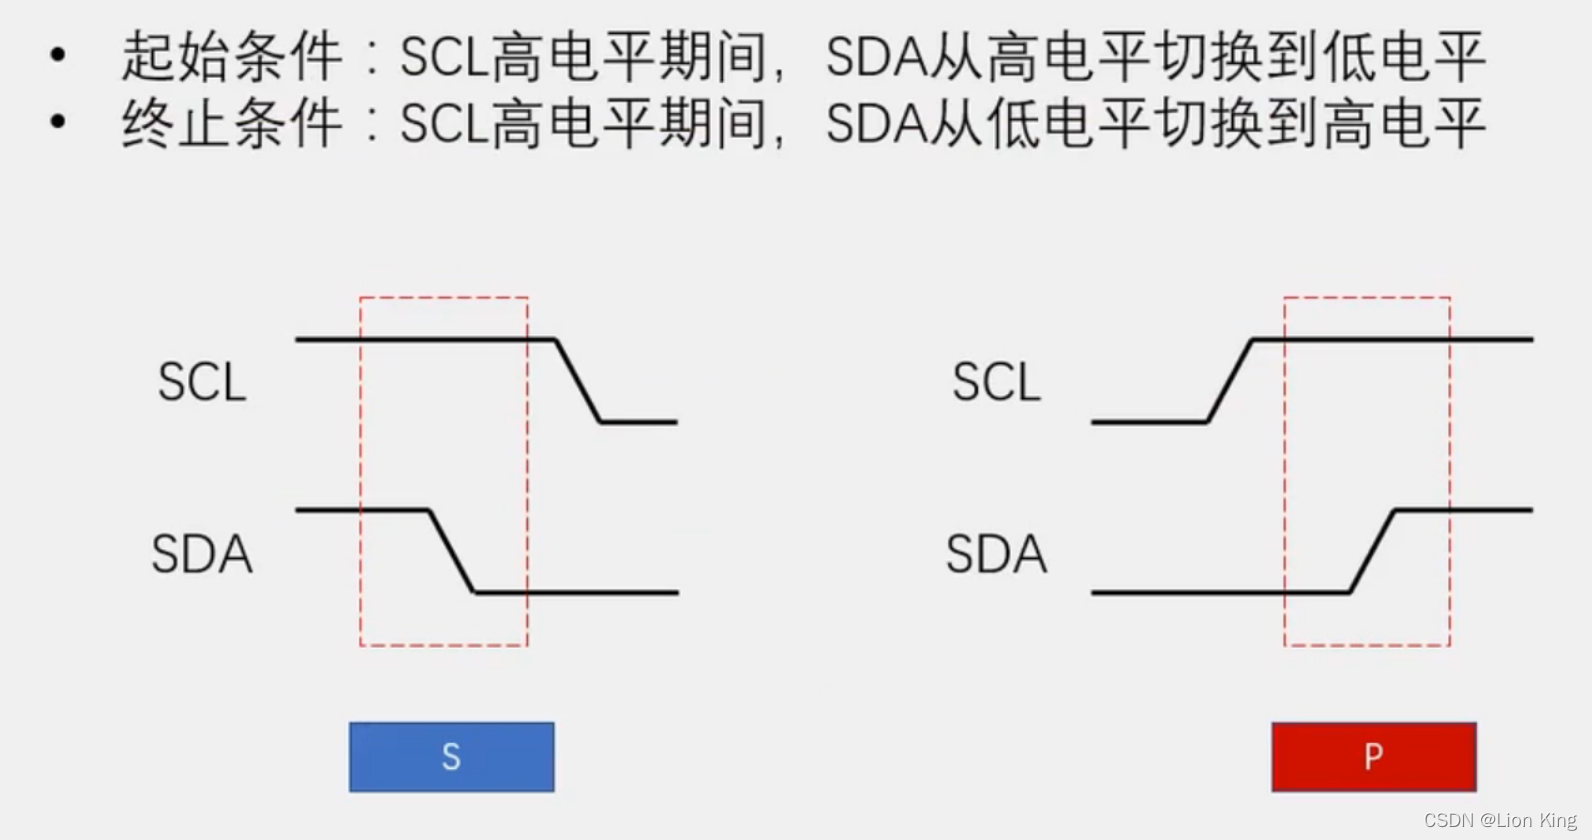
8、I2C时序结构
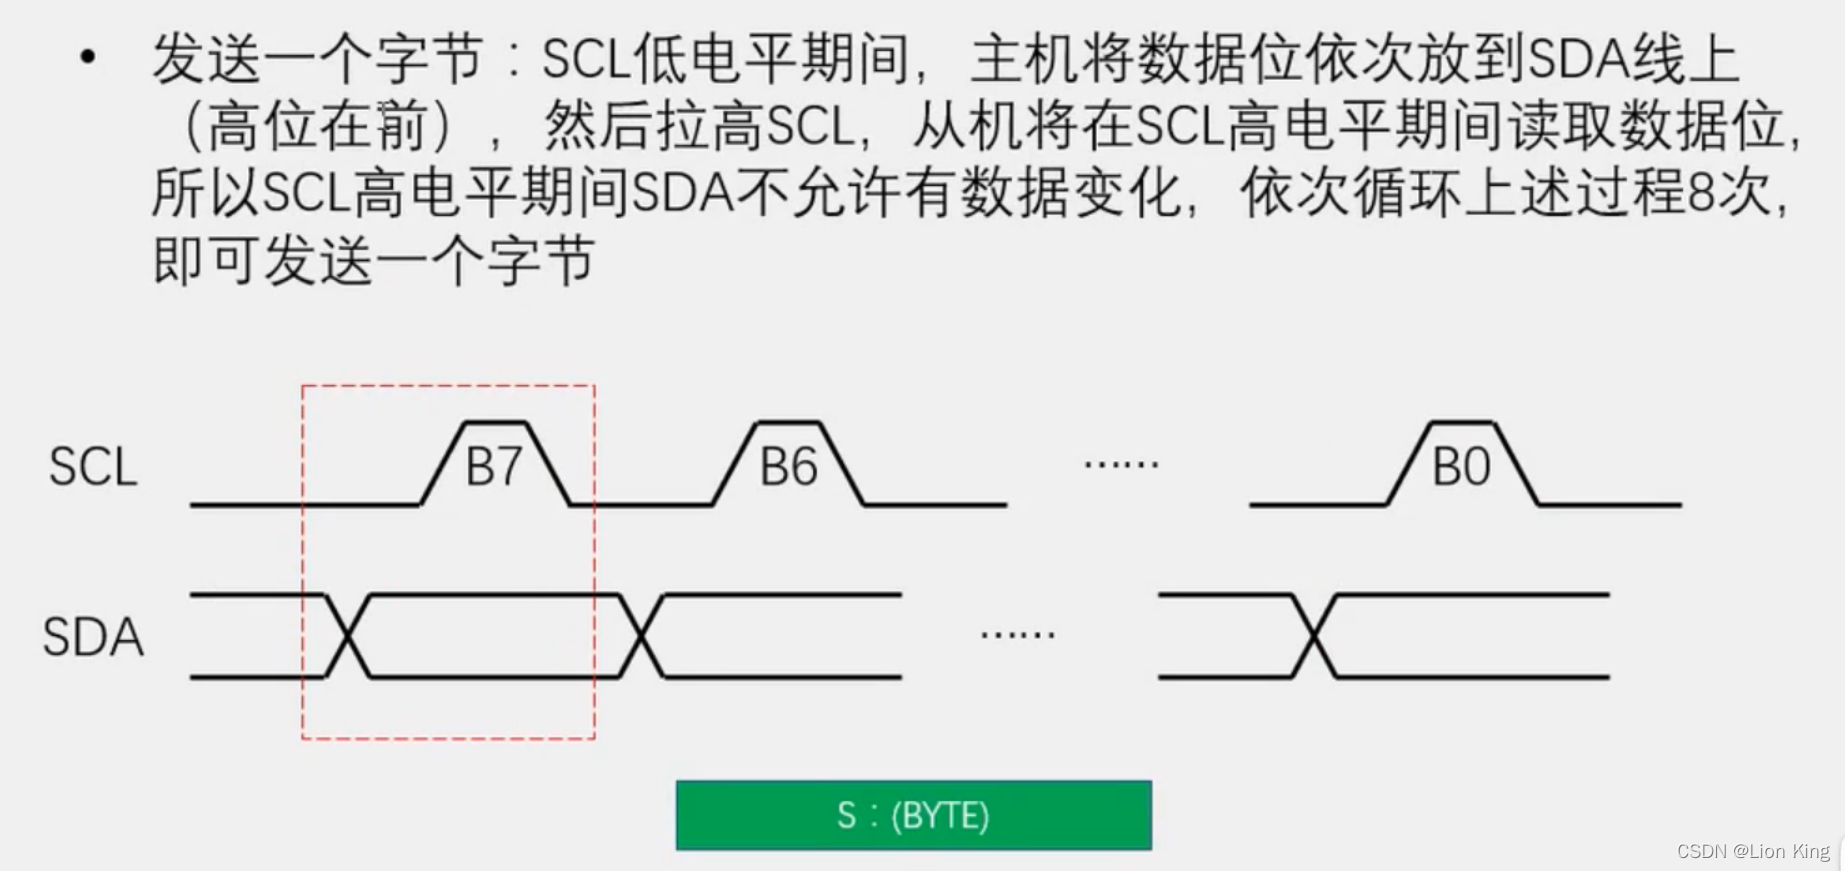
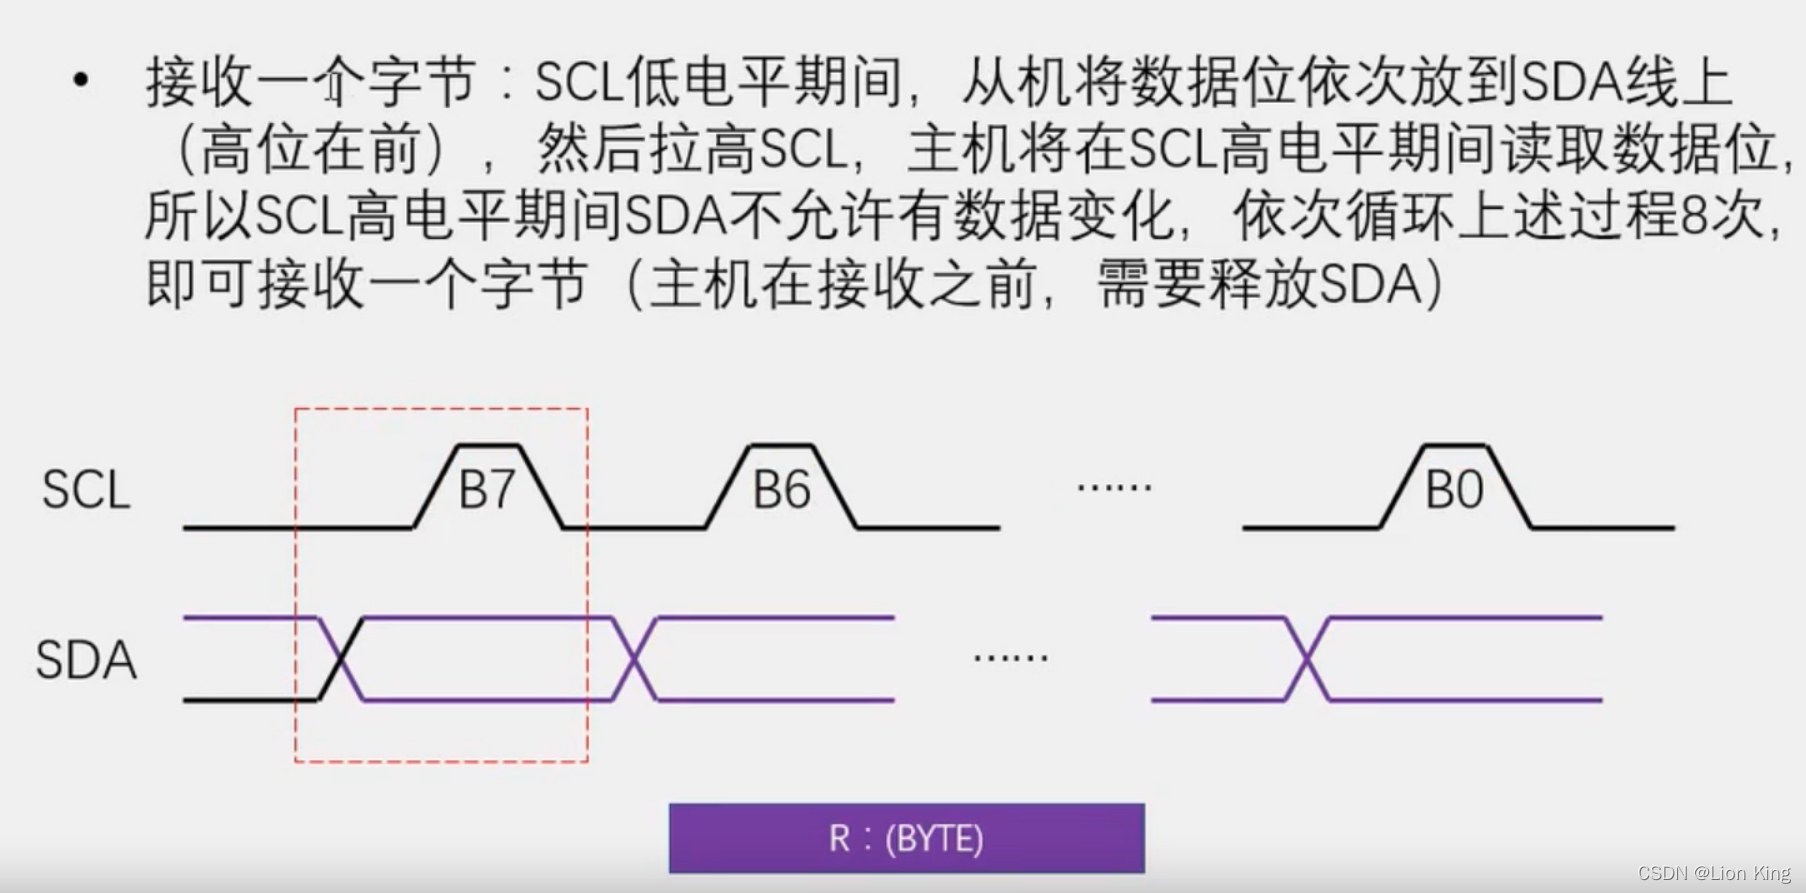
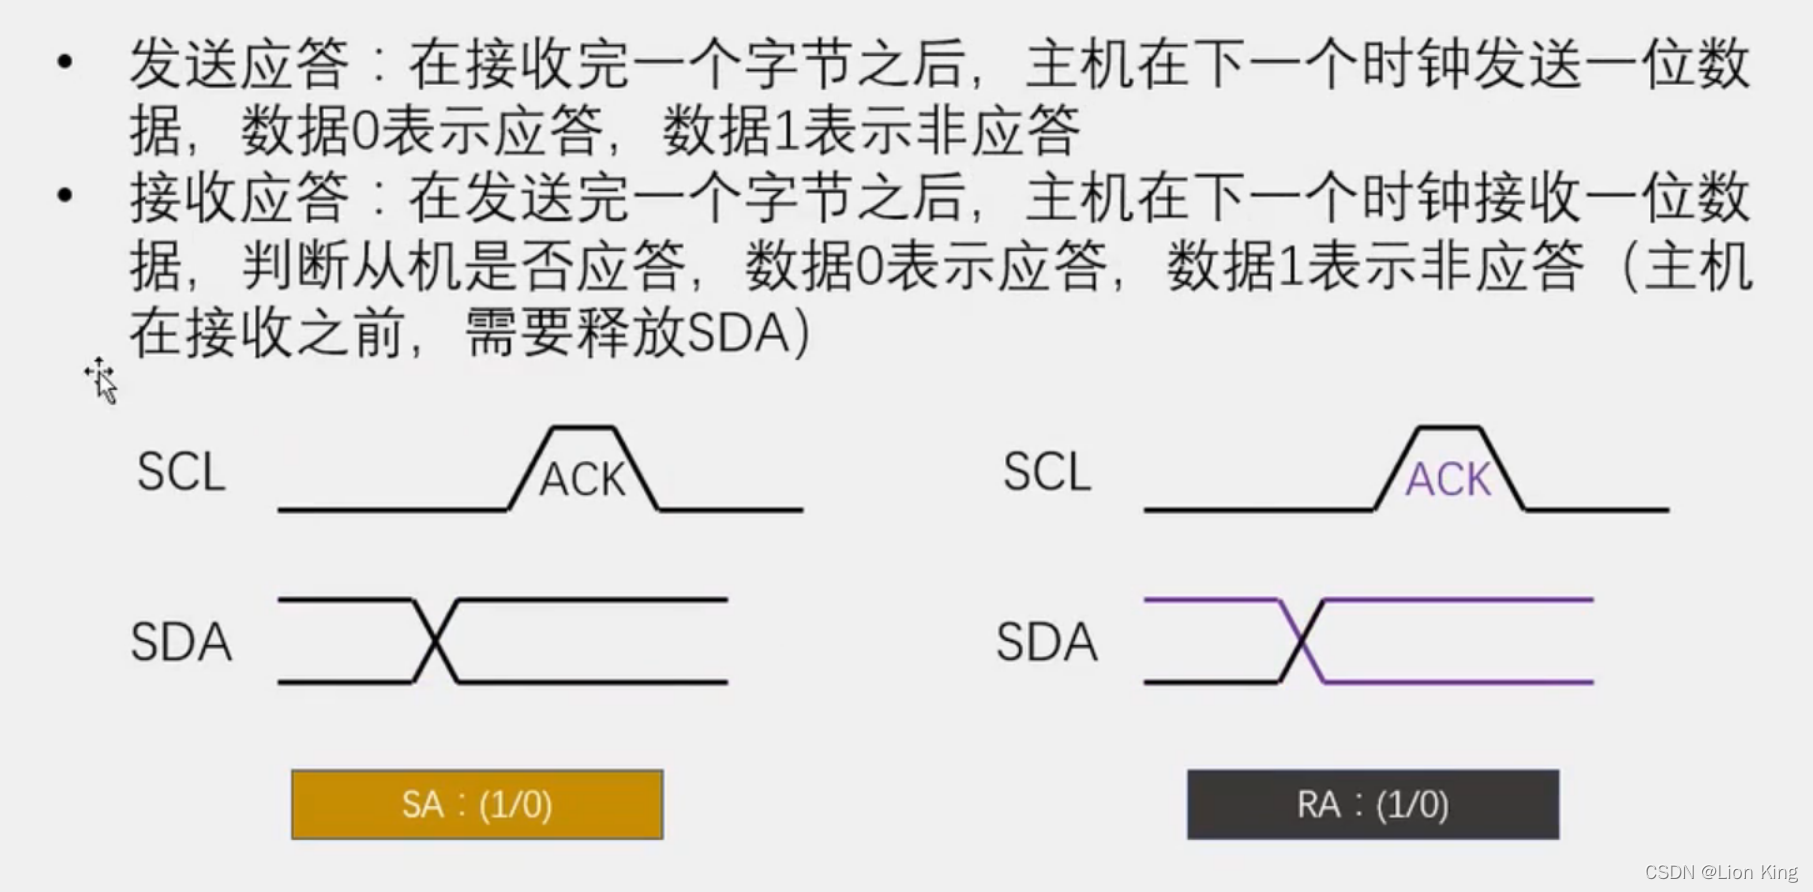
9、I2C数据帧
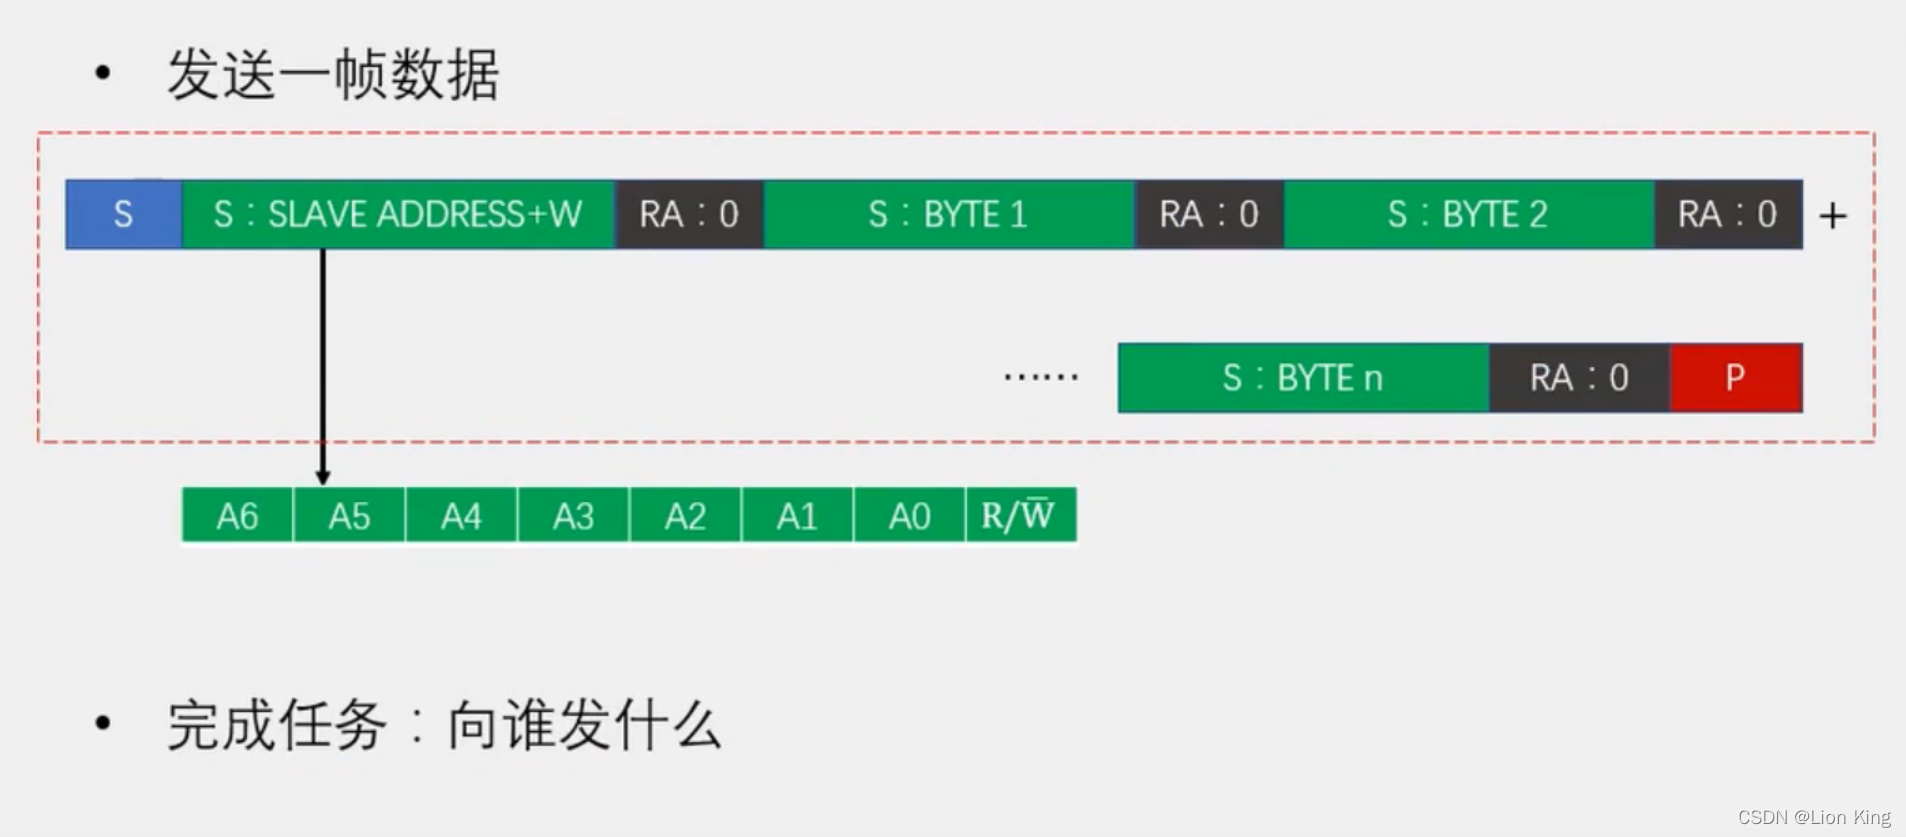
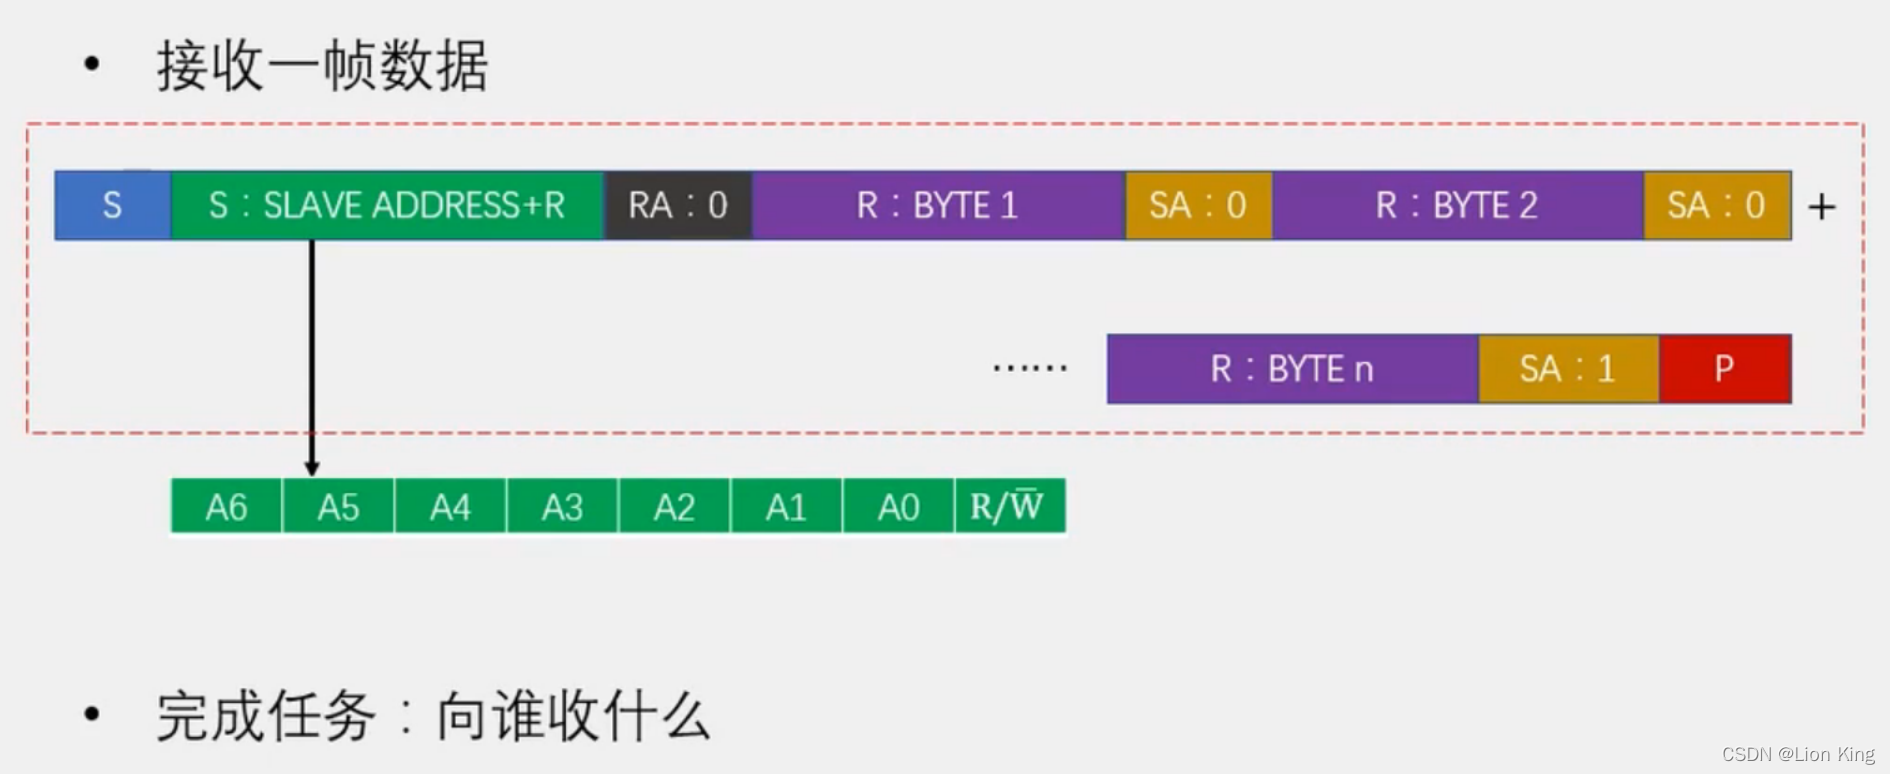
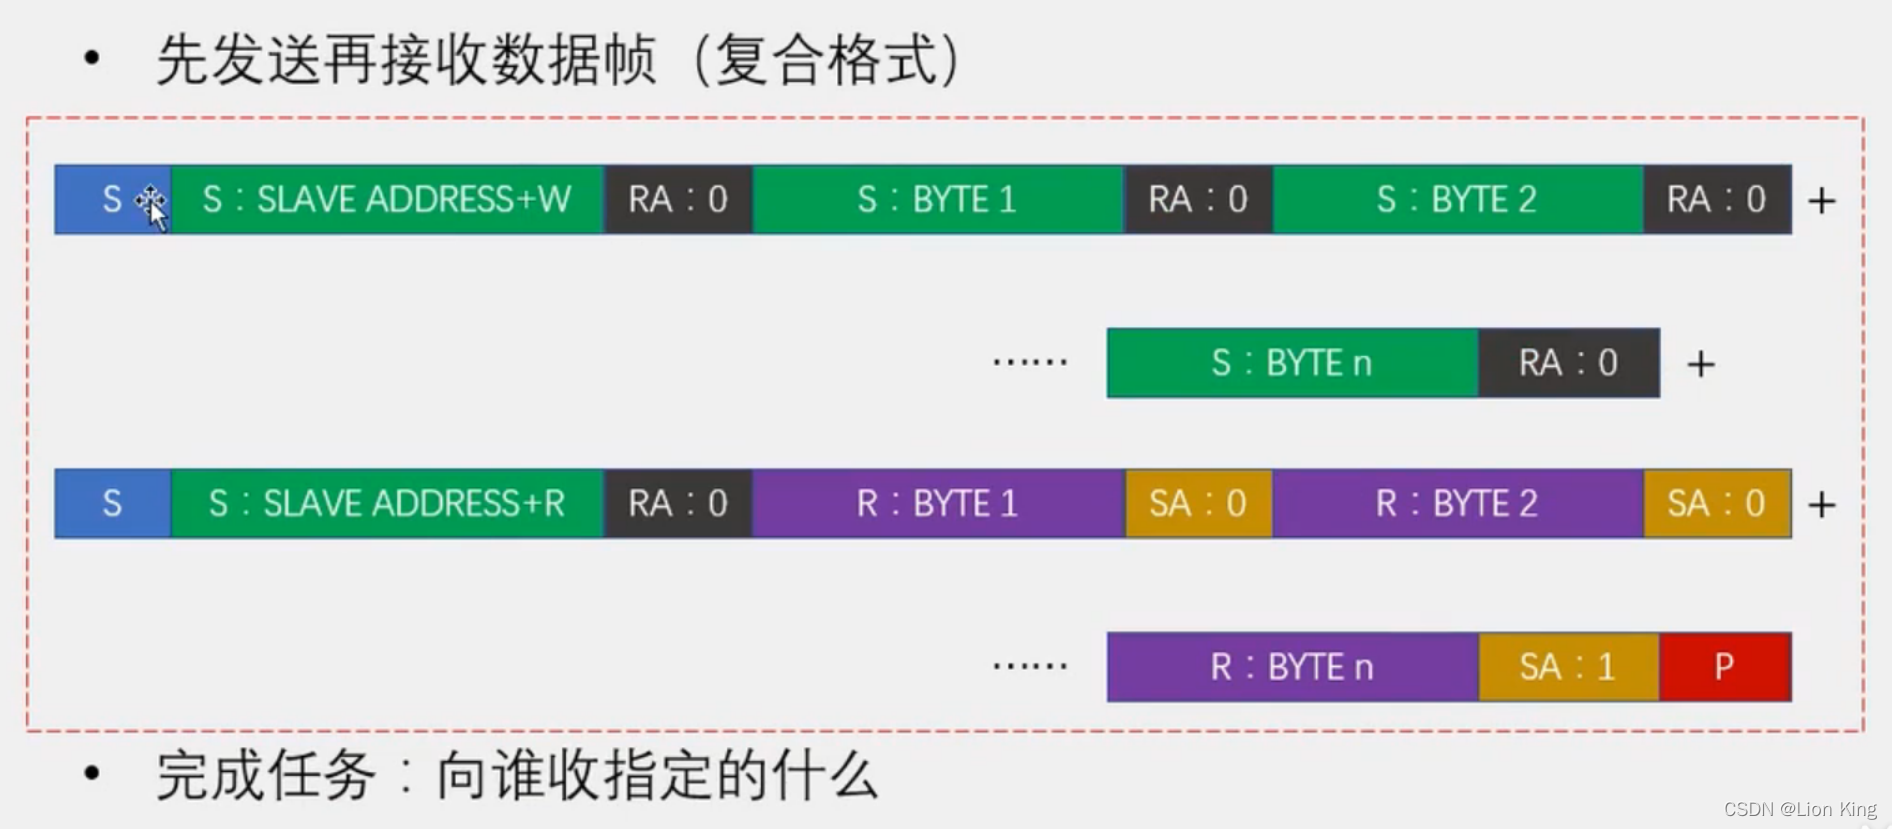
10、AT24C02数据帧
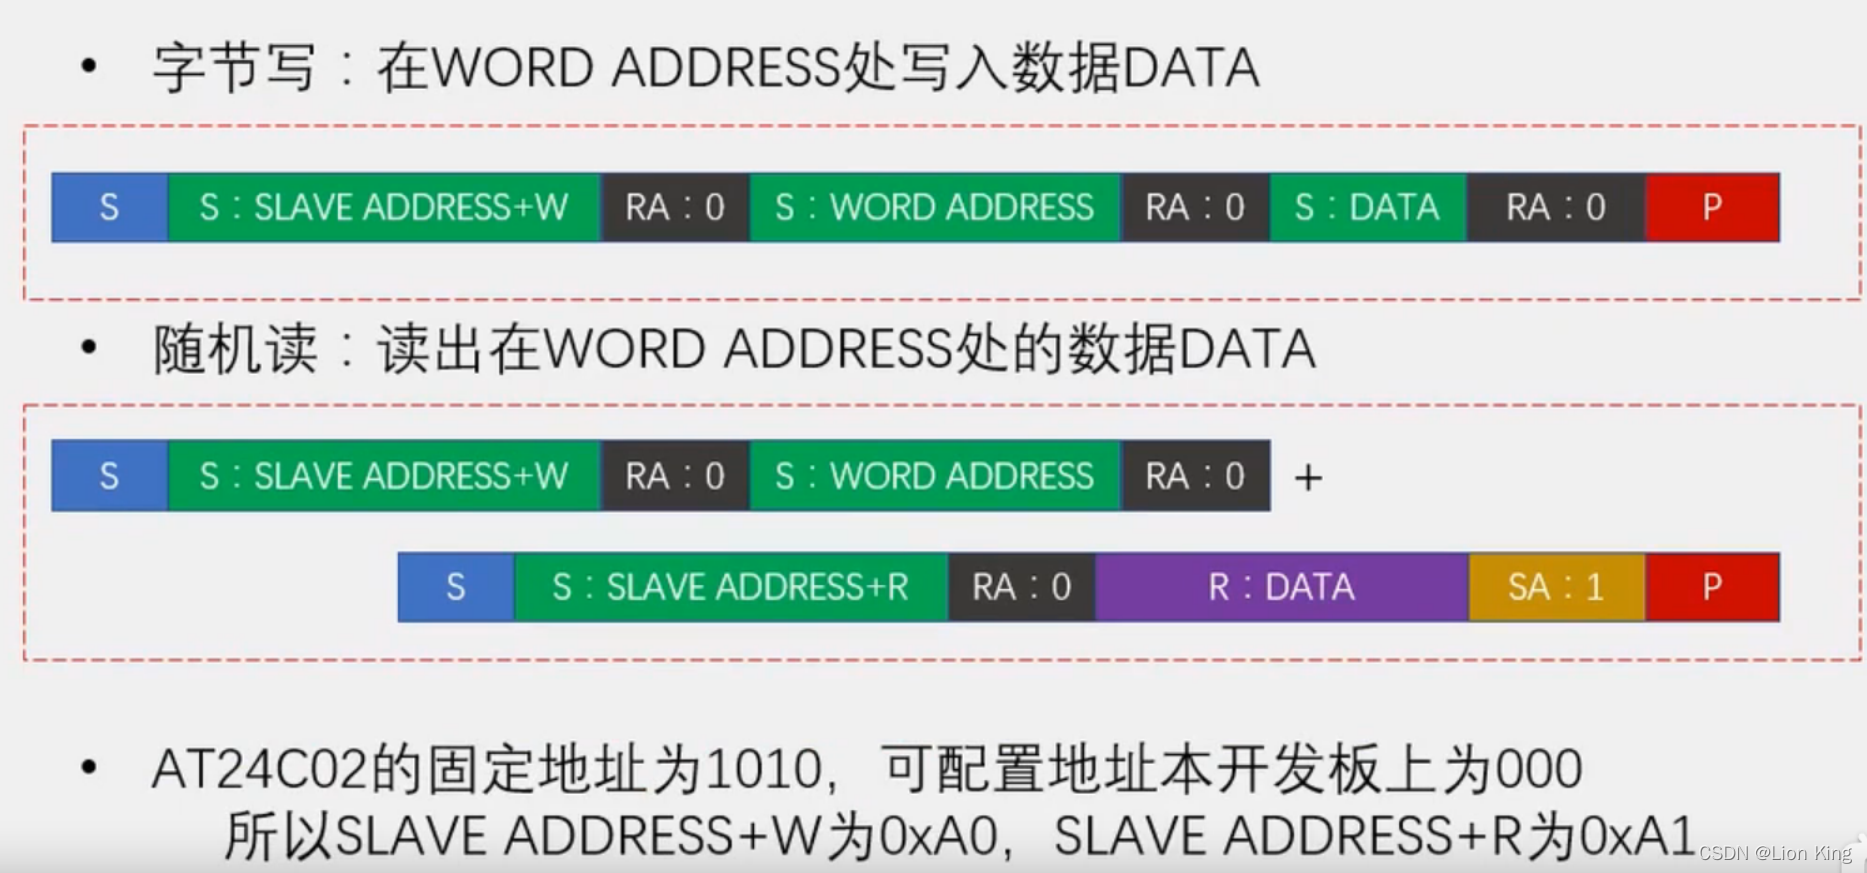
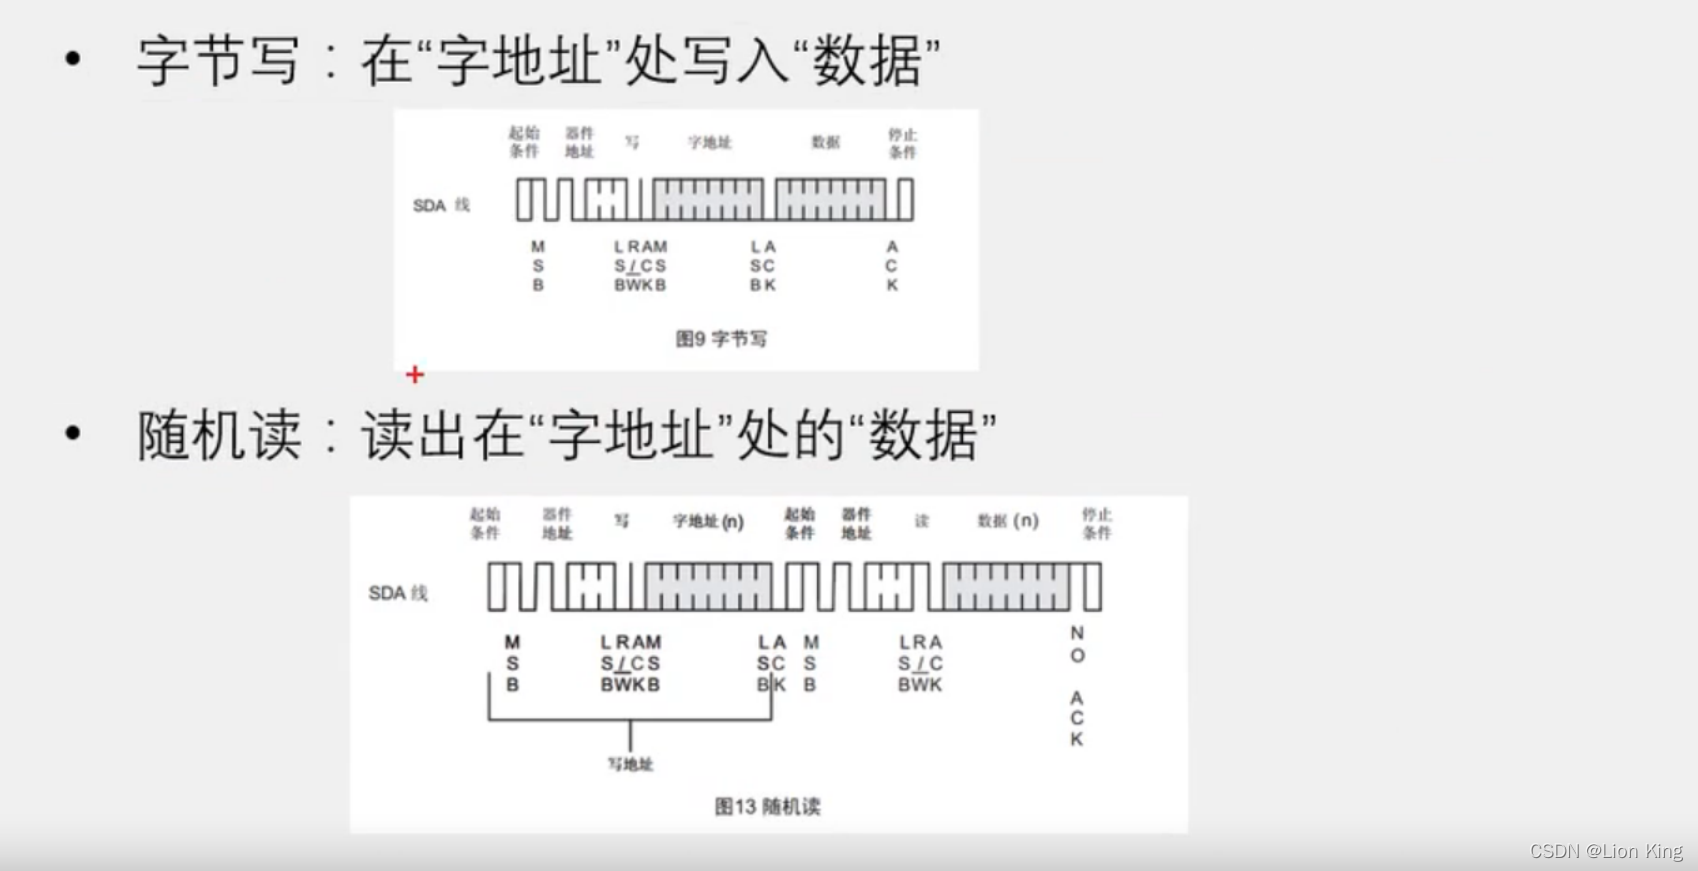
11、编写程序
main.c
#include <STC89C5xRC.H>#include "LCD1602.h"
#include "Key.h"
#include "AT24C02.h"
#include "Delay.h"unsigned char KeyNum;
unsigned int Num;void main()
{LCD_Init();LCD_ShowNum(1,1,Num,5);while(1){KeyNum=Key();if(KeyNum==1)	//K1按键,Num自增{Num++;LCD_ShowNum(1,1,Num,5);}if(KeyNum==2)	//K2按键,Num自减{Num--;LCD_ShowNum(1,1,Num,5);}if(KeyNum==3)	//K3按键,向AT24C02写入数据{AT24C02_WriteByte(0,Num%256);Delay(5);AT24C02_WriteByte(1,Num/256);Delay(5);LCD_ShowString(2,1,"Write OK");Delay(1000);LCD_ShowString(2,1,"        ");}if(KeyNum==4)	//K4按键,从AT24C02读取数据{Num=AT24C02_ReadByte(0);Num|=AT24C02_ReadByte(1)<<8;LCD_ShowNum(1,1,Num,5);LCD_ShowString(2,1,"Read OK ");Delay(1000);LCD_ShowString(2,1,"        ");}}
}
I2C.c
#include <STC89C5xRC.H>sbit I2C_SCL=P2^1;
sbit I2C_SDA=P2^0;/*** @brief  I2C开始* @param  无* @retval 无*/
void I2C_Start(void)
{I2C_SDA=1;I2C_SCL=1;I2C_SDA=0;I2C_SCL=0;
}/*** @brief  I2C停止* @param  无* @retval 无*/
void I2C_Stop(void)
{I2C_SDA=0;I2C_SCL=1;I2C_SDA=1;
}/*** @brief  I2C发送一个字节* @param  Byte 要发送的字节* @retval 无*/
void I2C_SendByte(unsigned char Byte)
{unsigned char i;for(i=0;i<8;i++){I2C_SDA=Byte&(0x80>>i);I2C_SCL=1;I2C_SCL=0;}
}/*** @brief  I2C接收一个字节* @param  无* @retval 接收到的一个字节数据*/
unsigned char I2C_ReceiveByte(void)
{unsigned char i,Byte=0x00;I2C_SDA=1;for(i=0;i<8;i++){I2C_SCL=1;if(I2C_SDA){Byte|=(0x80>>i);}I2C_SCL=0;}return Byte;
}/*** @brief  I2C发送应答* @param  AckBit 应答位,0为应答,1为非应答* @retval 无*/
void I2C_SendAck(unsigned char AckBit)
{I2C_SDA=AckBit;I2C_SCL=1;I2C_SCL=0;
}/*** @brief  I2C接收应答位* @param  无* @retval 接收到的应答位,0为应答,1为非应答*/
unsigned char I2C_ReceiveAck(void)
{unsigned char AckBit;I2C_SDA=1;I2C_SCL=1;AckBit=I2C_SDA;I2C_SCL=0;return AckBit;
}
I2C.h
#ifndef __I2C_H__
#define __I2C_H__void I2C_Start(void);
void I2C_Stop(void);
void I2C_SendByte(unsigned char Byte);
unsigned char I2C_ReceiveByte(void);
void I2C_SendAck(unsigned char AckBit);
unsigned char I2C_ReceiveAck(void);#endif
AT21C02.c
#include <STC89C5xRC.H>#include "I2C.h"#define AT24C02_ADDRESS		0xA0/*** @brief  AT24C02写入一个字节* @param  WordAddress 要写入字节的地址* @param  Data 要写入的数据* @retval 无*/
void AT24C02_WriteByte(unsigned char WordAddress,Data)
{I2C_Start();I2C_SendByte(AT24C02_ADDRESS);I2C_ReceiveAck();I2C_SendByte(WordAddress);I2C_ReceiveAck();I2C_SendByte(Data);I2C_ReceiveAck();I2C_Stop();
}/*** @brief  AT24C02读取一个字节* @param  WordAddress 要读出字节的地址* @retval 读出的数据*/
unsigned char AT24C02_ReadByte(unsigned char WordAddress)
{unsigned char Data;I2C_Start();I2C_SendByte(AT24C02_ADDRESS);I2C_ReceiveAck();I2C_SendByte(WordAddress);I2C_ReceiveAck();I2C_Start();I2C_SendByte(AT24C02_ADDRESS|0x01);I2C_ReceiveAck();Data=I2C_ReceiveByte();I2C_SendAck(1);I2C_Stop();return Data;
}
AT21C02.h
#ifndef __AT24C02_H__
#define __AT24C02_H__void AT24C02_WriteByte(unsigned char WordAddress,Data);
unsigned char AT24C02_ReadByte(unsigned char WordAddress);#endif
二十八、单片机实操二十六:秒表(定时器扫描按键数码管)
1、编写程序
main.c
#include <STC89C5xRC.H>
#include "Timer0.h"
#include "Key.h"
#include "Nixie.h"
#include "Delay.h"
#include "AT24C02.h"unsigned char KeyNum;
unsigned char Min,Sec,MiniSec;
unsigned char RunFlag;void main()
{Timer0_Init();while(1){KeyNum=Key();if(KeyNum==1)			//K1按键按下{RunFlag=!RunFlag;	//启动标志位翻转}if(KeyNum==2)			//K2按键按下{Min=0;				//分秒清0Sec=0;MiniSec=0;}if(KeyNum==3)			//K3按键按下{AT24C02_WriteByte(0,Min);	//将分秒写入AT24C02Delay(5);AT24C02_WriteByte(1,Sec);Delay(5);AT24C02_WriteByte(2,MiniSec);Delay(5);}if(KeyNum==4)			//K4按键按下{Min=AT24C02_ReadByte(0);	//读出AT24C02数据Sec=AT24C02_ReadByte(1);MiniSec=AT24C02_ReadByte(2);}Nixie_SetBuf(1,Min/10);	//设置显示缓存,显示数据Nixie_SetBuf(2,Min%10);Nixie_SetBuf(3,11);Nixie_SetBuf(4,Sec/10);Nixie_SetBuf(5,Sec%10);Nixie_SetBuf(6,11);Nixie_SetBuf(7,MiniSec/10);Nixie_SetBuf(8,MiniSec%10);}
}/*** @brief  秒表驱动函数,在中断中调用* @param  无* @retval 无*/
void Sec_Loop(void)
{if(RunFlag){MiniSec++;if(MiniSec>=100){MiniSec=0;Sec++;if(Sec>=60){Sec=0;Min++;if(Min>=60){Min=0;}}}}
}void Timer0_Routine() interrupt 1
{static unsigned int T0Count1,T0Count2,T0Count3;TL0 = 0x18;		//设置定时初值TH0 = 0xFC;		//设置定时初值T0Count1++;if(T0Count1>=20){T0Count1=0;Key_Loop();	//20ms调用一次按键驱动函数}T0Count2++;if(T0Count2>=2){T0Count2=0;Nixie_Loop();//2ms调用一次数码管驱动函数}T0Count3++;if(T0Count3>=10){T0Count3=0;Sec_Loop();	//10ms调用一次数秒表驱动函数}
}
Key.c
#include <STC89C5xRC.H>
#include "Delay.h"unsigned char Key_KeyNumber;/*** @brief  获取按键键码* @param  无* @retval 按下按键的键码,范围:0,1~4,0表示无按键按下*/
unsigned char Key(void)
{unsigned char Temp=0;Temp=Key_KeyNumber;Key_KeyNumber=0;return Temp;
}/*** @brief  获取当前按键的状态,无消抖及松手检测* @param  无* @retval 按下按键的键码,范围:0,1~4,0表示无按键按下*/
unsigned char Key_GetState()
{unsigned char KeyNumber=0;if(P31==0){KeyNumber=1;}if(P30==0){KeyNumber=2;}if(P32==0){KeyNumber=3;}if(P33==0){KeyNumber=4;}return KeyNumber;
}/*** @brief  按键驱动函数,在中断中调用* @param  无* @retval 无*/
void Key_Loop(void)
{static unsigned char NowState,LastState;LastState=NowState;				//按键状态更新NowState=Key_GetState();		//获取当前按键状态//如果上个时间点按键按下,这个时间点未按下,则是松手瞬间,以此避免消抖和松手检测if(LastState==1 && NowState==0){Key_KeyNumber=1;}if(LastState==2 && NowState==0){Key_KeyNumber=2;}if(LastState==3 && NowState==0){Key_KeyNumber=3;}if(LastState==4 && NowState==0){Key_KeyNumber=4;}
}
Key.h
#ifndef __KEY_H__
#define __KEY_H__unsigned char Key(void);
void Key_Loop(void);#endif
Nixie.c
#include <STC89C5xRC.H>
#include "Delay.h"//数码管显示缓存区
unsigned char Nixie_Buf[9]={0,10,10,10,10,10,10,10,10};//数码管段码表
unsigned char NixieTable[]={0x3F,0x06,0x5B,0x4F,0x66,0x6D,0x7D,0x07,0x7F,0x6F,0x00,0x40};/*** @brief  设置显示缓存区* @param  Location 要设置的位置,范围:1~8* @param  Number 要设置的数字,范围:段码表索引范围* @retval 无*/
void Nixie_SetBuf(unsigned char Location,Number)
{Nixie_Buf[Location]=Number;
}/*** @brief  数码管扫描显示* @param  Location 要显示的位置,范围:1~8* @param  Number 要显示的数字,范围:段码表索引范围* @retval 无*/
void Nixie_Scan(unsigned char Location,Number)
{P0=0x00;				//段码清0,消影switch(Location)		//位码输出{case 1:P24=1;P23=1;P22=1;break;case 2:P24=1;P23=1;P22=0;break;case 3:P24=1;P23=0;P22=1;break;case 4:P24=1;P23=0;P22=0;break;case 5:P24=0;P23=1;P22=1;break;case 6:P24=0;P23=1;P22=0;break;case 7:P24=0;P23=0;P22=1;break;case 8:P24=0;P23=0;P22=0;break;}P0=NixieTable[Number];	//段码输出
}/*** @brief  数码管驱动函数,在中断中调用* @param  无* @retval 无*/
void Nixie_Loop(void)
{static unsigned char i=1;Nixie_Scan(i,Nixie_Buf[i]);i++;if(i>=9){i=1;}
}
Nixie.h
#ifndef __NIXIE_H__
#define __NIXIE_H__void Nixie_SetBuf(unsigned char Location,Number);
void Nixie_Scan(unsigned char Location,Number);
void Nixie_Loop(void);#endif
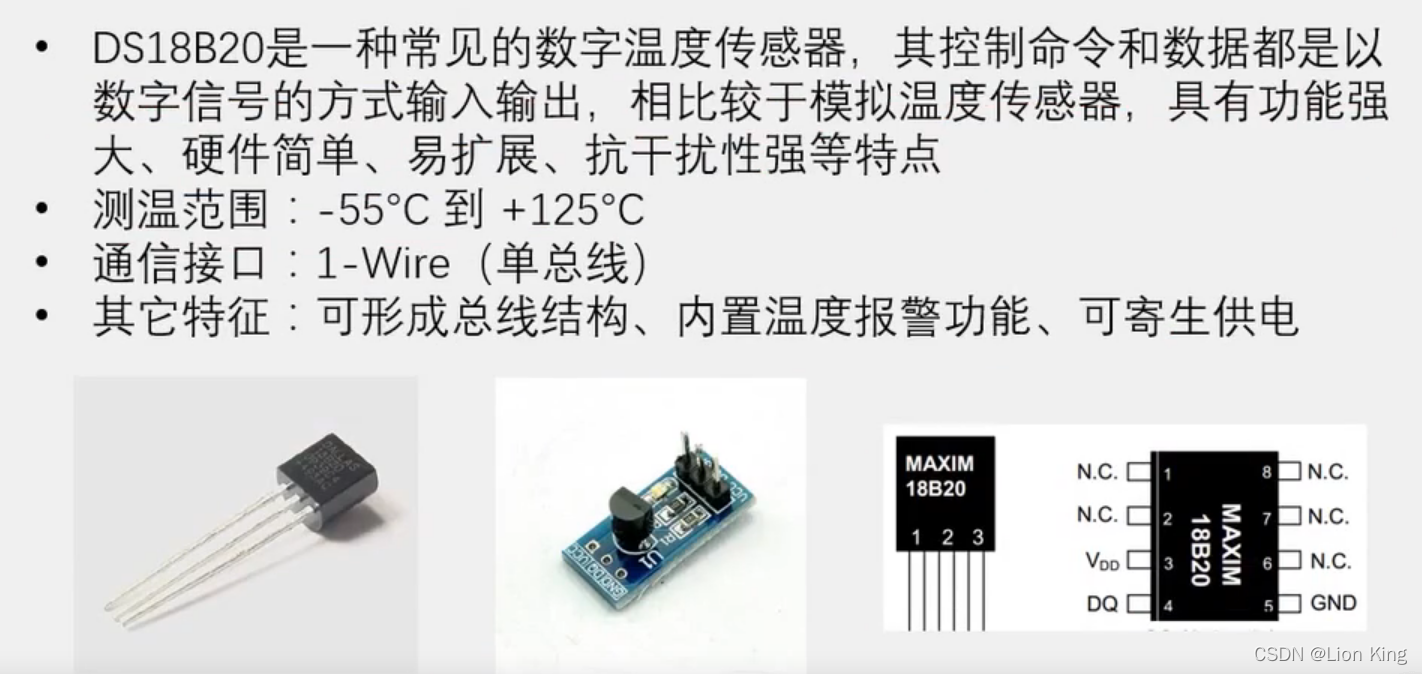
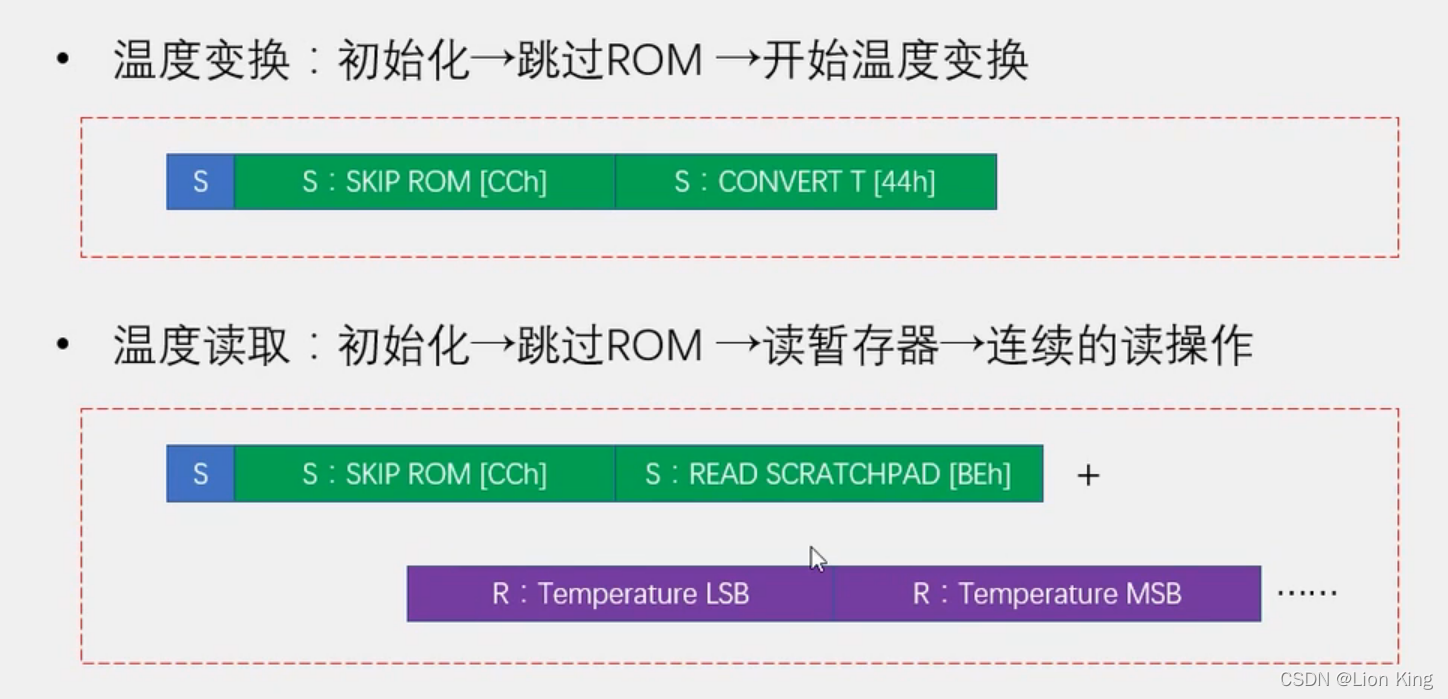
二十九、单片机实操二十七:DS18B20温度传感器与温度读取
1、DS18B20介绍
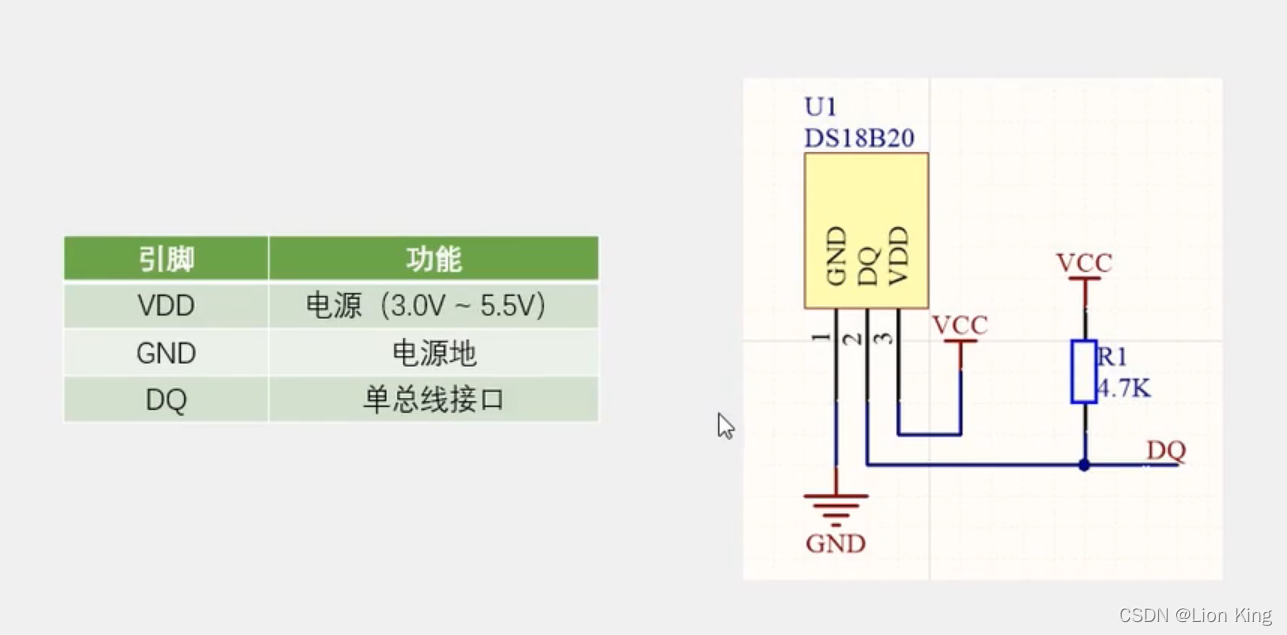
2、 引脚及应用电路
3、内部结构图
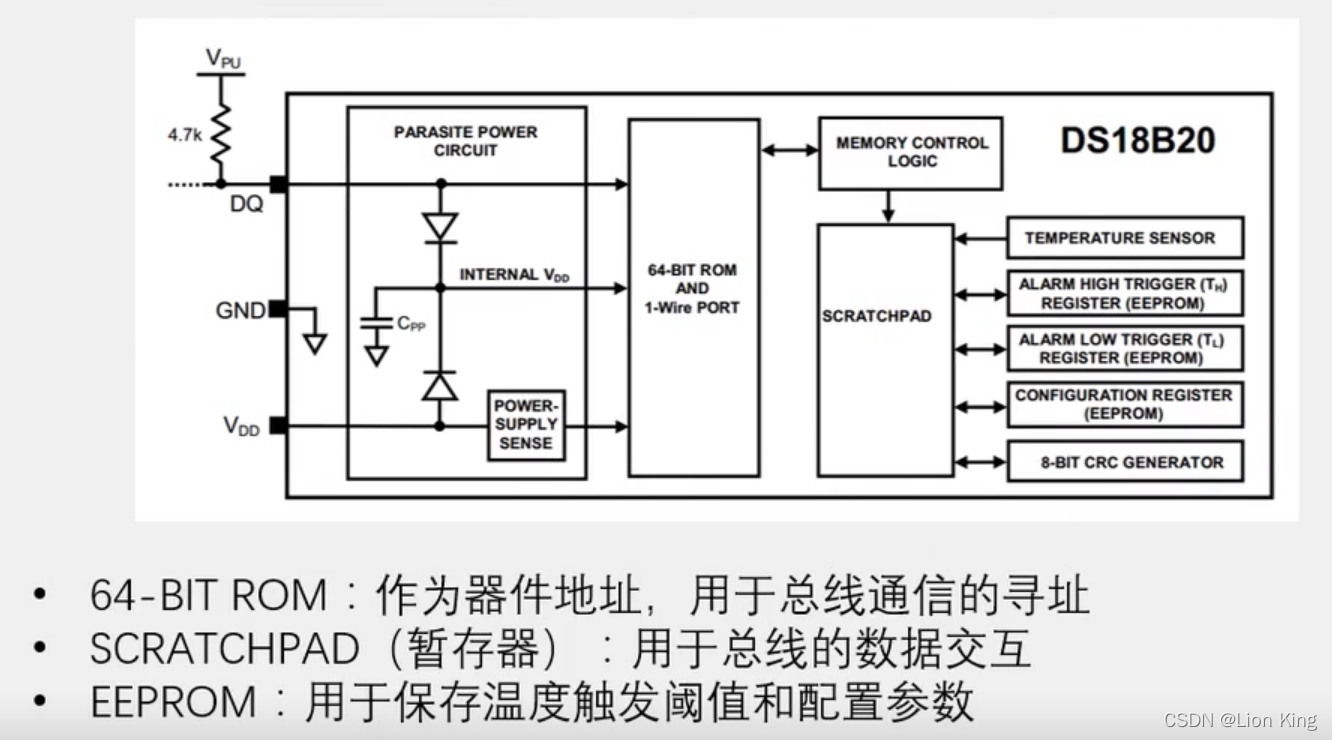
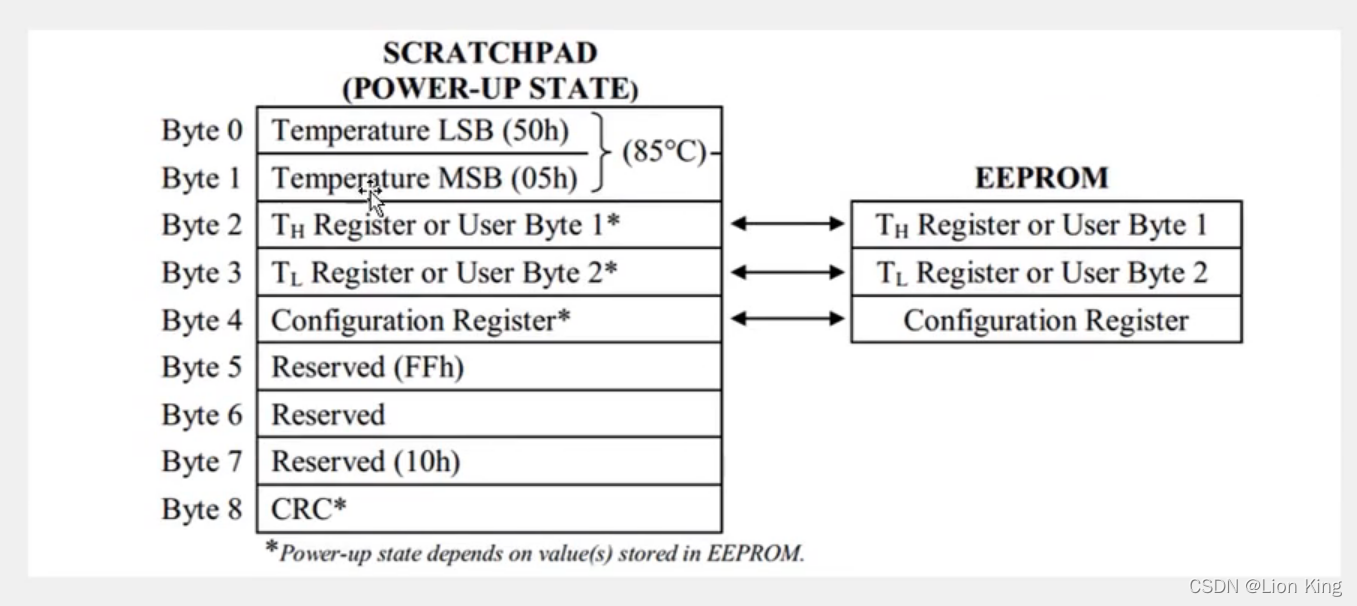
4、存储器结构
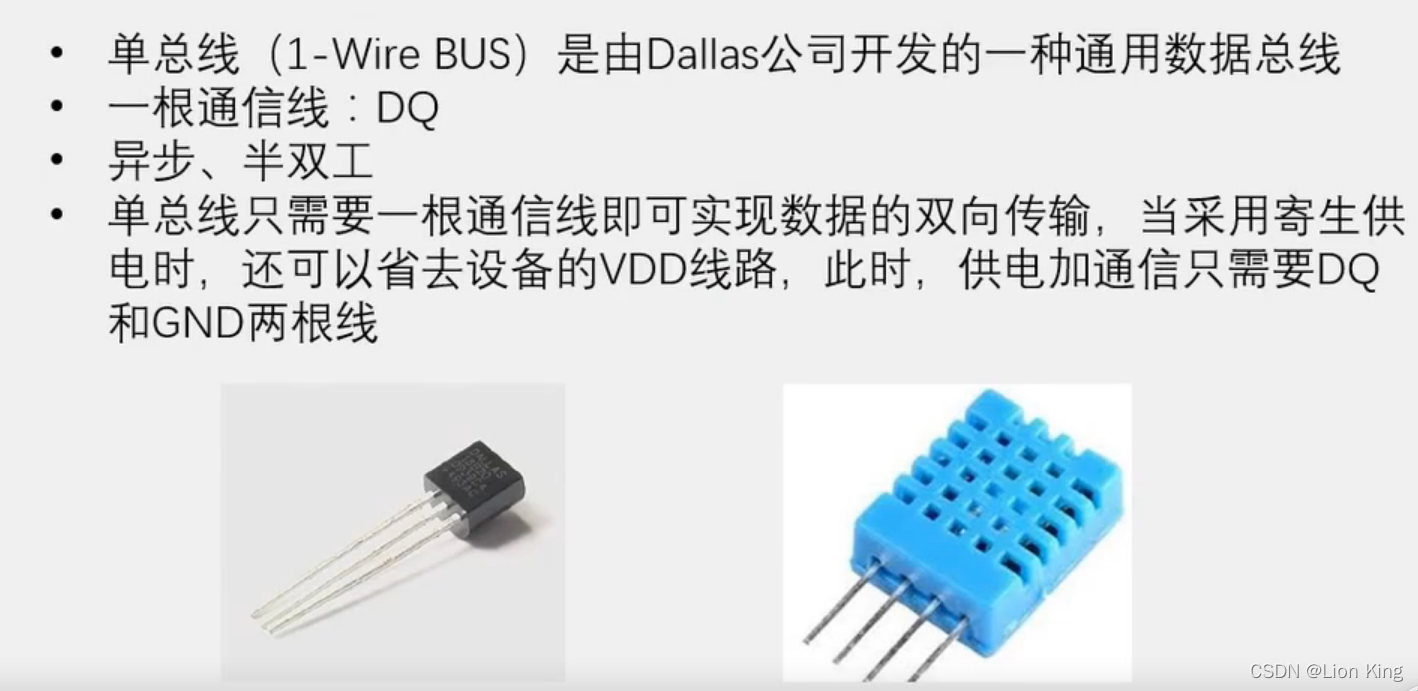
5、单总线介绍
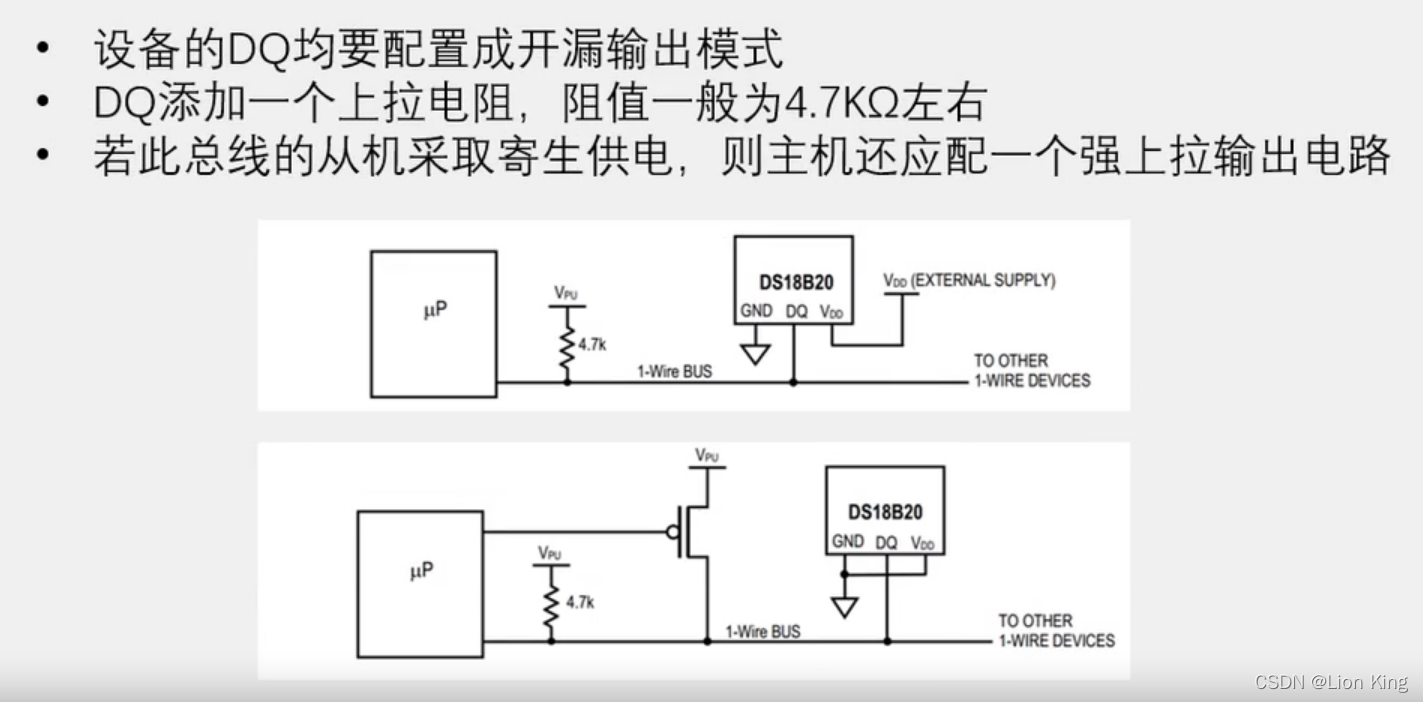
6、单总线电路规范
7、单总线时序结构
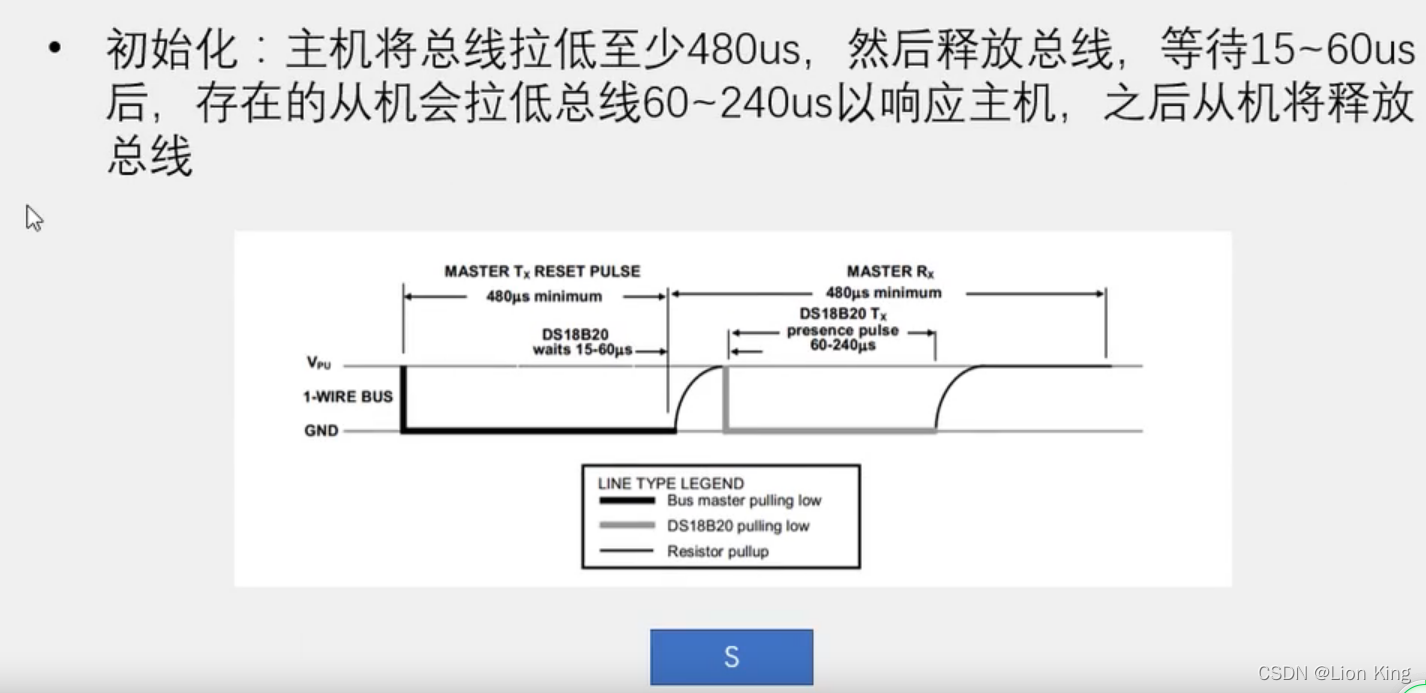
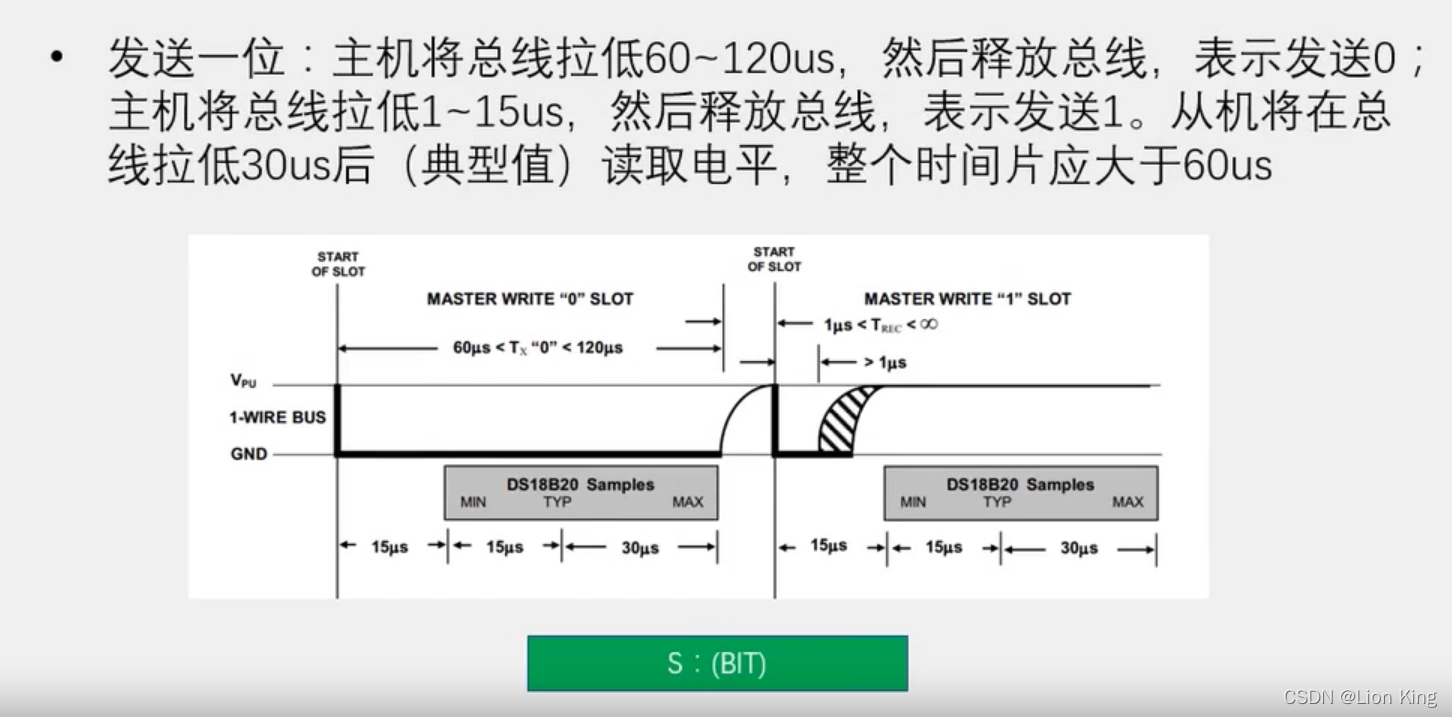
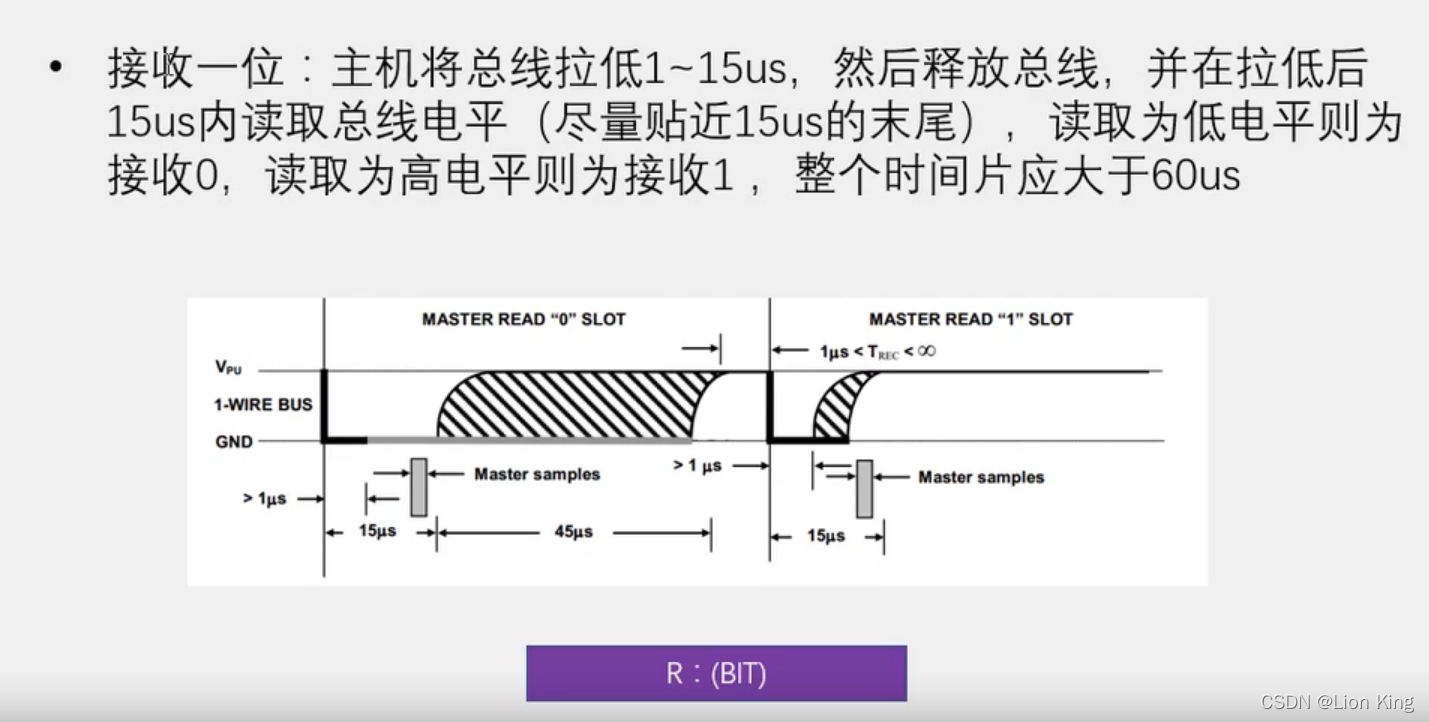
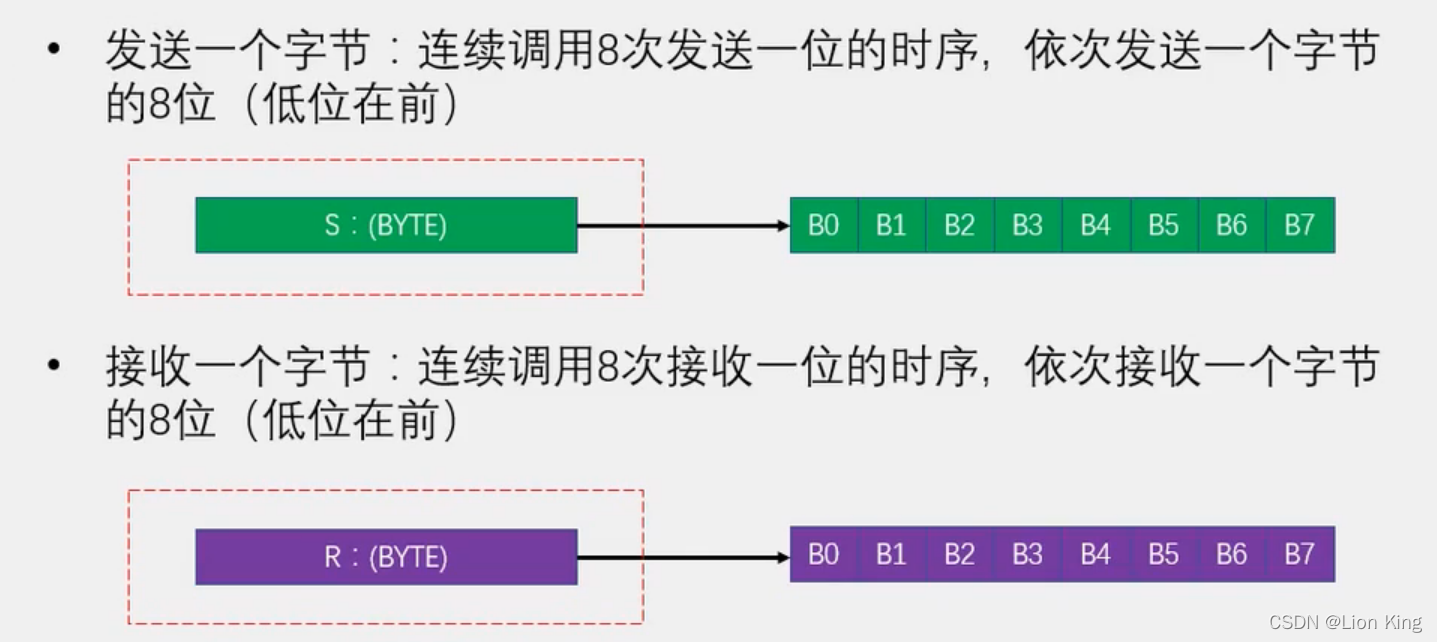
8、DS18B20操作流程

9、DS18B20数据帧
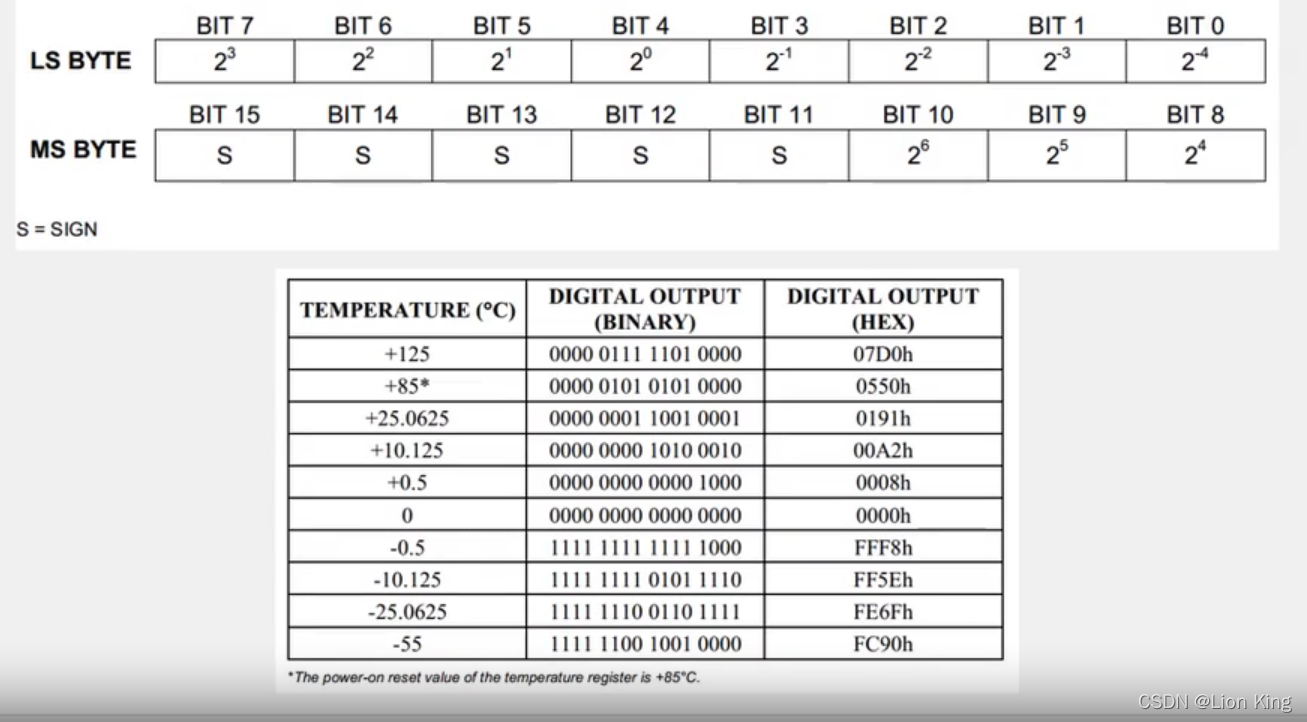
10、温度存储格式
11、编写程序
main.c
#include <STC89C5xRC.H>
#include "LCD1602.h"
#include "DS18B20.h"
#include "Delay.h"
#include "AT24C02.h"
#include "Key.h"
#include "Timer0.h"float T,TShow;
char TLow,THigh;
unsigned char KeyNum;void main()
{DS18B20_ConvertT();		//上电先转换一次温度,防止第一次读数据错误Delay(1000);			//等待转换完成THigh=AT24C02_ReadByte(0);	//读取温度阈值数据TLow=AT24C02_ReadByte(1);if(THigh>125 || TLow<-55 || THigh<=TLow){THigh=20;			//如果阈值非法,则设为默认值TLow=15;}LCD_Init();LCD_ShowString(1,1,"T:");LCD_ShowString(2,1,"TH:");LCD_ShowString(2,9,"TL:");LCD_ShowSignedNum(2,4,THigh,3);LCD_ShowSignedNum(2,12,TLow,3);Timer0_Init();while(1){KeyNum=Key();/*温度读取及显示*/DS18B20_ConvertT();	//转换温度T=DS18B20_ReadT();	//读取温度if(T<0)				//如果温度小于0{LCD_ShowChar(1,3,'-');	//显示负号TShow=-T;		//将温度变为正数}else				//如果温度大于等于0{LCD_ShowChar(1,3,'+');	//显示正号TShow=T;}LCD_ShowNum(1,4,TShow,3);		//显示温度整数部分LCD_ShowChar(1,7,'.');		//显示小数点LCD_ShowNum(1,8,(unsigned long)(TShow*100)%100,2);//显示温度小数部分/*阈值判断及显示*/if(KeyNum){if(KeyNum==1)	//K1按键,THigh自增{THigh++;if(THigh>125){THigh=125;}}if(KeyNum==2)	//K2按键,THigh自减{THigh--;if(THigh<=TLow){THigh++;}}if(KeyNum==3)	//K3按键,TLow自增{TLow++;if(TLow>=THigh){TLow--;}}if(KeyNum==4)	//K4按键,TLow自减{TLow--;if(TLow<-55){TLow=-55;}}LCD_ShowSignedNum(2,4,THigh,3);	//显示阈值数据LCD_ShowSignedNum(2,12,TLow,3);AT24C02_WriteByte(0,THigh);		//写入到At24C02中保存Delay(5);AT24C02_WriteByte(1,TLow);Delay(5);}if(T>THigh)			//越界判断{LCD_ShowString(1,13,"OV:H");}else if(T<TLow){LCD_ShowString(1,13,"OV:L");}else{LCD_ShowString(1,13,"    ");}}
}void Timer0_Routine() interrupt 1
{static unsigned int T0Count;TL0 = 0x18;		//设置定时初值TH0 = 0xFC;		//设置定时初值T0Count++;if(T0Count>=20){T0Count=0;Key_Loop();	//每20ms调用一次按键驱动函数}
}
OneWrite.c
#include <STC89C5xRC.H>
//引脚定义
sbit OneWire_DQ=P3^7;/*** @brief  单总线初始化* @param  无* @retval 从机响应位,0为响应,1为未响应*/
unsigned char OneWire_Init(void)
{unsigned char i;unsigned char AckBit;OneWire_DQ=1;OneWire_DQ=0;i = 247;while (--i);		//Delay 500usOneWire_DQ=1;i = 32;while (--i);			//Delay 70usAckBit=OneWire_DQ;i = 247;while (--i);		//Delay 500usreturn AckBit;
}/*** @brief  单总线发送一位* @param  Bit 要发送的位* @retval 无*/
void OneWire_SendBit(unsigned char Bit)
{unsigned char i;OneWire_DQ=0;i = 4;while (--i);			//Delay 10usOneWire_DQ=Bit;i = 24;while (--i);			//Delay 50usOneWire_DQ=1;
}/*** @brief  单总线接收一位* @param  无* @retval 读取的位*/
unsigned char OneWire_ReceiveBit(void)
{unsigned char i;unsigned char Bit;OneWire_DQ=0;i = 2;while (--i);			//Delay 5usOneWire_DQ=1;i = 2;while (--i);			//Delay 5usBit=OneWire_DQ;i = 24;while (--i);			//Delay 50usreturn Bit;
}/*** @brief  单总线发送一个字节* @param  Byte 要发送的字节* @retval 无*/
void OneWire_SendByte(unsigned char Byte)
{unsigned char i;for(i=0;i<8;i++){OneWire_SendBit(Byte&(0x01<<i));}
}/*** @brief  单总线接收一个字节* @param  无* @retval 接收的一个字节*/
unsigned char OneWire_ReceiveByte(void)
{unsigned char i;unsigned char Byte=0x00;for(i=0;i<8;i++){if(OneWire_ReceiveBit()){Byte|=(0x01<<i);}}return Byte;
}
OneWrite.h
#ifndef __ONEWIRE_H__
#define __ONEWIRE_H__unsigned char OneWire_Init(void);
void OneWire_SendBit(unsigned char Bit);
unsigned char OneWire_ReceiveBit(void);
void OneWire_SendByte(unsigned char Byte);
unsigned char OneWire_ReceiveByte(void);#endif
三十、单片机实操二十八:温度报警器
1、编写代码
main.c
#include <STC89C5xRC.H>
#include "LCD1602.h"
#include "DS18B20.h"
#include "Delay.h"
#include "AT24C02.h"
#include "Key.h"
#include "Timer0.h"float T,TShow;
char TLow,THigh;
unsigned char KeyNum;void main()
{DS18B20_ConvertT();		//上电先转换一次温度,防止第一次读数据错误Delay(1000);			//等待转换完成THigh=AT24C02_ReadByte(0);	//读取温度阈值数据TLow=AT24C02_ReadByte(1);if(THigh>125 || TLow<-55 || THigh<=TLow){THigh=20;			//如果阈值非法,则设为默认值TLow=15;}LCD_Init();LCD_ShowString(1,1,"T:");LCD_ShowString(2,1,"TH:");LCD_ShowString(2,9,"TL:");LCD_ShowSignedNum(2,4,THigh,3);LCD_ShowSignedNum(2,12,TLow,3);Timer0_Init();while(1){KeyNum=Key();/*温度读取及显示*/DS18B20_ConvertT();	//转换温度T=DS18B20_ReadT();	//读取温度if(T<0)				//如果温度小于0{LCD_ShowChar(1,3,'-');	//显示负号TShow=-T;		//将温度变为正数}else				//如果温度大于等于0{LCD_ShowChar(1,3,'+');	//显示正号TShow=T;}LCD_ShowNum(1,4,TShow,3);		//显示温度整数部分LCD_ShowChar(1,7,'.');		//显示小数点LCD_ShowNum(1,8,(unsigned long)(TShow*100)%100,2);//显示温度小数部分/*阈值判断及显示*/if(KeyNum){if(KeyNum==1)	//K1按键,THigh自增{THigh++;if(THigh>125){THigh=125;}}if(KeyNum==2)	//K2按键,THigh自减{THigh--;if(THigh<=TLow){THigh++;}}if(KeyNum==3)	//K3按键,TLow自增{TLow++;if(TLow>=THigh){TLow--;}}if(KeyNum==4)	//K4按键,TLow自减{TLow--;if(TLow<-55){TLow=-55;}}LCD_ShowSignedNum(2,4,THigh,3);	//显示阈值数据LCD_ShowSignedNum(2,12,TLow,3);AT24C02_WriteByte(0,THigh);		//写入到At24C02中保存Delay(5);AT24C02_WriteByte(1,TLow);Delay(5);}if(T>THigh)			//越界判断{LCD_ShowString(1,13,"OV:H");}else if(T<TLow){LCD_ShowString(1,13,"OV:L");}else{LCD_ShowString(1,13,"    ");}}
}void Timer0_Routine() interrupt 1
{static unsigned int T0Count;TL0 = 0x18;		//设置定时初值TH0 = 0xFC;		//设置定时初值T0Count++;if(T0Count>=20){T0Count=0;Key_Loop();	//每20ms调用一次按键驱动函数}
}
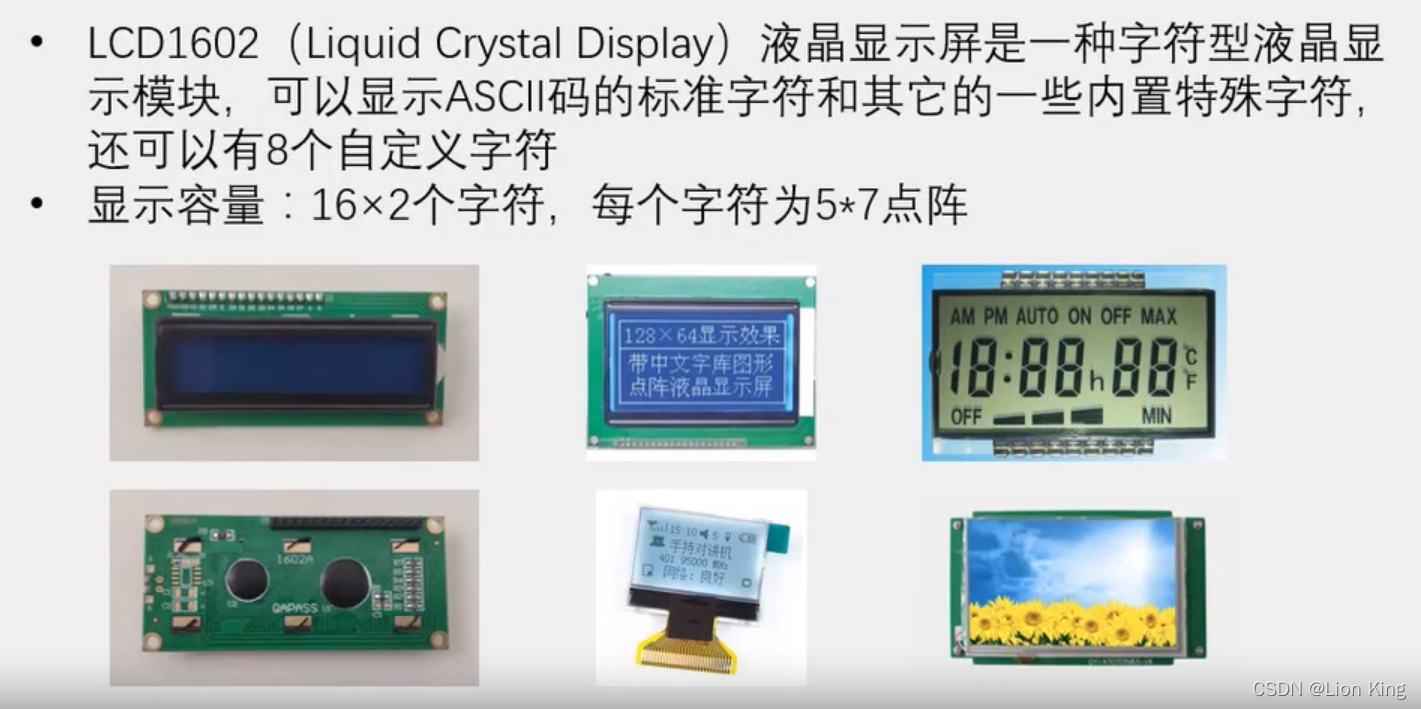
三十一、单片机实操二十九:LCD1602与功能函数代码
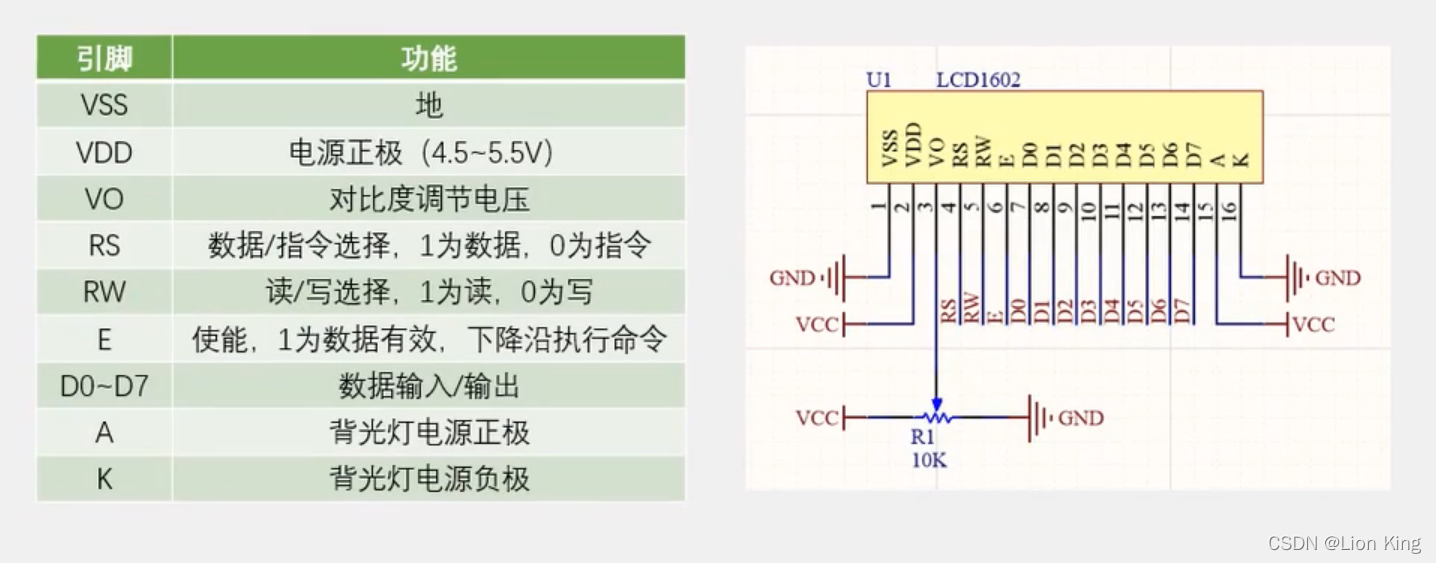
1、LCD1602介绍
2、引脚及应用电路
3、内部结构框图
 4、存储器结构
5、时序结构
6、LS1602指令集
7、LCD1602操作流程
8、编写代码
详见LCD1602模块。
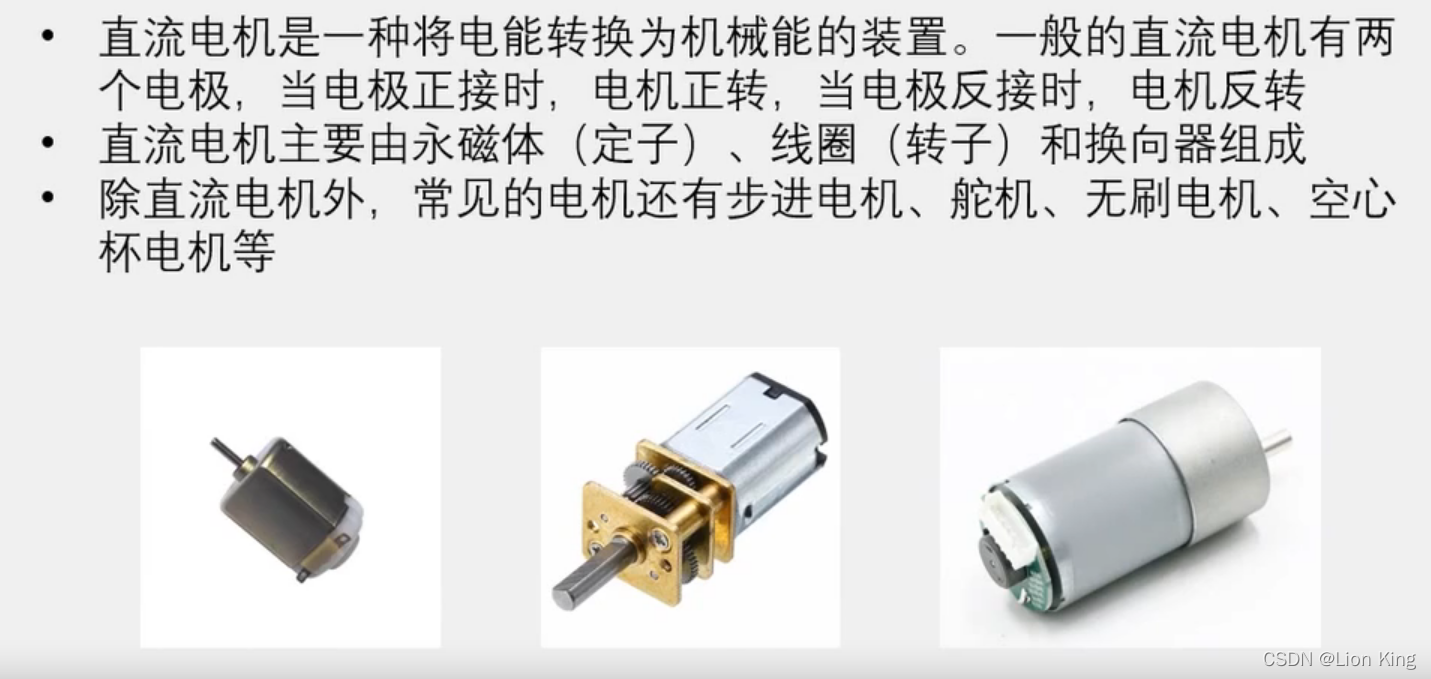
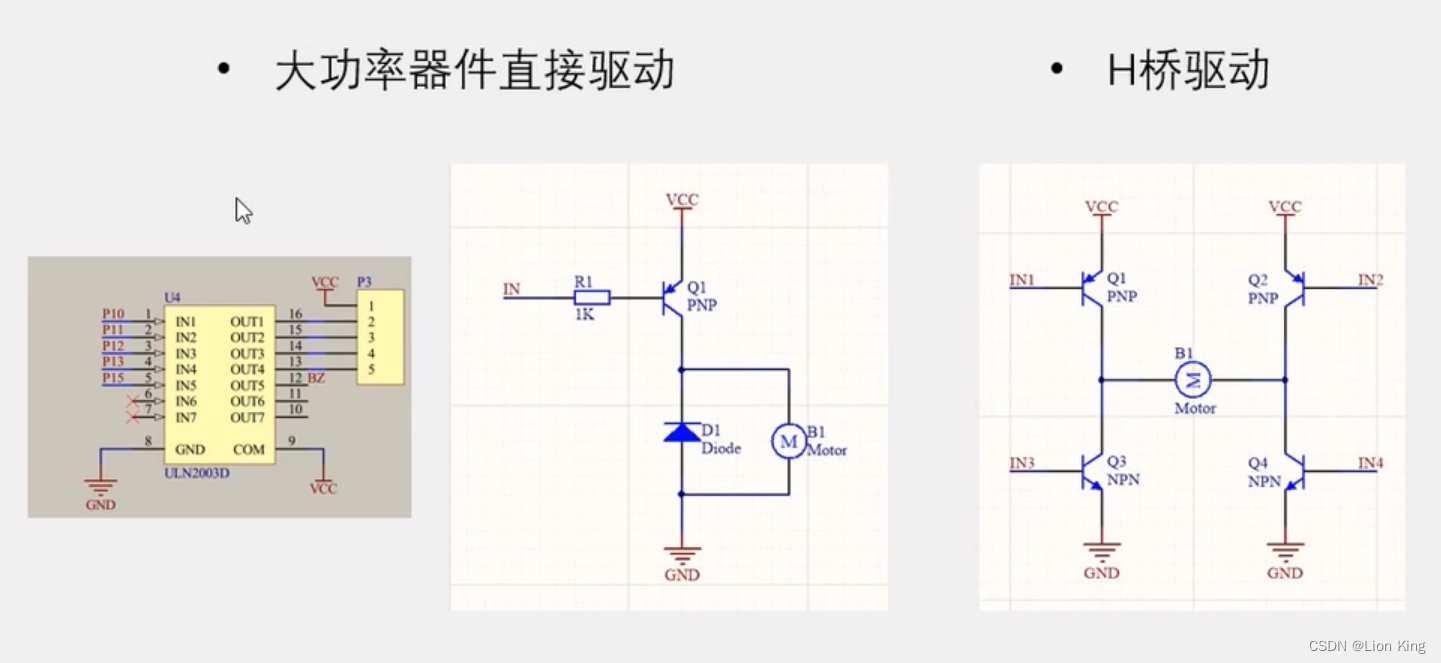
三十二、单片机实操三十:直流电机驱动(PWM)与LED呼吸灯
1、直流电机介绍
2、电机驱动电路
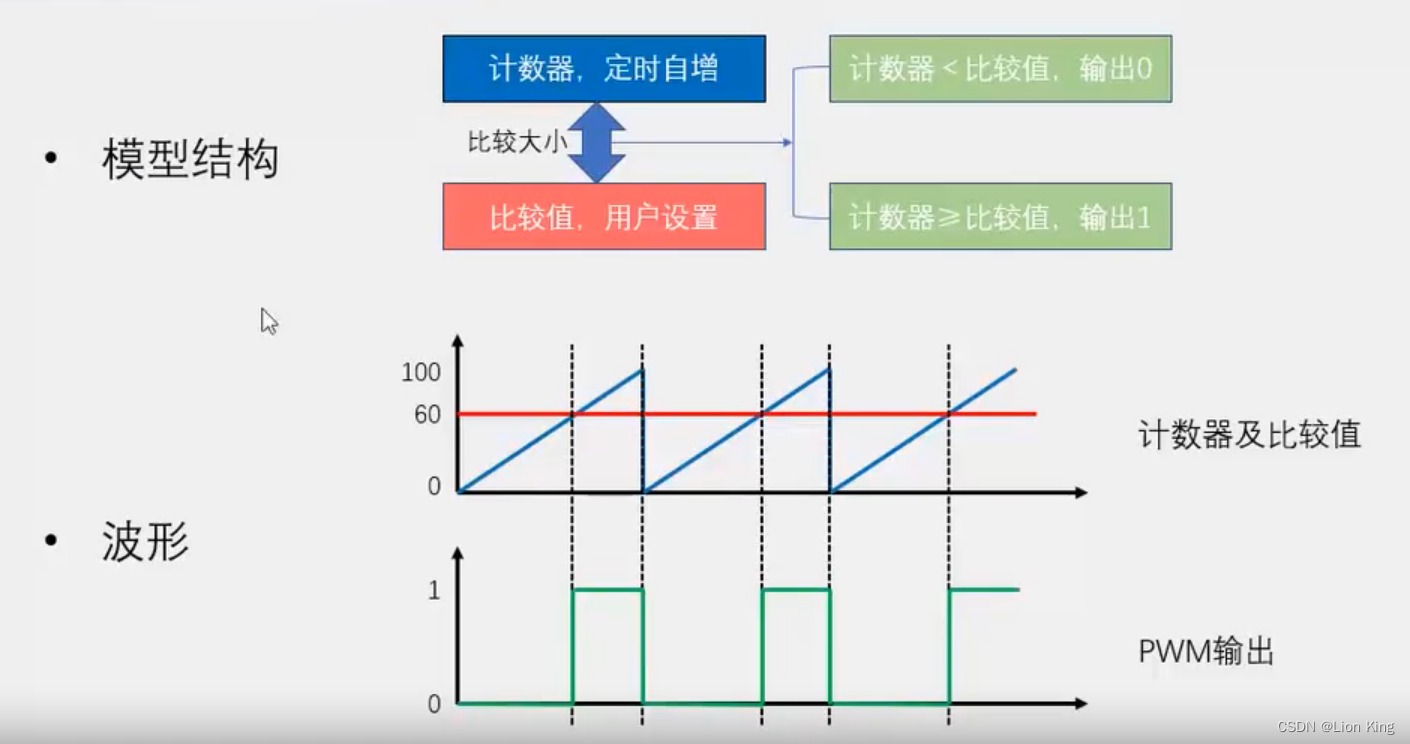
3、PWM介绍

4、产生PWM的方法
5、编写程序
main.c
#include <STC89C5xRC.H>sbit LED=P2^0;void Delay(unsigned int t)
{while(t--);
}void main()
{unsigned char Time,i;while(1){for(Time=0;Time<100;Time++)		//改变亮灭时间,由暗到亮{for(i=0;i<20;i++)			//计次延时{LED=0;					//LED亮Delay(Time);			//延时TimeLED=1;					//LED灭Delay(100-Time);		//延时100-Time}}for(Time=100;Time>0;Time--)		//改变亮灭时间,由亮到暗{for(i=0;i<20;i++)			//计次延时{LED=0;					//LED亮Delay(Time);			//延时TimeLED=1;					//LED灭Delay(100-Time);		//延时100-Time}}}
}
三十三、单片机实操三十一:直流电机调速
1、编写程序
main.c
#include <STC89C5xRC.H>#include "Delay.h"
#include "Key.h"
#include "Nixie.h"
#include "Timer0.h"sbit Motor=P1^0;unsigned char Counter,Compare;	//计数值和比较值,用于输出PWM
unsigned char KeyNum,Speed;void main()
{Timer0_Init();while(1){KeyNum=Key();if(KeyNum==1){Speed++;Speed%=4;if(Speed==0){Compare=0;}	//设置比较值,改变PWM占空比if(Speed==1){Compare=50;}if(Speed==2){Compare=75;}if(Speed==3){Compare=100;}}Nixie(1,Speed);}
}void Timer0_Routine() interrupt 1
{TL0 = 0x9C;		//设置定时初值TH0 = 0xFF;		//设置定时初值Counter++;Counter%=100;	//计数值变化范围限制在0~99if(Counter<Compare)	//计数值小于比较值{Motor=1;		//输出1}else				//计数值大于比较值{Motor=0;		//输出0}
}
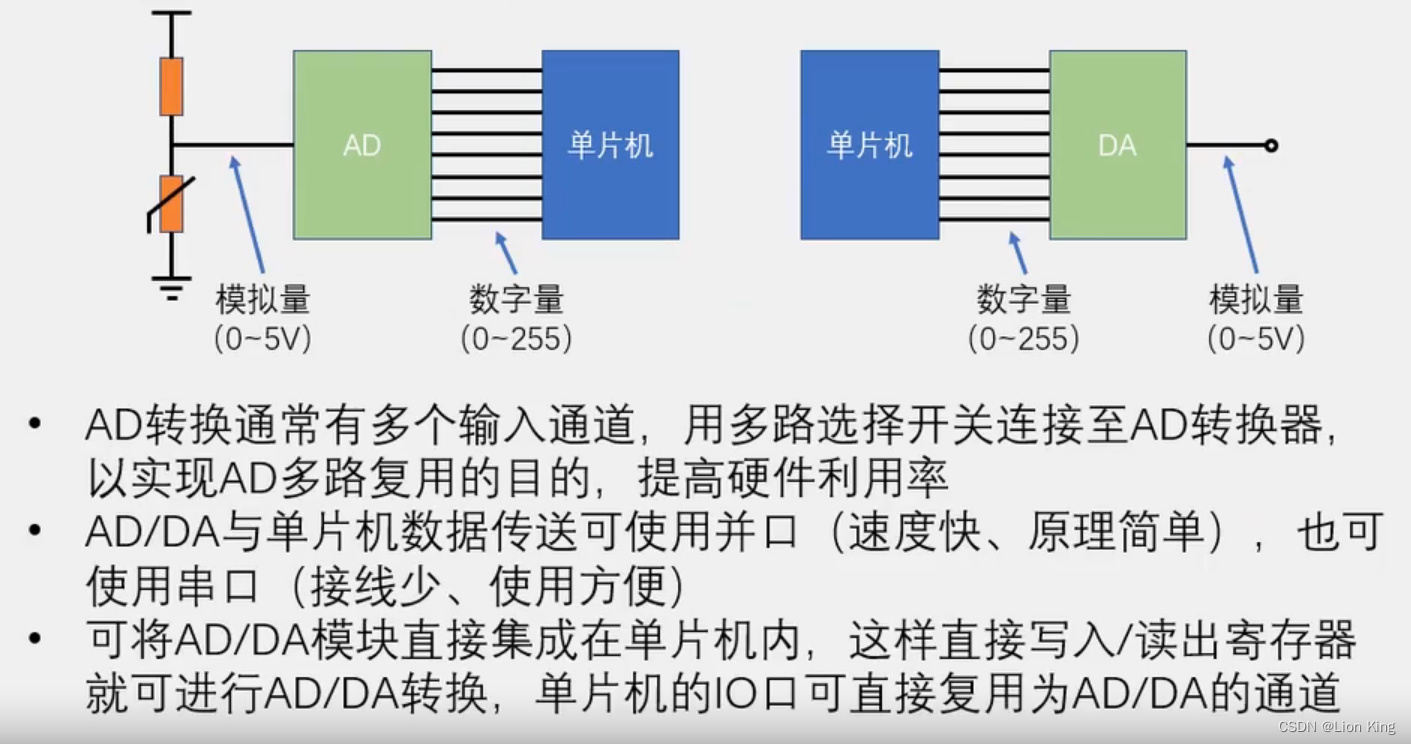
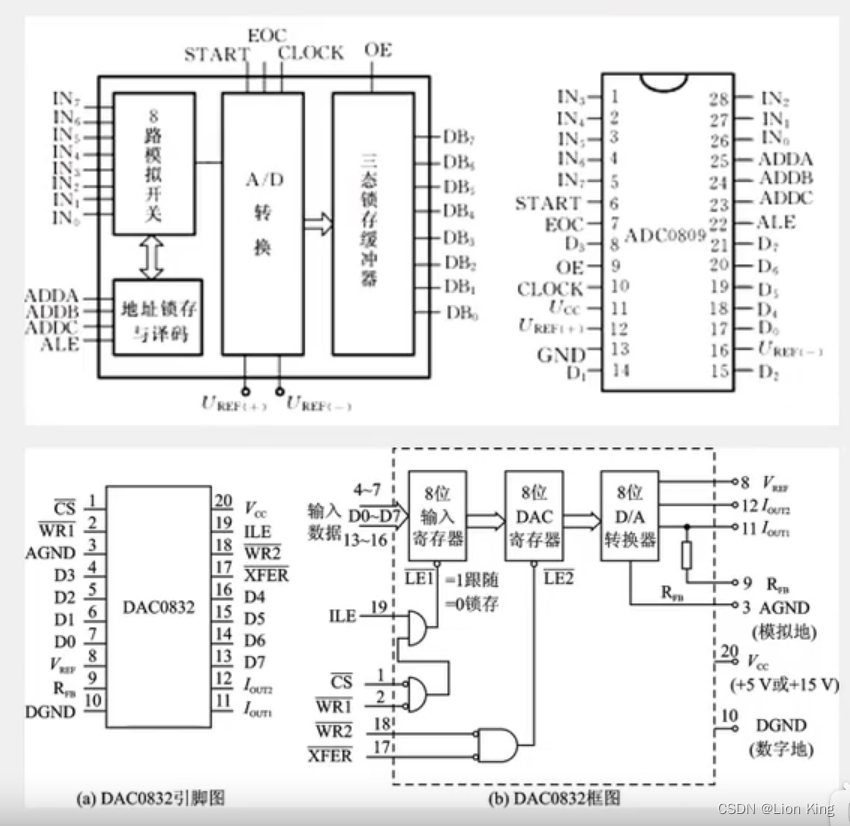
三十四、单片机实操三十二:AD/DA之AD模数转换
1、AD/DA介绍

2、硬件电路模型
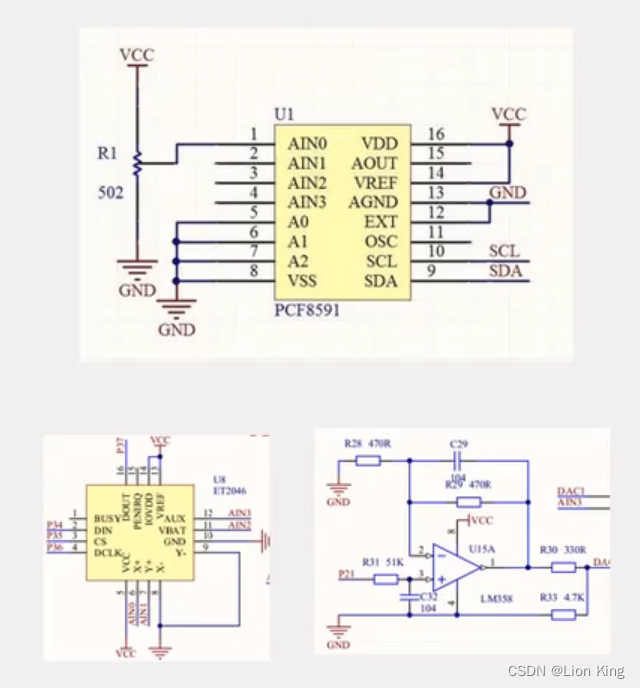
3、硬件电路
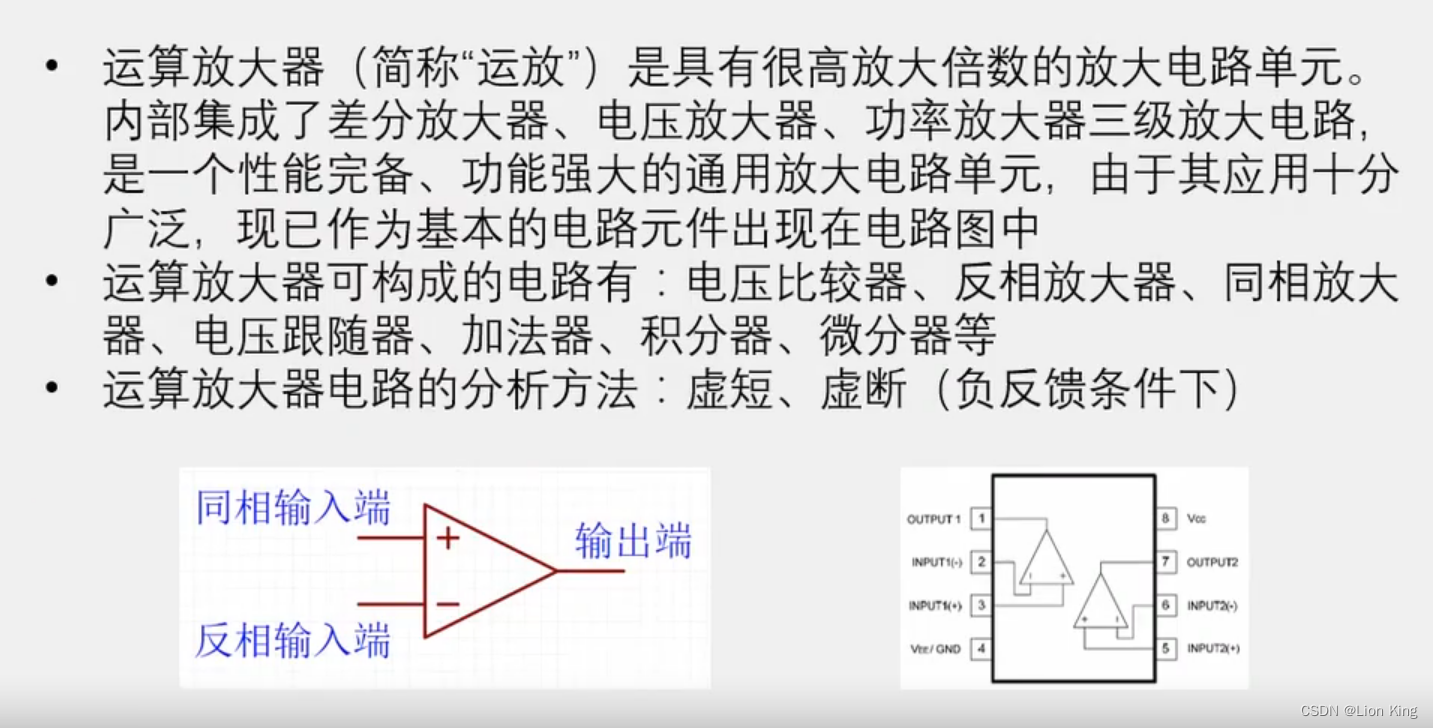
4、运算放大器
5、运放电路
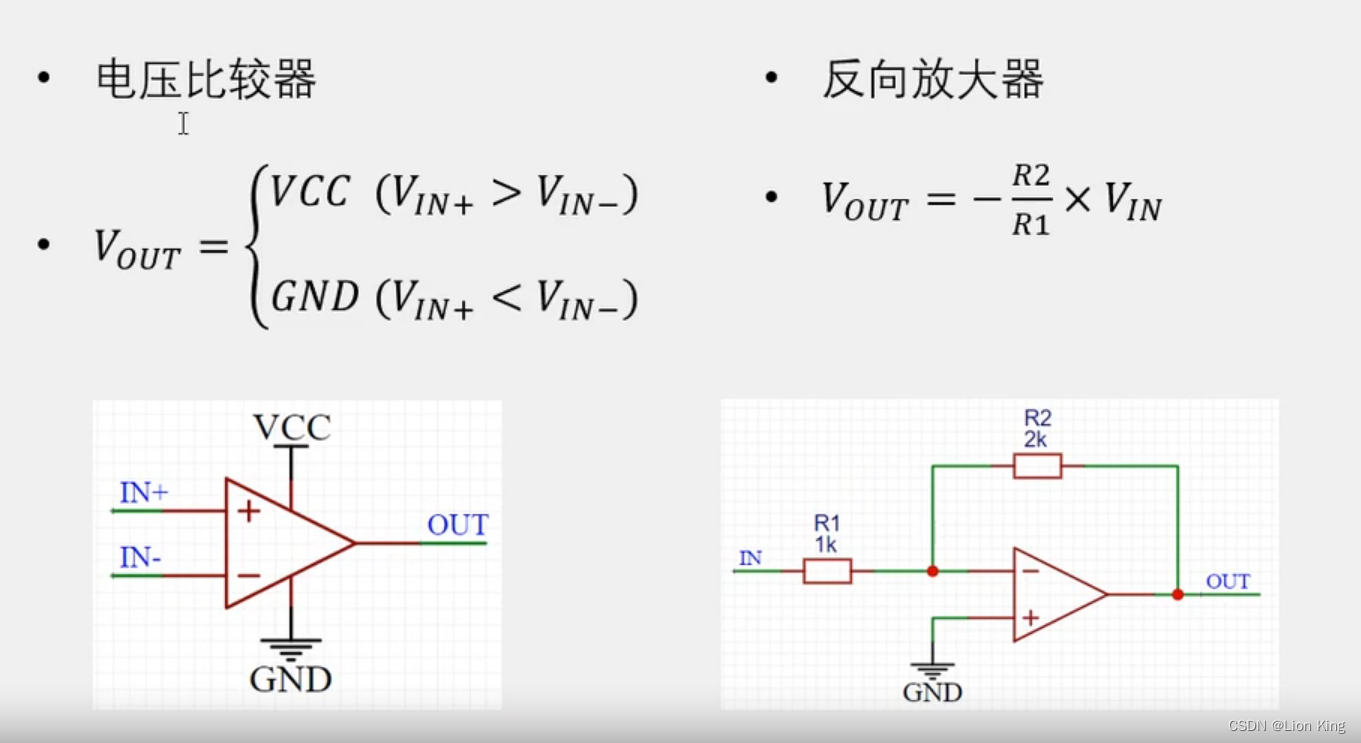
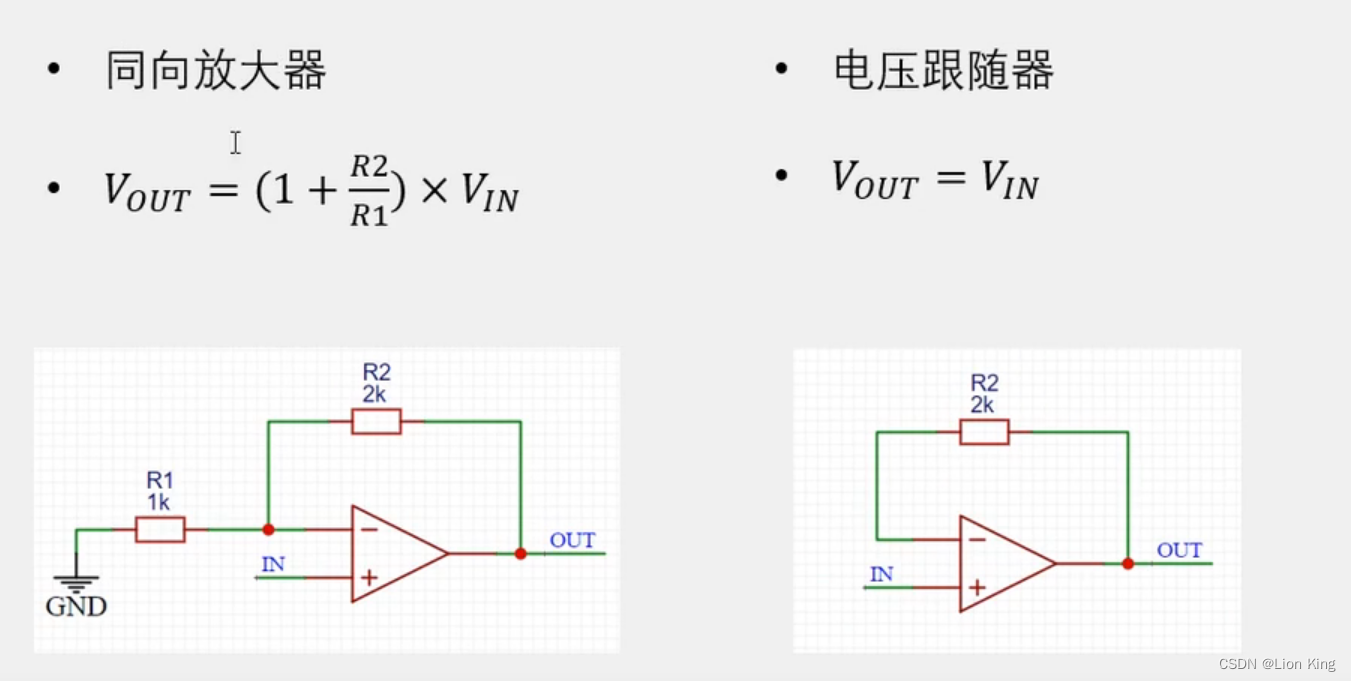
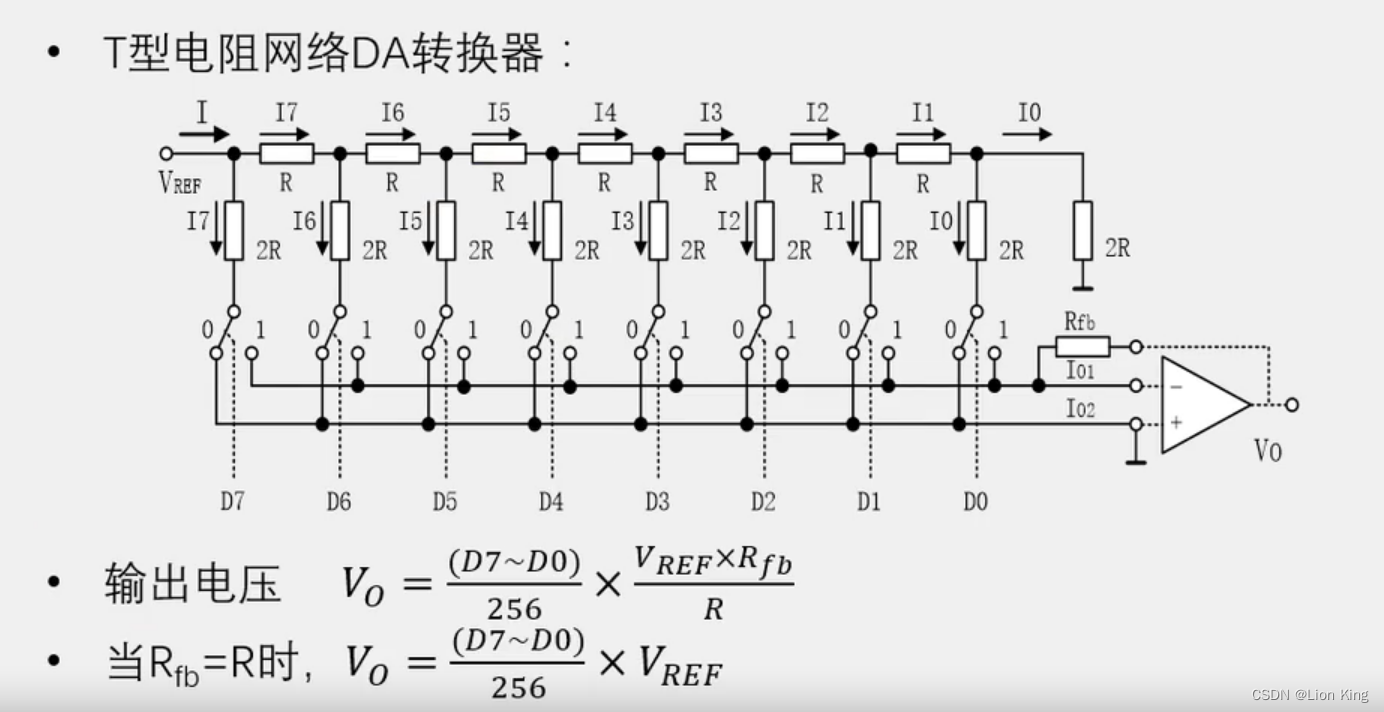
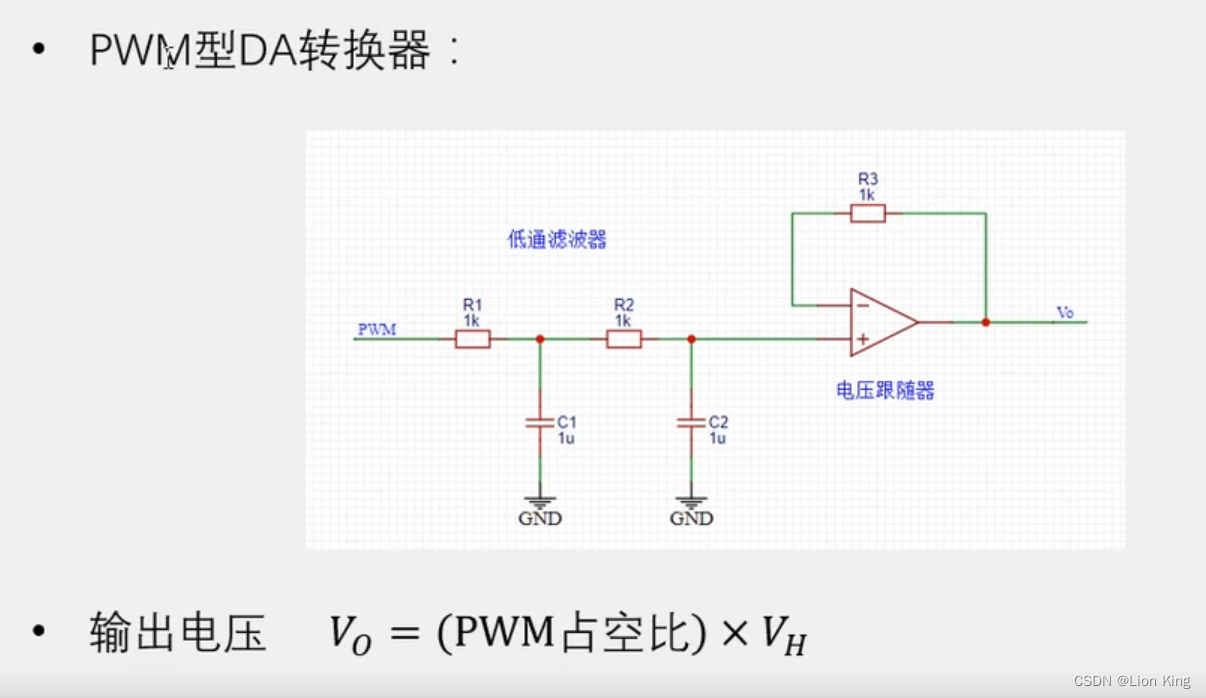
6、DA原理
7、AD原理
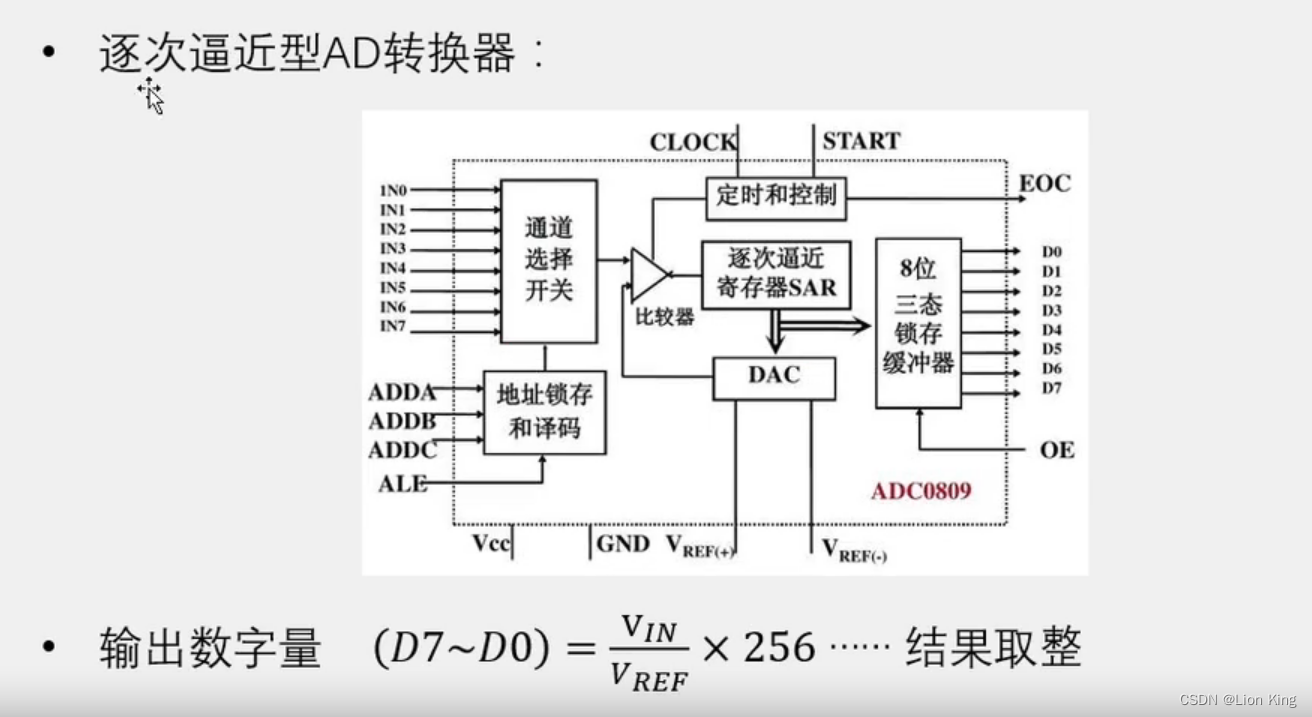
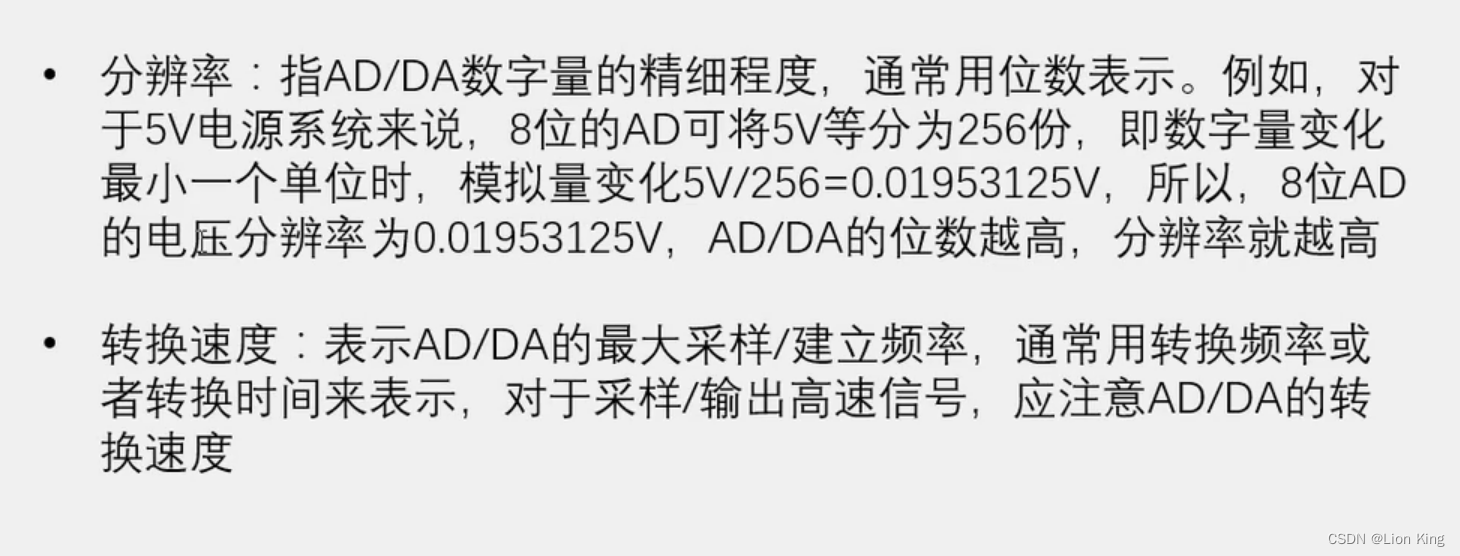
8、AD/DA性能指标
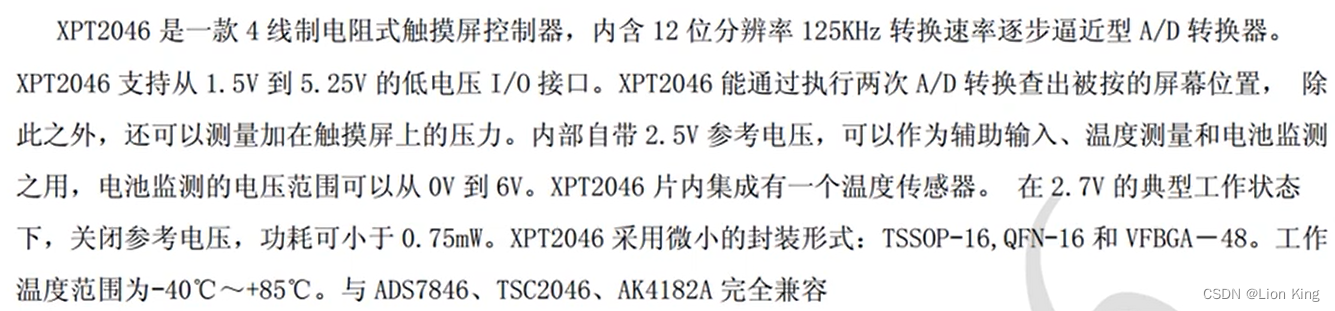
9、XPT2046功能说明
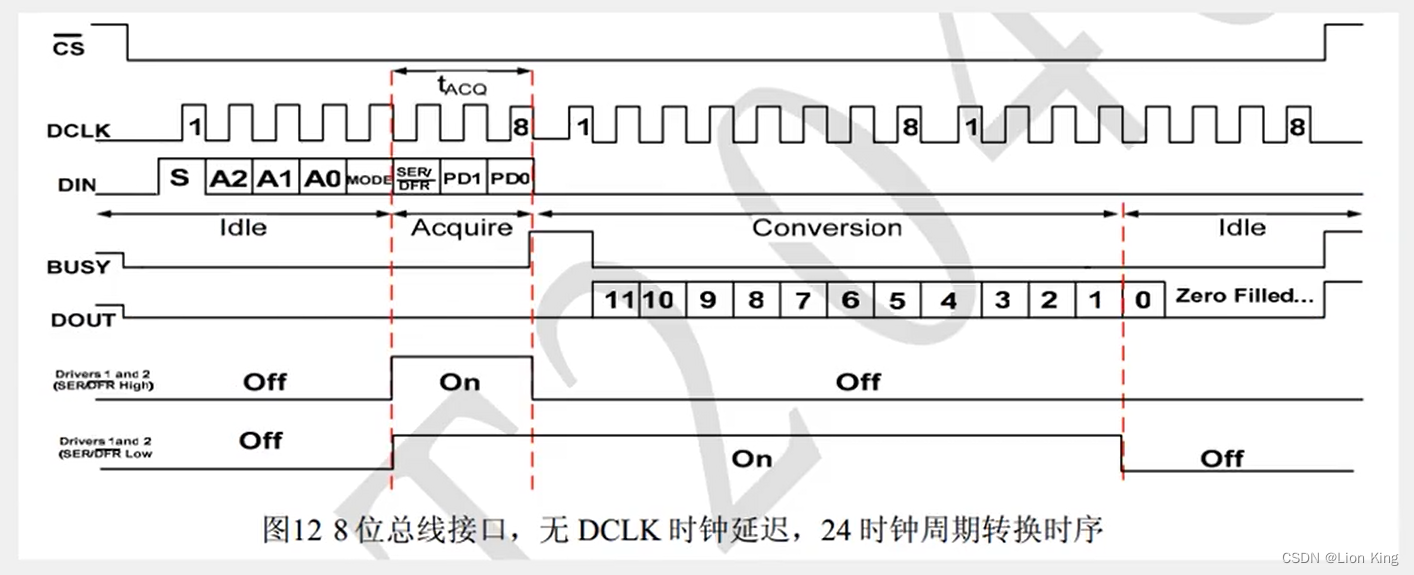
10、 XPT2046时序
11、开发板原理图
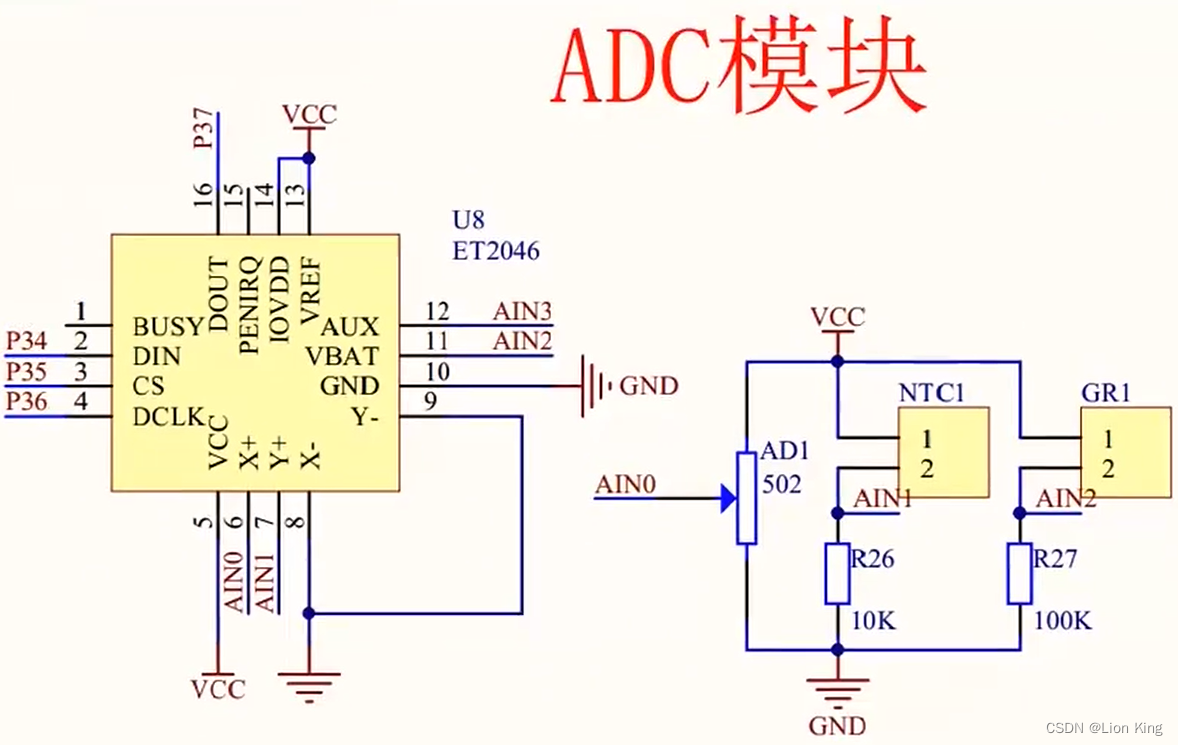
8、编写代码
main.c
#include <STC89C5xRC.H>
#include "Delay.h"
#include "LCD1602.h"
#include "XPT2046.h"unsigned int ADValue;void main(void)
{LCD_Init();LCD_ShowString(1,1,"ADJ  NTC  GR");while(1){ADValue=XPT2046_ReadAD(XPT2046_XP);		//读取AIN0,可调电阻LCD_ShowNum(2,1,ADValue,3);				//显示AIN0ADValue=XPT2046_ReadAD(XPT2046_YP);		//读取AIN1,热敏电阻LCD_ShowNum(2,6,ADValue,3);				//显示AIN1ADValue=XPT2046_ReadAD(XPT2046_VBAT);	//读取AIN2,光敏电阻LCD_ShowNum(2,11,ADValue,3);			//显示AIN2Delay(100);}
}
XPT2046.c
#include <STC89C5xRC.H>#include <INTRINS.H>//引脚定义
sbit XPY2046_DIN=P3^4;
sbit XPY2046_CS=P3^5;
sbit XPY2046_DCLK=P3^6;
sbit XPY2046_DOUT=P3^7;/*** @brief  ZPT2046读取AD值* @param  Command 命令字,范围:头文件内定义的宏,结尾的数字表示转换的位数* @retval AD转换后的数字量,范围:8位为0~255,12位为0~4095*/
unsigned int XPT2046_ReadAD(unsigned char Command)
{unsigned char i;unsigned int Data=0;XPY2046_DCLK=0;XPY2046_CS=0;for(i=0;i<8;i++){XPY2046_DIN=Command&(0x80>>i);XPY2046_DCLK=1;XPY2046_DCLK=0;}for(i=0;i<16;i++){XPY2046_DCLK=1;XPY2046_DCLK=0;if(XPY2046_DOUT){Data|=(0x8000>>i);}}XPY2046_CS=1;return Data>>8;
}
XPT2046.h
#ifndef __XPT2046_H__
#define __XPT2046_H__#define XPT2046_VBAT	0xAC
#define XPT2046_AUX		0xEC
#define XPT2046_XP		0x9C	//0xBC
#define XPT2046_YP		0xDCunsigned int XPT2046_ReadAD(unsigned char Command);#endif
三十五、单片机实操三十三:DA数模转换
1、编写代码
main.c
#include <STC89C5xRC.H>#include "Delay.h"
#include "Timer0.h"sbit DA=P2^1;unsigned char Counter,Compare;	//计数值和比较值,用于输出PWM
unsigned char i;void main()
{Timer0_Init();while(1){for(i=0;i<100;i++){Compare=i;			//设置比较值,改变PWM占空比Delay(10);}for(i=100;i>0;i--){Compare=i;			//设置比较值,改变PWM占空比Delay(10);}}
}void Timer0_Routine() interrupt 1
{TL0 = 0x9C;		//设置定时初值TH0 = 0xFF;		//设置定时初值Counter++;Counter%=100;	//计数值变化范围限制在0~99if(Counter<Compare)	//计数值小于比较值{DA=1;		//输出1}else				//计数值大于比较值{DA=0;		//输出0}
}
三十六、单片机实操三十四:红外遥控与外部中断
1、红外遥控简介
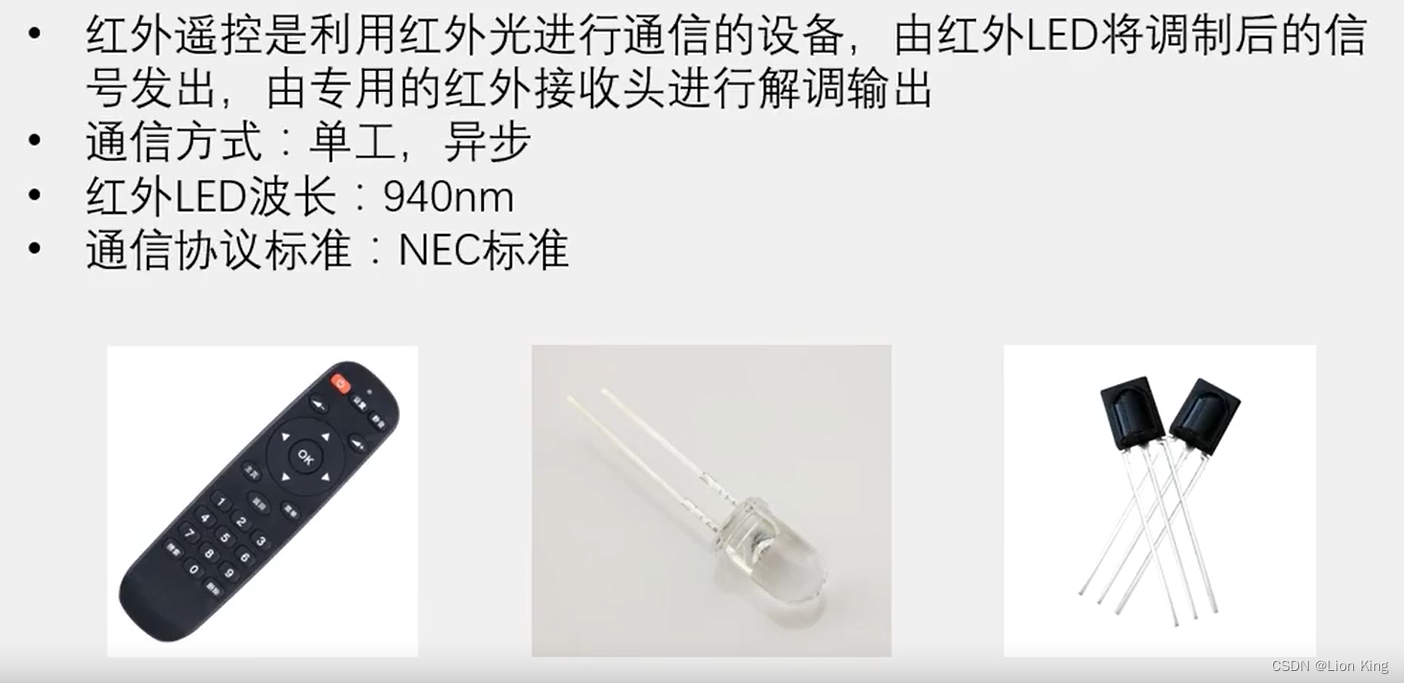
2、 硬件电路
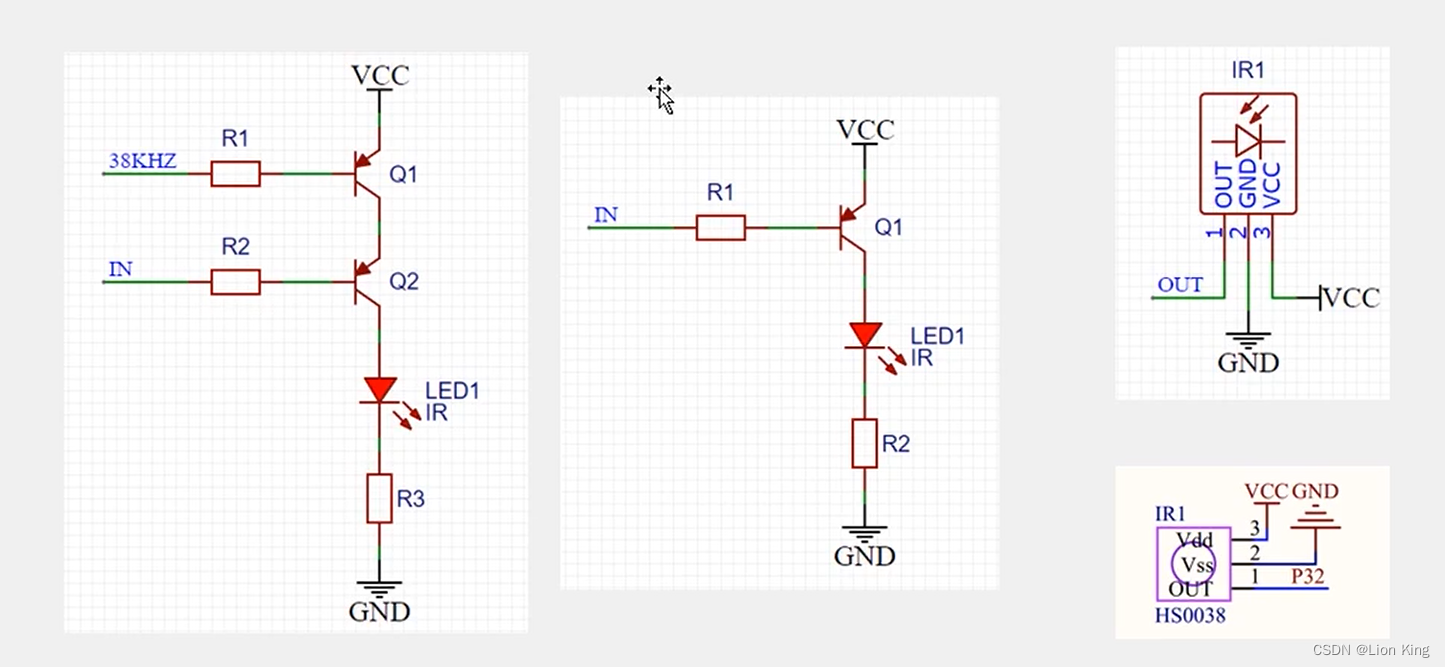
3、基本发送与接收
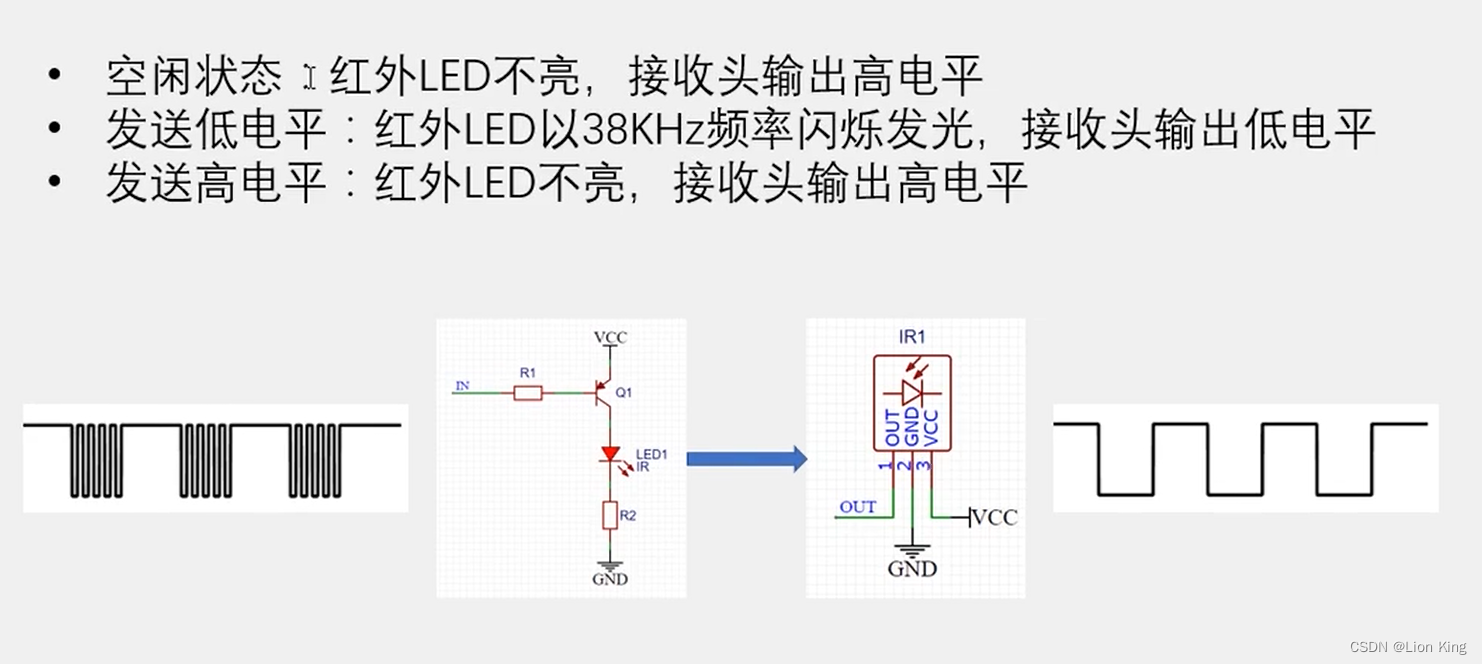
4、NEC编码
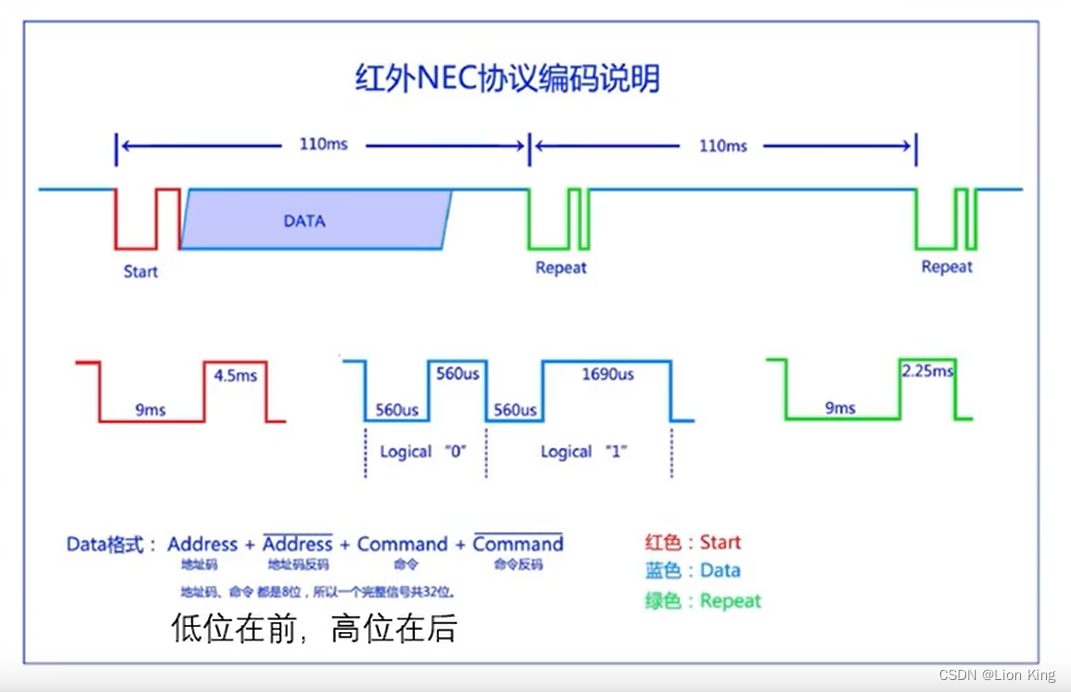
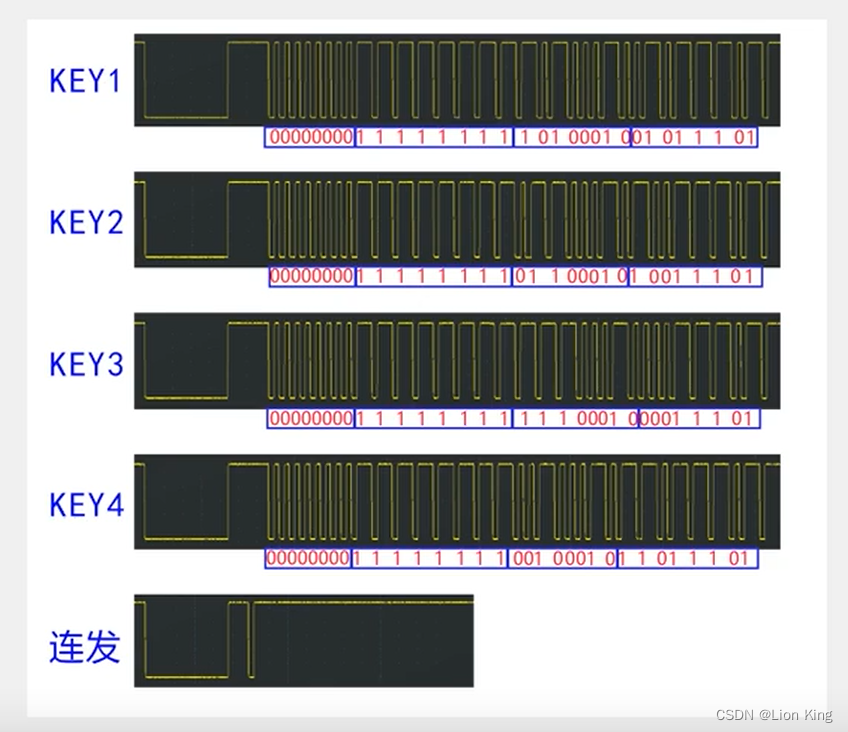
5、 遥控器键码

6、51单片机的外部中断
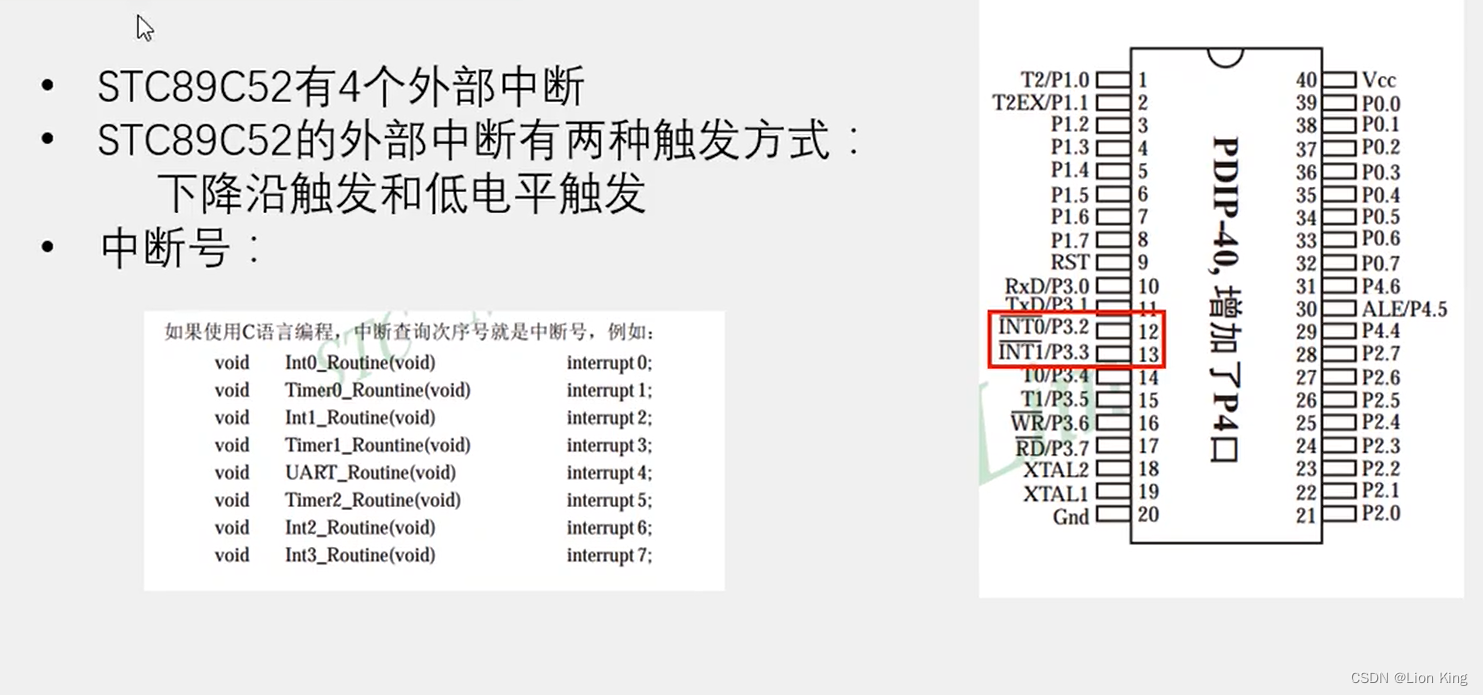
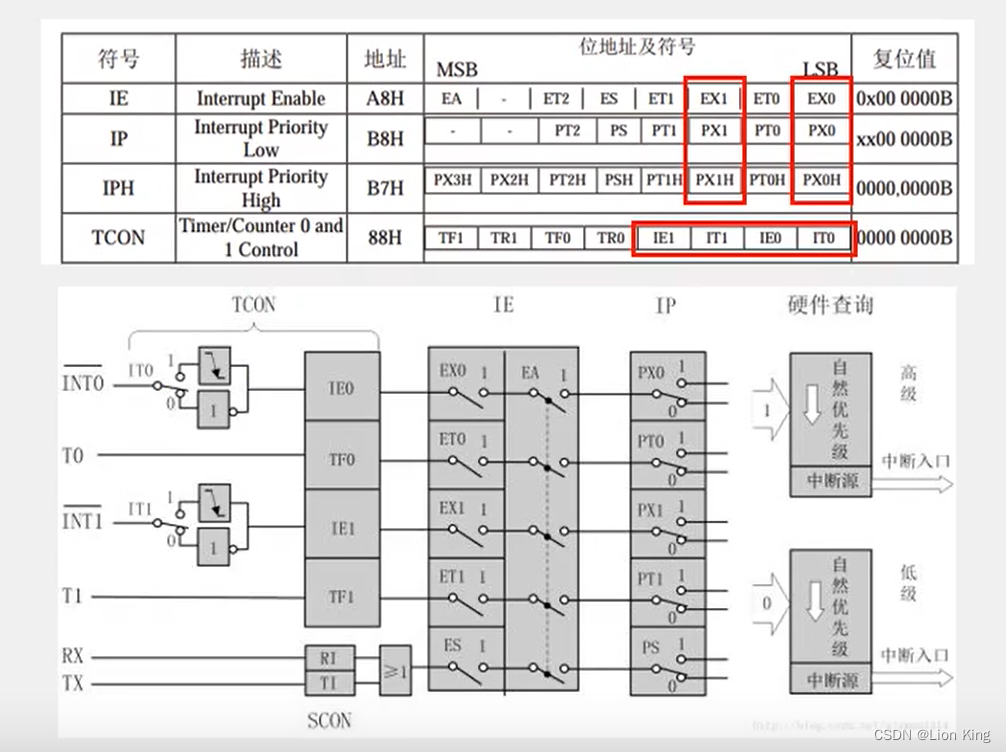
7、外部中断寄存器
8、编写程序
main.c
#include <STC89C5xRC.H>#include "Delay.h"
#include "LCD1602.h"
#include "IR.h"unsigned char Num;
unsigned char Address;
unsigned char Command;void main()
{LCD_Init();LCD_ShowString(1,1,"ADDR  CMD  NUM");LCD_ShowString(2,1,"00    00   000");IR_Init();while(1){if(IR_GetDataFlag() || IR_GetRepeatFlag())	//如果收到数据帧或者收到连发帧{Address=IR_GetAddress();		//获取遥控器地址码Command=IR_GetCommand();		//获取遥控器命令码LCD_ShowHexNum(2,1,Address,2);	//显示遥控器地址码LCD_ShowHexNum(2,7,Command,2);	//显示遥控器命令码if(Command==IR_VOL_MINUS)		//如果遥控器VOL-按键按下{Num--;						//Num自减}if(Command==IR_VOL_ADD)			//如果遥控器VOL+按键按下{Num++;						//Num自增}LCD_ShowNum(2,12,Num,3);		//显示Num}}
}
IR.c
#include <STC89C5xRC.H>#include "Timer0.h"
#include "Int0.h"unsigned int IR_Time;
unsigned char IR_State;unsigned char IR_Data[4];
unsigned char IR_pData;unsigned char IR_DataFlag;
unsigned char IR_RepeatFlag;
unsigned char IR_Address;
unsigned char IR_Command;/*** @brief  红外遥控初始化* @param  无* @retval 无*/
void IR_Init(void)
{Timer0_Init();Int0_Init();
}/*** @brief  红外遥控获取收到数据帧标志位* @param  无* @retval 是否收到数据帧,1为收到,0为未收到*/
unsigned char IR_GetDataFlag(void)
{if(IR_DataFlag){IR_DataFlag=0;return 1;}return 0;
}/*** @brief  红外遥控获取收到连发帧标志位* @param  无* @retval 是否收到连发帧,1为收到,0为未收到*/
unsigned char IR_GetRepeatFlag(void)
{if(IR_RepeatFlag){IR_RepeatFlag=0;return 1;}return 0;
}/*** @brief  红外遥控获取收到的地址数据* @param  无* @retval 收到的地址数据*/
unsigned char IR_GetAddress(void)
{return IR_Address;
}/*** @brief  红外遥控获取收到的命令数据* @param  无* @retval 收到的命令数据*/
unsigned char IR_GetCommand(void)
{return IR_Command;
}//外部中断0中断函数,下降沿触发执行
void Int0_Routine(void) interrupt 0
{if(IR_State==0)				//状态0,空闲状态{Timer0_SetCounter(0);	//定时计数器清0Timer0_Run(1);			//定时器启动IR_State=1;				//置状态为1}else if(IR_State==1)		//状态1,等待Start信号或Repeat信号{IR_Time=Timer0_GetCounter();	//获取上一次中断到此次中断的时间Timer0_SetCounter(0);	//定时计数器清0//如果计时为13.5ms,则接收到了Start信号(判定值在12MHz晶振下为13500,在11.0592MHz晶振下为12442)if(IR_Time>12442-500 && IR_Time<12442+500){IR_State=2;			//置状态为2}//如果计时为11.25ms,则接收到了Repeat信号(判定值在12MHz晶振下为11250,在11.0592MHz晶振下为10368)else if(IR_Time>10368-500 && IR_Time<10368+500){IR_RepeatFlag=1;	//置收到连发帧标志位为1Timer0_Run(0);		//定时器停止IR_State=0;			//置状态为0}else					//接收出错{IR_State=1;			//置状态为1}}else if(IR_State==2)		//状态2,接收数据{IR_Time=Timer0_GetCounter();	//获取上一次中断到此次中断的时间Timer0_SetCounter(0);	//定时计数器清0//如果计时为1120us,则接收到了数据0(判定值在12MHz晶振下为1120,在11.0592MHz晶振下为1032)if(IR_Time>1032-500 && IR_Time<1032+500){IR_Data[IR_pData/8]&=~(0x01<<(IR_pData%8));	//数据对应位清0IR_pData++;			//数据位置指针自增}//如果计时为2250us,则接收到了数据1(判定值在12MHz晶振下为2250,在11.0592MHz晶振下为2074)else if(IR_Time>2074-500 && IR_Time<2074+500){IR_Data[IR_pData/8]|=(0x01<<(IR_pData%8));	//数据对应位置1IR_pData++;			//数据位置指针自增}else					//接收出错{IR_pData=0;			//数据位置指针清0IR_State=1;			//置状态为1}if(IR_pData>=32)		//如果接收到了32位数据{IR_pData=0;			//数据位置指针清0if((IR_Data[0]==~IR_Data[1]) && (IR_Data[2]==~IR_Data[3]))	//数据验证{IR_Address=IR_Data[0];	//转存数据IR_Command=IR_Data[2];IR_DataFlag=1;	//置收到连发帧标志位为1}Timer0_Run(0);		//定时器停止IR_State=0;			//置状态为0}}
}
IR.h
#ifndef __IR_H__
#define __IR_H__#define IR_POWER		0x45
#define IR_MODE			0x46
#define IR_MUTE			0x47
#define IR_START_STOP	0x44
#define IR_PREVIOUS		0x40
#define IR_NEXT			0x43
#define IR_EQ			0x07
#define IR_VOL_MINUS	0x15
#define IR_VOL_ADD		0x09
#define IR_0			0x16
#define IR_RPT			0x19
#define IR_USD			0x0D
#define IR_1			0x0C
#define IR_2			0x18
#define IR_3			0x5E
#define IR_4			0x08
#define IR_5			0x1C
#define IR_6			0x5A
#define IR_7			0x42
#define IR_8			0x52
#define IR_9			0x4Avoid IR_Init(void);
unsigned char IR_GetDataFlag(void);
unsigned char IR_GetRepeatFlag(void);
unsigned char IR_GetAddress(void);
unsigned char IR_GetCommand(void);#endif
Int0.c
#include <STC89C5xRC.H>/*** @brief  外部中断0初始化* @param  无* @retval 无*/
void Int0_Init(void)
{IT0=1;IE0=0;EX0=1;EA=1;PX0=1;
}/*外部中断0中断函数模板
void Int0_Routine(void) interrupt 0
{}
*/
Int0.h
#ifndef __INT0_H__
#define __INT0_H__void Int0_Init(void);#endif
Timer0.c
#include <STC89C5xRC.H>/*** @brief  定时器0初始化* @param  无* @retval 无*/
void Timer0_Init(void)
{TMOD &= 0xF0;		//设置定时器模式TMOD |= 0x01;		//设置定时器模式TL0 = 0;		//设置定时初值TH0 = 0;		//设置定时初值TF0 = 0;		//清除TF0标志TR0 = 0;		//定时器0不计时
}/*** @brief  定时器0设置计数器值* @param  Value,要设置的计数器值,范围:0~65535* @retval 无*/
void Timer0_SetCounter(unsigned int Value)
{TH0=Value/256;TL0=Value%256;
}/*** @brief  定时器0获取计数器值* @param  无* @retval 计数器值,范围:0~65535*/
unsigned int Timer0_GetCounter(void)
{return (TH0<<8)|TL0;
}/*** @brief  定时器0启动停止控制* @param  Flag 启动停止标志,1为启动,0为停止* @retval 无*/
void Timer0_Run(unsigned char Flag)
{TR0=Flag;
}
Timer0.h
#ifndef __TIMER0_H__
#define __TIMER0_H__void Timer0_Init(void);
void Timer0_SetCounter(unsigned int Value);
unsigned int Timer0_GetCounter(void);
void Timer0_Run(unsigned char Flag);#endif
三十七、单片机实操三十五:红外遥控电机调速
1、编写程序
main.c
#include <STC89C5xRC.H>#include "Delay.h"
#include "Key.h"
#include "Nixie.h"
#include "Motor.h"
#include "IR.h"unsigned char Command,Speed;void main()
{Motor_Init();IR_Init();while(1){if(IR_GetDataFlag())	//如果收到数据帧{Command=IR_GetCommand();		//获取遥控器命令码if(Command==IR_0){Speed=0;}		//根据遥控器命令码设置速度if(Command==IR_1){Speed=1;}if(Command==IR_2){Speed=2;}if(Command==IR_3){Speed=3;}if(Speed==0){Motor_SetSpeed(0);}	//速度输出if(Speed==1){Motor_SetSpeed(50);}if(Speed==2){Motor_SetSpeed(75);}if(Speed==3){Motor_SetSpeed(100);}}Nixie(1,Speed);						//数码管显示速度}
}
Time1.c
#include <STC89C5xRC.H>/*** @brief  定时器1初始化,100us@12.000MHz* @param  无* @retval 无*/
void Timer1_Init(void)
{TMOD &= 0x0F;		//设置定时器模式TMOD |= 0x10;		//设置定时器模式TL1 = 0x9C;		//设置定时初值TH1 = 0xFF;		//设置定时初值TF1 = 0;		//清除TF1标志TR1 = 1;		//定时器1开始计时ET1=1;EA=1;PT1=0;
}/*定时器中断函数模板
void Timer1_Routine() interrupt 3
{static unsigned int T1Count;TL1 = 0x9C;		//设置定时初值TH1 = 0xFF;		//设置定时初值T1Count++;if(T1Count>=1000){T1Count=0;}
}
*/
Time1.h
#ifndef __TIMER1_H__
#define __TIMER1_H__void Timer1_Init(void);#endif
Motor.c
#include <STC89C5xRC.H>#include "Timer1.h"//引脚定义
sbit Motor=P1^0;unsigned char Counter,Compare;/*** @brief  电机初始化* @param  无* @retval 无*/
void Motor_Init(void)
{Timer1_Init();
}/*** @brief  电机设置速度* @param  Speed 要设置的速度,范围0~100* @retval 无*/
void Motor_SetSpeed(unsigned char Speed)
{Compare=Speed;
}//定时器1中断函数
void Timer1_Routine() interrupt 3
{TL1 = 0x9C;		//设置定时初值TH1 = 0xFF;		//设置定时初值Counter++;Counter%=100;	//计数值变化范围限制在0~99if(Counter<Compare)	//计数值小于比较值{Motor=1;		//输出1}else				//计数值大于比较值{Motor=0;		//输出0}
}
Motor.h
#ifndef __MOTOR_H__
#define __MOTOR_H__void Motor_Init(void);
void Motor_SetSpeed(unsigned char Speed);#endif