专业网站建设效果显著淘宝关键词排名优化
文章目录
- 1.创建Vue项目
- 1.1创建项目
- 1.2 初始项目
- 2.vue3 语法
- 2.1 复杂写法
- 2.2 简易写法
- 2.3 reactive(对象类型)
- 2.4 ref(简单类型)
- 2.5 computed(计算属性)
- 2.6 watch(监听)
- 3.vue3 生命周期
- 4.vue3 组件通信
- 4.1 父传子(defineProps)
- 4.1 子传父(defineEmits)
- 5.vue3 跨组件通信
- 5.1 跨层传递数据
- 5.2 跨层传递方法
- 6.vue3 跨组件通信(pinia)
- 6.1 下载pinia
- 6.2 pinia的全局注册
- 6.3 pinia的使用
1.创建Vue项目
1.1创建项目
项目文件下运行 npm init vue@latest
npm init vue@latest
1.2 初始项目
npm install
2.vue3 语法
2.1 复杂写法
<script>
export default {setup() {const message = "年后";const messagehandle = () => {console.log(message);};return {message,messagehandle,};},
};
</script>
2.2 简易写法
<script setup>
const message = "你好呀";
const logHandle = () => {console.log(message);
};
</script>
响应式api,完成响应式数据
2.3 reactive(对象类型)
<script setup>
//引入响应式对象
import { reactive } from "vue";
//执行响应式对象
const state = reactive({status: 0,
});
//自定义匿名函数
const addCunt = () => {state.status++;
};
</script>
2.4 ref(简单类型)
ref执行的响应式数据,要用.value接受,
import { ref } from "vue";const state = ref(0);const addCunt = () => {state.value++;
};
2.5 computed(计算属性)
调用computed,返回值用一个常量接受。
<script setup>
import { ref } from "vue";
import { computed } from "vue";
const list = ref([1, 2, 3, 4, 5, 6, 7, 8]);const computedList = computed(() => {return list.value.filter((item) => item > 2);
});
</script>
2.6 watch(监听)
1.监听单个值的变化
2.watch 默认是监听ref浅层监听。
//监听数据的变化
watch(count, (newValue, oldValue) => {console.log(newValue, "+", oldValue);
});
2.监听多个值的变化
//监听数据的变化
watch([count, name], ([newCount, newName], [oldCount, oldName]) => {console.log(newCount, newName, "+", oldCount, oldName);
});
- immediate在为触发前执行一次
watch(count,() => {console.log("11");},{immediate: true,}
);
4.深度监听
watch(count,() => {console.log("111");},{deep: true,}
);
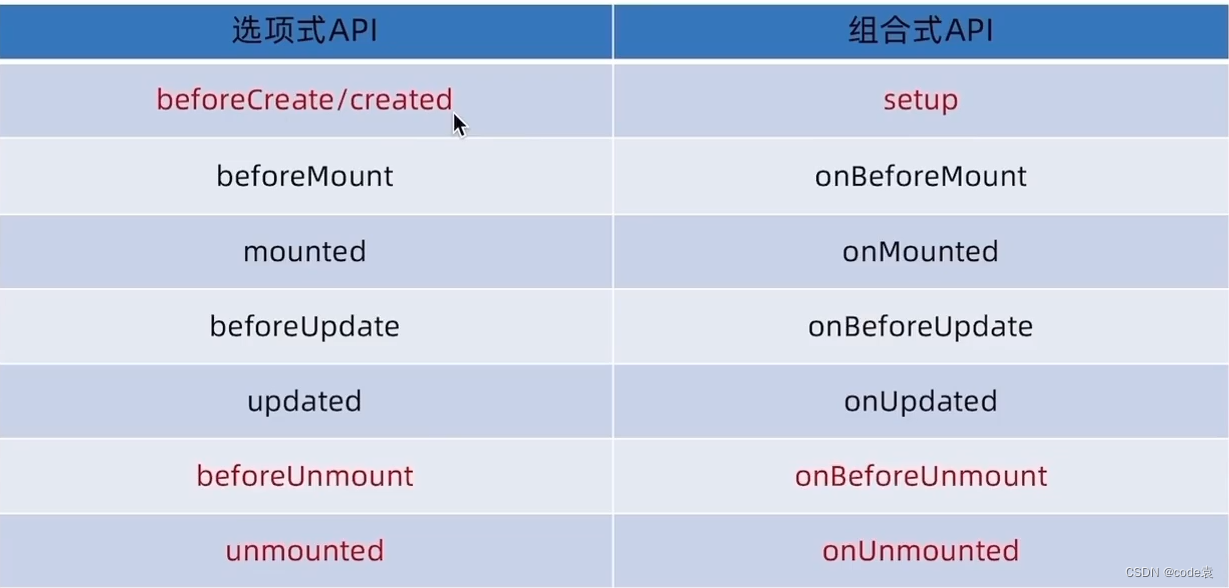
3.vue3 生命周期
vue3的生命周期和vue2类似。
4.vue3 组件通信
4.1 父传子(defineProps)
1.在父组件在vue3中引入子组件,直接使用,不需要注册
2.在子组件通过defineProps接受数据
父
<script setup>
import { ref } from "vue";
import sonCom from "./components/son.vue";
const number = ref(100);
</script><template><div><sonCom message="小明" :number="number"></sonCom></div>
</template>
子
<template><div>{{ message }}{{ number }}</div>
</template><script setup>
const count = defineProps({message: String,number: Number,
});
console.log(count.message);
</script><style></style>
4.1 子传父(defineEmits)
<script setup>
import sonCom from "./components/son.vue";
import { ref } from "vue";
const getMessage = (msg) => {console.log(msg);
};
</script><template><div><sonCom @get-message="getMessage"></sonCom></div>
</template><template><button @click="sendMsg">按钮</button>
</template><script setup>
const emit = defineEmits(["get-message"]);
const sendMsg = () => {emit("get-message", "5555");
};
</script><style></style>5.vue3 跨组件通信
provide 发送消息,inject接受消息
5.1 跨层传递数据
发送消息
provide("data-key", count);
接受消息
const message = inject("data-key");
5.2 跨层传递方法
const count = ref(0);
const addcount = () => {count.value++;
};provide("methods", addcount);
const methods = inject("methods");
6.vue3 跨组件通信(pinia)
pinia官网
6.1 下载pinia
npm install pinia
6.2 pinia的全局注册
import './assets/main.css'import { createApp } from 'vue'
import { createPinia } from 'pinia'
import App from './App.vue'const pinia=createPinia()createApp(App).use(pinia).mount('#app')
6.3 pinia的使用
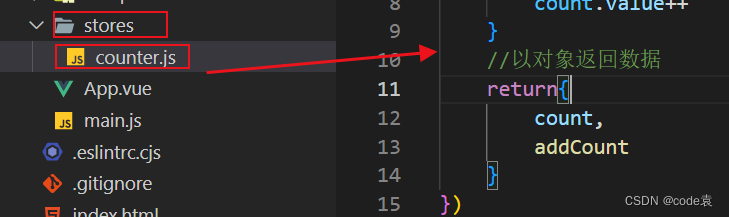
import {defineStore} from 'pinia'
import { ref } from 'vue'
export const useCounterStore=defineStore('counter',()=>{//定义数据const count=ref(0)//定义方法const addCount=()=>{count.value++}//以对象返回数据return{count,addCount}
})
使用pinia
<script setup>
//导入方法
import { useCounterStore } from "./stores/counter";
//执行方法得到实例对象
const useCounter = useCounterStore();
console.log(useCounter);
</script><template><div><button @click="useCounter.addCount">{{ useCounter.count }}</button></div>
</template>