哪些网站可以做招商广告语软件开发公司网站
若该文为原创文章,转载请注明原文出处。
此实验参考 《鲁班猫监控检测》,原代码有点BUG,已经下载不了。2. 鲁班猫监控检测 — [野火]嵌入式AI应用开发实战指南—基于LubanCat-RK系列板卡 文档 (embedfire.com)
一、简介
记录简单的摄像头监控检测示例,用户在浏览器上登录监控页面,登录后点击按钮可以进行视频录制和目标检测。 web程序采用的是基于python的flask框架,实现流媒体直播,图像是通过opencv调用摄像头获取,对图片检测处理使用npu。最络效果如下:
二、环境
1、测试平台:ATK-RK3568
2、系统: buildroot
3、Python版本:系统自带
4、opencv版本:系统自带
5、Toolkit Lite2:系统自带
6、Flask:1.0.2
三、Flask安装
Flask系统没有安装需要自己安装,安装需要联网
打开板子终端,插好网线,输入udhcpc自动获取网络。
安装Flask
pip install flaskflask库简单使用可以参考 Flask 官方文档。
四、框架介绍
1、Flask介绍
Flask通过 /video_viewer 路由返回一个入参为生成器的Response对象。Flask将会负责调用生成器,进入循环,持续地将摄像头中获取的帧数据作为响应块返回, 并把所有部分的结果以块的形式发送给客户端。
2、网页
网页分为两个界面,一是显示,一是登录。
登录需要输入账号和密码,账号密码内置好了,在另一个文件里。
login.html
<!DOCTYPE html>
<html>
<head><meta charset="UTF-8"><title>Login</title><meta name="viewport" content="width=device-width, initial-scale=1"><script type="application/x-javascript"> addEventListener("load", function () {setTimeout(hideURLbar, 0);}, false);function hideURLbar() {window.scrollTo(0, 1);} </script><link href="../static/css/style.css" rel='stylesheet' type='text/css'/><!--字体--><link href='http://fonts.useso.com/css?family=PT+Sans:400,700,400italic,700italic|Oswald:400,300,700'rel='stylesheet' type='text/css'><link href='http://fonts.useso.com/css?family=Exo+2' rel='stylesheet' type='text/css'><!--//js--><script src="http://ajax.useso.com/ajax/libs/jquery/1.11.0/jquery.min.js"></script>
</head>
<body>
<script>$(document).ready(function (c) {$('.close').on('click', function (c) {$('.login-form').fadeOut('slow', function (c) {$('.login-form').remove();});});
});
</script>
<!--SIGN UP-->
<h1>ATK-RK3568监控检测</h1>
<div class="login-form"><div class="close"></div><div class="head-info"><label class="lbl-1"> </label><label class="lbl-2"> </label><label class="lbl-3"> </label></div><div class="clear"></div><div class="avtar"><img src="../static/images/cat.png"/></div><form method="post" action="{{ url_for("user.login") }}"><input type="text" class="text" name="username" value="Username" onfocus="this.value = '';"onblur="if (this.value == '') {this.value = 'Username';}"><div class="key"><input type="password" name="password" value="Passowrd" onfocus="this.value = '';"onblur="if (this.value == '') {this.value = 'Password';}"></div><div class="signin"><input type="submit" value="Login">{% if errmsg %} {# 判断是否有错误信息 #}<div class="error_tip" style="display: block;color: red">{{ errmsg }}</div>{% endif %}</div></form></div>
<div class="copy-rights"><p> Copyright@2023 仅供学习参考,详细使用信息参考下 <a href="https://doc.embedfire.com/linux/rk356x/Python/zh/latest/circuit/rknn.html" target="_blank" title="Github">教程</a></p>
</div></body>
</html>
index.html
<!DOCTYPE html>
<html lang="en"><head><meta charset="UTF-8"><meta name="viewport" content="width=device-width, initial-scale=1.0"><meta http-equiv="X-UA-Compatible" content="ie=edge"><title>ATK-RK3568监控检测</title><style>body {background-color: #484856;}</style>
</head>
<body>
<h1 align="center" style="color: whitesmoke;">Flask+OpenCV+Rknn</h1>
<div class="top"><div class="recorder" id="recorder" align="center"><button id="record" class="btn">录制视频</button><button id="stop" class="btn">暂停录制</button><button id="process" class="btn">开启检测</button><button id="pause" class="btn">暂停检测</button><input type="button" class="btn" value="退出登录"onclick="javascrtpt:window.location.href='{{ url_for('user.logout') }}'"><a id="download"></a><script type="text/javascript" src="{{ url_for('static', filename='button_process.js') }}"></script></div>
</div>
<img id="video" src="{{ url_for('home.video_viewer') }}">
</body>
</html>
显示界面就几个按钮和显示区域,比较简单。
3、摄像头中获取帧
摄像头获取代码比较多, 这里只贴一部分
def get_frame(self):ret, self.frame = self.cap.read()print('---->:get_frame')if ret:if self.is_process:#self.image = cv2.cvtColor(self.frame, cv2.COLOR_BGR2RGB)self.image = cv2.cvtColor(self.frame, cv2.COLOR_BGR2RGB)self.image2 = np.expand_dims(self.image, 0)self.outputs = self.rknn_lite.inference(inputs=[self.image2], data_format=['nhwc'])print('done')self.frame = process_image(self.image, self.outputs)#self.rknn_frame = process_image(self.image, self.outputs)#cv2.imwrite('result.jpg', self.frame)print('Save results to result.jpg!')ret, image = cv2.imencode('.jpg', self.frame)return image.tobytes()if self.frame is not None:ret, image = cv2.imencode('.jpg', self.frame)print('---->:cv2.imencode')return image.tobytes()else:return None简单的説是读取摄像头数据,然后判断是识别的还是不是识别。 is_process是识别标记,通过网页上的按钮来控制。读取数据后通过tobytes上传给网页显示。
4、NPU处理图像
RKNN Toolkit Lite2安装方法,正点原子的手册写的很详细,自行安装,其他板子类似。
处理流程:
1、创建RKNN对象
self.rknn_lite = RKNNLite()
2、加载RKNN模型
def load_rknn(self):# load RKNN modelprint('--> Load RKNN model')ret = self.rknn_lite.load_rknn(RKNN_MODEL)if ret != 0:print('Load RKNN model failed')exit(ret)# Init runtime environmentprint('--> Init runtime environment')ret = self.rknn_lite.init_runtime()if ret != 0:print('Init runtime environment failed!')exit(ret)3、对摄像头获取的图片进行处理,设置图片大小
self.cap.set(cv2.CAP_PROP_FRAME_WIDTH, 640)
self.cap.set(cv2.CAP_PROP_FRAME_HEIGHT, 640)
4、转换成RGB格式
opencv输出的格式是BGR,需要转成RGB处理
self.image = cv2.cvtColor(self.frame, cv2.COLOR_BGR2RGB)5、推理
self.image2 = np.expand_dims(self.image, 0)
self.outputs = self.rknn_lite.inference(inputs=[self.image2], data_format=['nhwc'])
先给图片数据增加一个维度,在推理输出。
6、对图像进行后处理,返回处理后的图像
self.frame = process_image(self.image, self.outputs)后处理完整代码。
import urllib
import time
import sys
import numpy as np
import cv2
from rknnlite.api import RKNNLiteRKNN_MODEL = './controller/utils/yolov5s.rknn'
OBJ_THRESH = 0.25
NMS_THRESH = 0.45
IMG_SIZE = 640CLASSES = ("person", "bicycle", "car", "motorbike ", "aeroplane ", "bus ", "train", "truck ", "boat", "traffic light","fire hydrant", "stop sign ", "parking meter", "bench", "bird", "cat", "dog ", "horse ", "sheep", "cow", "elephant","bear", "zebra ", "giraffe", "backpack", "umbrella", "handbag", "tie", "suitcase", "frisbee", "skis", "snowboard", "sports ball", "kite","baseball bat", "baseball glove", "skateboard", "surfboard", "tennis racket", "bottle", "wine glass", "cup", "fork", "knife ","spoon", "bowl", "banana", "apple", "sandwich", "orange", "broccoli", "carrot", "hot dog", "pizza ", "donut", "cake", "chair", "sofa","pottedplant", "bed", "diningtable", "toilet ", "tvmonitor", "laptop	", "mouse	", "remote ", "keyboard ", "cell phone", "microwave ","oven ", "toaster", "sink", "refrigerator ", "book", "clock", "vase", "scissors ", "teddy bear ", "hair drier", "toothbrush ")def sigmoid(x):return 1 / (1 + np.exp(-x))def xywh2xyxy(x):# Convert [x, y, w, h] to [x1, y1, x2, y2]y = np.copy(x)y[:, 0] = x[:, 0] - x[:, 2] / 2  # top left xy[:, 1] = x[:, 1] - x[:, 3] / 2  # top left yy[:, 2] = x[:, 0] + x[:, 2] / 2  # bottom right xy[:, 3] = x[:, 1] + x[:, 3] / 2  # bottom right yreturn ydef process(input, mask, anchors):anchors = [anchors[i] for i in mask]grid_h, grid_w = map(int, input.shape[0:2])box_confidence = input[..., 4]box_confidence = np.expand_dims(box_confidence, axis=-1)box_class_probs = input[..., 5:]box_xy = input[..., :2]*2 - 0.5col = np.tile(np.arange(0, grid_w), grid_w).reshape(-1, grid_w)row = np.tile(np.arange(0, grid_h).reshape(-1, 1), grid_h)col = col.reshape(grid_h, grid_w, 1, 1).repeat(3, axis=-2)row = row.reshape(grid_h, grid_w, 1, 1).repeat(3, axis=-2)grid = np.concatenate((col, row), axis=-1)box_xy += gridbox_xy *= int(IMG_SIZE/grid_h)box_wh = pow(input[..., 2:4]*2, 2) * anchorsbox = np.concatenate((box_xy, box_wh), axis=-1)return box, box_confidence, box_class_probsdef filter_boxes(boxes, box_confidences, box_class_probs):"""Filter boxes with box threshold. It's a bit different with origin yolov5 post process!# Argumentsboxes: ndarray, boxes of objects.box_confidences: ndarray, confidences of objects.box_class_probs: ndarray, class_probs of objects.# Returnsboxes: ndarray, filtered boxes.classes: ndarray, classes for boxes.scores: ndarray, scores for boxes."""boxes = boxes.reshape(-1, 4)box_confidences = box_confidences.reshape(-1)box_class_probs = box_class_probs.reshape(-1, box_class_probs.shape[-1])_box_pos = np.where(box_confidences >= OBJ_THRESH)boxes = boxes[_box_pos]box_confidences = box_confidences[_box_pos]box_class_probs = box_class_probs[_box_pos]class_max_score = np.max(box_class_probs, axis=-1)classes = np.argmax(box_class_probs, axis=-1)_class_pos = np.where(class_max_score >= OBJ_THRESH)boxes = boxes[_class_pos]classes = classes[_class_pos]scores = (class_max_score* box_confidences)[_class_pos]return boxes, classes, scoresdef nms_boxes(boxes, scores):"""Suppress non-maximal boxes.# Argumentsboxes: ndarray, boxes of objects.scores: ndarray, scores of objects.# Returnskeep: ndarray, index of effective boxes."""x = boxes[:, 0]y = boxes[:, 1]w = boxes[:, 2] - boxes[:, 0]h = boxes[:, 3] - boxes[:, 1]areas = w * horder = scores.argsort()[::-1]keep = []while order.size > 0:i = order[0]keep.append(i)xx1 = np.maximum(x[i], x[order[1:]])yy1 = np.maximum(y[i], y[order[1:]])xx2 = np.minimum(x[i] + w[i], x[order[1:]] + w[order[1:]])yy2 = np.minimum(y[i] + h[i], y[order[1:]] + h[order[1:]])w1 = np.maximum(0.0, xx2 - xx1 + 0.00001)h1 = np.maximum(0.0, yy2 - yy1 + 0.00001)inter = w1 * h1ovr = inter / (areas[i] + areas[order[1:]] - inter)inds = np.where(ovr <= NMS_THRESH)[0]order = order[inds + 1]keep = np.array(keep)return keepdef yolov5_post_process(input_data):masks = [[0, 1, 2], [3, 4, 5], [6, 7, 8]]anchors = [[10, 13], [16, 30], [33, 23], [30, 61], [62, 45],[59, 119], [116, 90], [156, 198], [373, 326]]boxes, classes, scores = [], [], []for input, mask in zip(input_data, masks):b, c, s = process(input, mask, anchors)b, c, s = filter_boxes(b, c, s)boxes.append(b)classes.append(c)scores.append(s)boxes = np.concatenate(boxes)boxes = xywh2xyxy(boxes)classes = np.concatenate(classes)scores = np.concatenate(scores)# nmsnboxes, nclasses, nscores = [], [], []for c in set(classes):inds = np.where(classes == c)b = boxes[inds]c = classes[inds]s = scores[inds]keep = nms_boxes(b, s)if len(keep) != 0:nboxes.append(b[keep])nclasses.append(c[keep])nscores.append(s[keep])if not nclasses and not nscores:return None, None, Noneboxes = np.concatenate(nboxes)classes = np.concatenate(nclasses)scores = np.concatenate(nscores)return boxes, classes, scoresdef draw(image, boxes, scores, classes):"""Draw the boxes on the image.# Argument:image: original image.boxes: ndarray, boxes of objects.classes: ndarray, classes of objects.scores: ndarray, scores of objects.all_classes: all classes name."""for box, score, cl in zip(boxes, scores, classes):top, left, right, bottom = boxprint('class: {}, score: {}'.format(CLASSES[cl], score))print('box coordinate left,top,right,down: [{}, {}, {}, {}]'.format(top, left, right, bottom))top = int(top)left = int(left)right = int(right)bottom = int(bottom)cv2.rectangle(image, (top, left), (right, bottom), (255, 0, 0), 2)cv2.putText(image, '{0} {1:.2f}'.format(CLASSES[cl], score),(top, left - 6),cv2.FONT_HERSHEY_SIMPLEX,0.6, (0, 0, 255), 2)def letterbox(im, new_shape=(640, 640), color=(0, 0, 0)):# Resize and pad image while meeting stride-multiple constraintsshape = im.shape[:2]  # current shape [height, width]if isinstance(new_shape, int):new_shape = (new_shape, new_shape)# Scale ratio (new / old)r = min(new_shape[0] / shape[0], new_shape[1] / shape[1])# Compute paddingratio = r  # ratiosnew_unpad = int(round(shape[1] * r)), int(round(shape[0] * r))dw, dh = new_shape[1] - new_unpad[0], new_shape[0] - new_unpad[1]  # wh paddingdw /= 2  # divide padding into 2 sidesdh /= 2if shape[::-1] != new_unpad:  # resizeim = cv2.resize(im, new_unpad, interpolation=cv2.INTER_LINEAR)top, bottom = int(round(dh - 0.1)), int(round(dh + 0.1))left, right = int(round(dw - 0.1)), int(round(dw + 0.1))im = cv2.copyMakeBorder(im, top, bottom, left, right, cv2.BORDER_CONSTANT, value=color)  # add borderreturn im, ratio, (dw, dh)def process_image(image, outputs):# post processinput0_data = outputs[0]input1_data = outputs[1]input2_data = outputs[2]input0_data = input0_data.reshape([3, -1]+list(input0_data.shape[-2:]))input1_data = input1_data.reshape([3, -1]+list(input1_data.shape[-2:]))input2_data = input2_data.reshape([3, -1]+list(input2_data.shape[-2:]))print('process_image 1')input_data = list()input_data.append(np.transpose(input0_data, (2, 3, 0, 1)))input_data.append(np.transpose(input1_data, (2, 3, 0, 1)))input_data.append(np.transpose(input2_data, (2, 3, 0, 1)))print('process_image 2')boxes, classes, scores = yolov5_post_process(input_data)print('process_image 3')image = cv2.cvtColor(image, cv2.COLOR_RGB2BGR)if boxes is not None:draw(image, boxes, scores, classes)print('process_image 4')return image
这一部分有修改,用源码运行不起来。
五、运行测试
1、下载代码
git clone https://github.com/Yinyifeng18/flask-opencv-rknn-rk3568.git下载后,通过adb或tftp把代码上传到板子上。
在工程代码目录lubancat-flask-opencv-rknn中,执行以下命令:
python main.py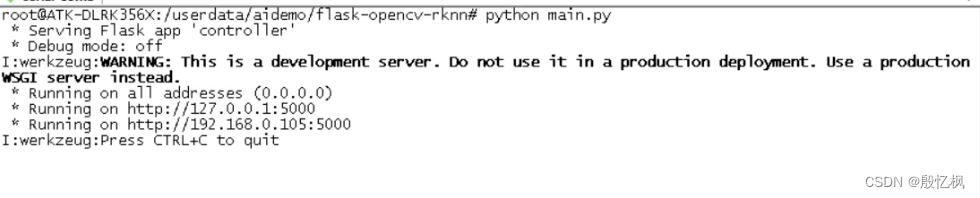
程序打印的提示信息,告诉我们服务器以及开始监听 http://0.0.0.0:5000 的地址,系统的默认网口ip。 如若想退出程序,按下 CTRL+C 。
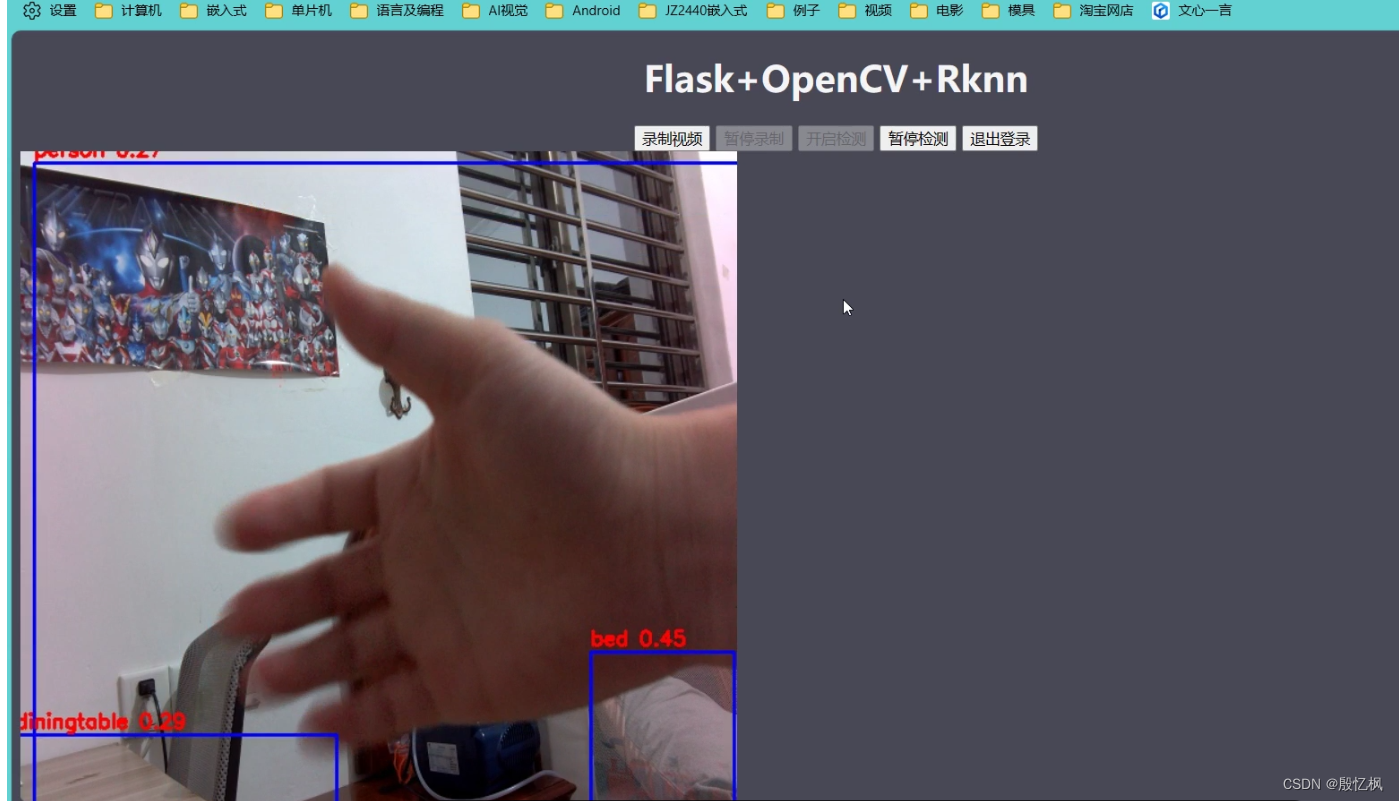
这里通过在浏览器中输入网址: http://192.168.0.105:5000/login , 来观察一下实验现象。
实验现象如图:

登录完成后,进入到监控界面,点击 开启检测 进入到检测状态。
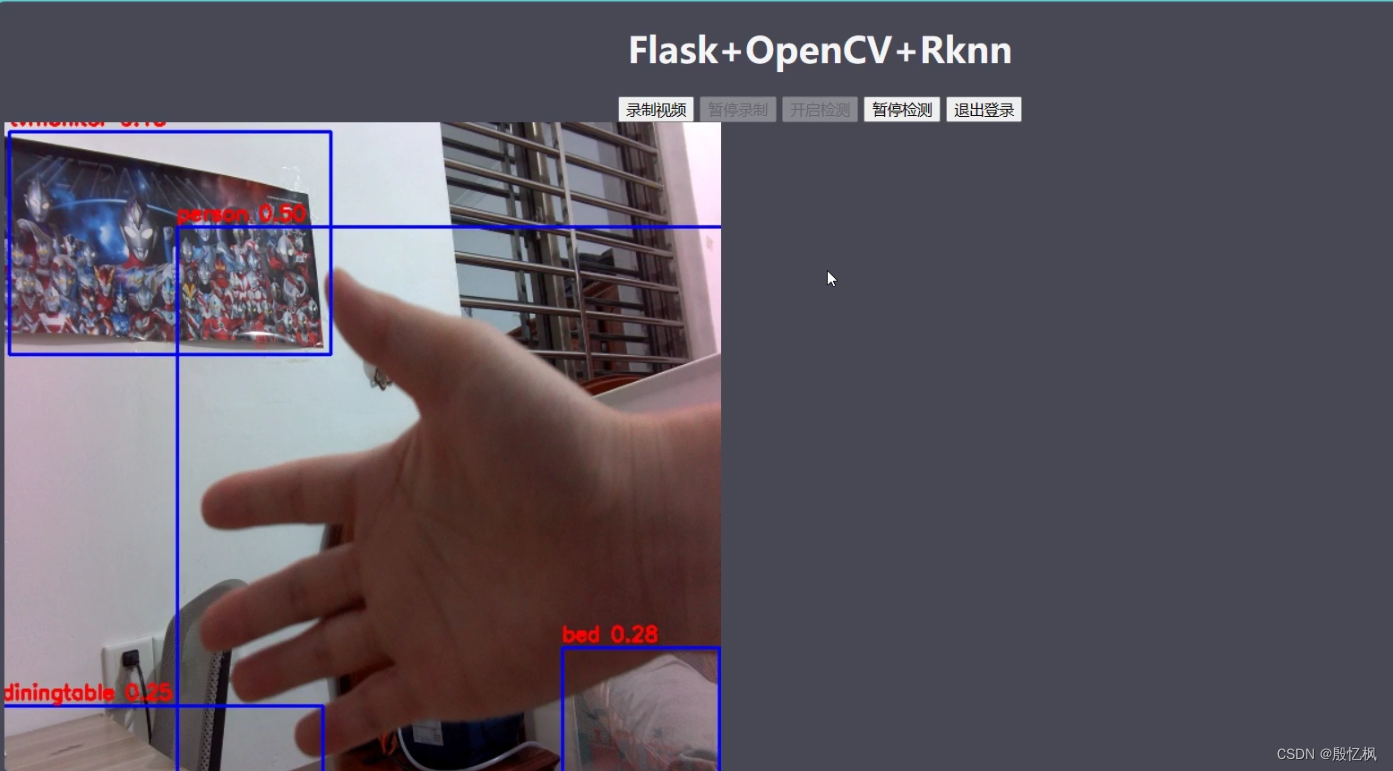
简单的监控显示和目标检测功能。
6、参考链接
https://github.com/miguelgrinberg/flask-video-streaming
Embedfire/flask-video-streaming-recorder
https://github.com/rockchip-linux/rknn-toolkit2
https://doc.embedfire.com/linux/rk356x/Ai/zh/latest/lubancat_ai/example/camera_demo.html
如有侵权,或需要完整代码,请及时联系博主。